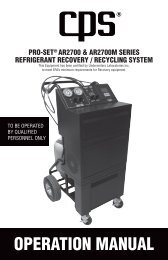
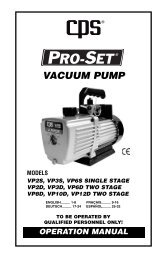
Operation Manual - CPS Products
Operation Manual - CPS Products
Operation Manual - CPS Products

You also want an ePaper? Increase the reach of your titles
YUMPU automatically turns print PDFs into web optimized ePapers that Google loves.
AC450<br />
OPEN-JAW DIGITAL<br />
ELECTRICAL TESTER<br />
600V<br />
CAT III<br />
<strong>Operation</strong> <strong>Manual</strong>
CONTENTS<br />
PAGE<br />
SAFETY INFORMATION .......................... 1<br />
SYMBOL EXPLANATION ......................... 2<br />
SAFETY PRECAUTIONS .......................... 2<br />
MAINTENANCE .................................... 4<br />
GENERAL DESCRIPTION ......................... 4<br />
PANEL DESCRIPTION ............................. 5<br />
OPERATING INSTRUCTIONS ..................... 10<br />
SPECIFICATIONS .................................. 14<br />
AUTO POWER OFF ................................ 17<br />
REPLACING THE BATTERY ....................... 17<br />
ACCESSORIES ...................................... 18
SAFETY INFORMATION<br />
This open jaw digital electrical tester has been designed<br />
according to IEC1010 – 1 and IEC1010 – 2 – 032 concerning<br />
safety requirements for electrical measuring instruments and<br />
hand – held current clamps with an overvoltage category (CAT<br />
III) and pollution 2.<br />
This open jaw digital electrical tester complies with the requirements<br />
of the following European Community Directives:<br />
89/336/EEC (Electromagnetic Compatibility) and 73/23/EEC (Low<br />
Voltage) as amended by 93/68/EEC (CE Marking).<br />
CAUTION<br />
Using this appliance in an environment with a<br />
strong radiated radio-frequency electromagnetic<br />
field (approximately 3V/m) may influence it’s<br />
measuring accuracy.<br />
1
SYMBOL EXPLANATION<br />
Important safety info. Refer to the operating manual.<br />
Dangerous voltage may be present.<br />
Earth ground.<br />
Double insulation (Protection class II).<br />
AC – Alternating Current.<br />
DC – Direct current.<br />
Battery.<br />
Conforms to European Union directives.<br />
SAFETY PRECAUTIONS<br />
Follow all safety and operating instructions to ensure maximum<br />
personal safety during the operation and to ensure the meter is<br />
used safely and is kept in good operating condition.<br />
2
• Read these operating instructions thoroughly and completely<br />
before operating your meter. Pay particular attention to<br />
WARNINGS, which will inform you of potentially dangerous<br />
procedures. The instructions in these warnings must be<br />
followed.<br />
• Always inspect your meter and test leads for any sign of damage<br />
or abnormality before every use. If any abnormal conditions<br />
exist (i.e. broken test leads, cracked cases, display not<br />
reading, etc.), do not attempt to take any measurements.<br />
• Do not expose the instrument to direct sunlight, extreme temperature<br />
or moisture.<br />
• Never ground yourself when taking electrical measurements.<br />
Do not touch exposed metal pipes, outlets, fixtures, etc.,<br />
which might be at ground potential. Keep your body isolated<br />
from ground by using dry clothing, rubber shoes, rubber mat,<br />
or any approved insulating material.<br />
• Use extreme caution when working with voltages above 60V<br />
dc or 30V ac rms. Keep fingers behind the probe barriers<br />
while measuring.<br />
• Never use the meter to measure voltages that might exceed<br />
the maximum allowable input value of any function.<br />
• Never touch exposed wiring, connections or any live circuit<br />
when attempting to take measurements.<br />
3
MAINTENANCE<br />
• Before opening the case, always disconnect test leads from<br />
all energized circuits.<br />
• Never use the meter unless the back cover is in place and fastened<br />
completely.<br />
• Do not clean using abrasives or solvents on the meter. Use a<br />
damp cloth and mild detergent only.<br />
• Only qualified service technicians should perform calibration<br />
and repair of the meter.<br />
• Do not attempt calibration or service unless trained, and person<br />
capable of rendering first aid and resuscitation is present.<br />
GENERAL DESCRIPTION<br />
The meter is an autoranging professional open jaw digital electrical<br />
tester with 3999 counts. designed to measure DC and AC<br />
voltage, AC current, resistance, capacitance, frequency, duty<br />
cycle, diode and continuity test.<br />
4
PANEL DESCRIPTION<br />
1. Transformer jaws<br />
Senses the AC current flowing through the conductor.<br />
2. Hold button<br />
When this button is pushed, the display will keep the<br />
last reading and “ H ” symbol will appear on the LCD<br />
until pushing it again. When this button is pressed more<br />
than two seconds, the backlight will turn on until pressing<br />
it more than two seconds again.<br />
3. Rotary switch<br />
This rotary switch is used to select functions and power<br />
supply of the meter on or off.<br />
4. Buttons<br />
4.1 F. Func.<br />
In Ω range, press this button to select or<br />
or Ω function. Different symbol of function will appear<br />
on the LCD.<br />
4.2 R. Range<br />
Press this button to select auto or manual range. When a<br />
function with auto and manual mode is selected, the meter<br />
enters auto range at first. To change to manual range, push<br />
this button once.<br />
5
When the meter operates in manual ranging mode, push<br />
this button to change range to the higher one and hold this<br />
button for more than 3 seconds to return to auto range<br />
mode.<br />
4.3 REL<br />
Push the button to set relative measurement mode. “REL”<br />
symbol will appear on LCD, and the current reading will<br />
be stored as reference. In the Relative mode, the value<br />
shown on the LCD is always the difference between the<br />
stored reference value and the present reading. If the new<br />
reading is the same as the reference value, the display will<br />
be zero.<br />
4.4 % Hz<br />
This button is used to select frequency or duty cycle<br />
measurement.<br />
5. LCD DISPLAY<br />
6
Low battery indication<br />
Auto range indication<br />
Relative measurement indication<br />
Hold data indication<br />
DC input indication<br />
AC input indication<br />
Diode test indication<br />
Continuity indication<br />
Polarity indication<br />
Capacitance measurement unit<br />
Ohm measurement unit<br />
Frequency measurement unit<br />
Current measurement unit<br />
Duty cycle measurement indication<br />
6. “VΩHz” jack<br />
This is positive input terminal for volt, diode, resistance,<br />
frequency, duty cycle and capacitance measurement.<br />
Connection is made to it using the red test lead.<br />
7. “COM” jack<br />
This is negative (ground) input terminal for all<br />
measurement modes except current. Connection is made<br />
to it using the black test lead.<br />
7
FRONT VIEW<br />
1<br />
2<br />
3<br />
4<br />
4.4<br />
4.2 4.3<br />
5<br />
7<br />
6<br />
8
BACK VIEW<br />
9
OPERATING INSTRUCTIONS<br />
DC VOLTAGE MEASUREMENT<br />
1. Insert the black and red test leads into the COM and VΩHz<br />
input terminals respectively.<br />
2. Set rotary switch at desired V — - - - position. Select the<br />
desired DC voltage range, or set automatic range.<br />
3. When the magnitude of voltage to be measured is unknown,<br />
always start with the highest range.<br />
4. Connect the test lead tips in parallel with the circuit to be<br />
measured. Be careful not to touch any electrical conductors.<br />
5. The polarity of the red lead connection will be indicated<br />
along with the voltage value.<br />
6. Read the measurement directly from the display.<br />
AC VOLTAGE MEASUREMENT<br />
1. Insert the black and red test leads into the COM and VΩHz<br />
input terminals respectively.<br />
2. Set rotary switch at desired V~ position. Select the desired<br />
AC voltage range, or set automatic range.<br />
When the magnitude of voltage to be measured is unknown,<br />
always start with the highest range.<br />
3. Connect the test lead tips in parallel with the circuit to be<br />
measured. Be careful not to touch any electrical conductors.<br />
4. Read the measurement directly from the display.<br />
10
AC CURRENT MEASUREMENT<br />
1. Set the rotary switch at A~ position.<br />
2. Place only one conductor between the open jaws.<br />
3. Read the measurement directly from the display.<br />
RESISTANCE MEASUREMENT<br />
1. Insert the black and red test leads into the COM and VΩHz<br />
input terminals respectively.<br />
2. Set rotary switch at desired Ω position.<br />
3. Push F.FUNC. button to select Ω.<br />
4. If the resistance being measured exceeds the maximum<br />
value of the range selected or the input is not connected,<br />
an overrange indication “OL” will be display and the<br />
higher range has to be selected.<br />
5. Read the measurement directly from the display.<br />
NOTE:<br />
1. If the resistance being measured exceeds the maximum<br />
value of the range selected or the input is not connected, an<br />
overrange indication “OL”will be displayed.<br />
2. When checking in-circuit resistance, be sure the circuit<br />
under test has all power removed and that all capacitors<br />
have been discharged fully.<br />
3. For measuring resistance above 1MΩ, the meter may take a<br />
few seconds to get stable reading. This is normal for high<br />
resistance measurements.<br />
4. When the input is not connected, i.e. at open circuit, the<br />
figure “OL” will be displayed for the overrange condition.<br />
11
DIODE MEASUREMENT<br />
1. Insert the black and red test leads into the COM and VΩHz<br />
input terminals respectively.<br />
2. Set rotary switch at desired Ω position.<br />
3. Push F.FUNC. button to select .<br />
4. The red lead should be connected to the anode and the black<br />
lead to the cathode of the diode.<br />
5. The typical voltage drop should be about 0.6V for silicon<br />
diode or 0.3V for germanium diode.<br />
6. If the diode is reverse biased or there is an open circuit the<br />
reading displayed will be “OL”.<br />
CONTINUITY TESTING<br />
1. Insert the black and red test leads into the COM and VΩHz<br />
input terminals respectively.<br />
2. Set rotary switch at desired Ω position.<br />
3. Push F.FUNC. button to select .<br />
4. If continuity exists (i.e., resistance less than 30Ω) built – in<br />
buzzer will sound.<br />
CAPACITANCE MEASUREMENT<br />
1. Insert the black and red test leads into the COM and VΩHz<br />
input terminals respectively.<br />
2. Turn the rotary switch to ll position.<br />
Connect test leads across the capacitor under measurement<br />
and be sure that the polarity of connection is observed (Note:<br />
The polarity of the red lead connection is positive “+”).<br />
3. Read the measurement directly from the display.<br />
12
MEASURING FREQUENCY<br />
NOTE: The input voltage should be between 1V and 10V rms. ac.<br />
If the voltage is more than 10V rms. Reading may be out of the<br />
accuracy range.<br />
1. Insert the black and red test leads into the COM and VΩHz<br />
input terminals respectively.<br />
2. Set rotary switch at desired Hz position.<br />
3. If the % symbol appears in the display, press the % Hz.<br />
button to change to Hz.<br />
4. The signal amplitude must also be greater than the<br />
sensitivity level.<br />
5. Determine that the amplitude level of the signal to be<br />
measured is not greater than the input voltage limit<br />
(250V DC/AC rms.).<br />
6. Read the measurement directly from the display.<br />
DUTY CYCLE TEST<br />
1. Insert the black and red test leads into the COM and VΩHz<br />
input terminals respectively.<br />
2. Set rotary switch at desired Hz position.<br />
3. Push % Hz. button to select % mode and connect the test<br />
lead tips in parallel with the circuit to be measured. Be<br />
careful not to touch any electrical conductors.<br />
4. Read the measurement result directly from the display.<br />
13
SPECIFICATIONS<br />
Accuracy is given as ±(% of reading + number of least significant<br />
digits) at 18°C to 28°C, with relative humidity up to 80%.<br />
All specifications assume less than 1 year since calibration.<br />
Temperature coefficient is 0.1 x specified accuracy/°C (20°C).<br />
GENERAL<br />
Maximum voltage: CAT III 600V.<br />
Display:<br />
LCD 3999 counts. updates 2-3/sec.<br />
Ranging method: Auto / <strong>Manual</strong><br />
Polarity indication: “—” displayed for negative polarity<br />
Overrange indication: Only figure “OL” on the display<br />
Jaw capability: 12mm (Max conductor size)<br />
Power: Battery 9V — - - - IEC 6F22 JIS 006P<br />
NEDA 1604 type.<br />
Low battery: “ ” appears on the display<br />
Operating: 0°C to 40°C<br />
Storage temperature: -10°C to 50°C<br />
Temperature: 0.1 x specified accuracy) /°C<br />
coefficient: ( 28°C )<br />
Altitude:<br />
2000m<br />
Size:<br />
192mm x 68mm x 43mm<br />
Weight: Approx. 230g.<br />
14
RANGE<br />
4V<br />
40V<br />
400V<br />
1000V<br />
RESOLUTION<br />
1mV<br />
10mV<br />
0.1V<br />
1V<br />
DC VOLTAGE<br />
ACCURACY<br />
±0.7% of reading ± 1 digits<br />
±0.8% of reading ±3 digits<br />
Input Impedance: 10MΩ<br />
Overload Protection: 1000V DC or 700V AC RMS<br />
RANGE<br />
4V<br />
40V<br />
400V<br />
700V<br />
RESOLUTION<br />
1mV<br />
10mV<br />
0.1V<br />
1V<br />
AC VOLTAGE<br />
ACCURACY<br />
±0.8% of reading ± 5 digits<br />
±1.0% of reading ±10 digits<br />
Input Impedance: 10MΩ<br />
Frequency range: 40Hz to 400Hz.<br />
Overload Protection: 1000V DC or 700V AC RMS<br />
RANGE<br />
200A<br />
RESOLUTION<br />
0.1A<br />
AC CURRENT<br />
ACCURACY<br />
±3.0% of reading ± 3 digits<br />
Overload Protection: 240A for 60 seconds maximum.<br />
Frequency range: 50Hz to 400Hz.<br />
15
RANGE<br />
400Ω<br />
4kΩ<br />
40kΩ<br />
400kΩ<br />
4MΩ<br />
40MΩ<br />
RESOLUTION<br />
0.1Ω<br />
1Ω<br />
10Ω<br />
0.1kΩ<br />
1kΩ<br />
10kΩ<br />
RESISTANCE<br />
16<br />
ACCURACY<br />
±1.2% of reading ± 1 digits<br />
±2.0% of reading ±3 digits<br />
Overload Protection: 250V dc or rms. ac for all ranges.<br />
RANGE<br />
40nF<br />
400nF<br />
4µF<br />
40µF<br />
CAPACITANCE MEASUREMENT<br />
RESOLUTION<br />
10pF<br />
0.1nF<br />
1nF<br />
10nF<br />
ACCURACY<br />
±4.0% of reading ±10 digits<br />
-<br />
Overload Protection: 250V dc or rms. ac for all ranges.<br />
RANGE<br />
40Hz<br />
400Hz<br />
40kHz<br />
40kHz<br />
100kHz<br />
FREQUENCY MEASUREMENT<br />
RESOLUTION<br />
0.01Hz<br />
0.1Hz<br />
1Hz<br />
10Hz<br />
0.1kHz<br />
ACCURACY<br />
±2.0% of reading ± 1 digit<br />
Measurement range: 1V to 10V rms. 10Hz to 100kHz.
RANGE<br />
AUDIBLE CONTINUITY AND DIODE<br />
Duty Cycle: 0.1% to 99.9%<br />
DESCRIPTION<br />
If continuity exists (about less than 30Ω),<br />
built-in buzzer will sound.<br />
Show the approx. Forward voltage of the diode.<br />
AUTO POWER OFF<br />
To extend the battery life, Auto Power Off function is provided. If<br />
no key operations of range changing happen about 30 minutes,<br />
the meter will be turned off automatically. To turn it on, rotate<br />
the rotary switch or push any function buttons only.<br />
REPLACING THE BATTERY<br />
To avoid electrical shock or personal injury, remove the test<br />
leads and any input signals before replacing the battery.<br />
Replace only with same type of battery.<br />
WARNING<br />
To avoid electrical shock or personal injury,<br />
remove the test leads and any input signals<br />
before replacing the battery. Replace only with<br />
same type of battery.<br />
17
When the electrical tester displays the “ ” mark or the<br />
backlight becomes dim, the battery must be replaced to maintain<br />
proper operation. Use the following procedure to replace<br />
the battery:<br />
1. The Rotary Switch is used to select OFF. Disconnect test<br />
leads from any live source and remove the test leads from<br />
the input terminals.<br />
2. Remove screws on the battery cover and open the cover.<br />
3. Remove the exhausted battery and replace with a new<br />
9-voltage battery (IEC 6F22 JIS 006P NEDA 1604 type).<br />
4. Never use the multimeter unless the battery cover is in<br />
place and fastened fully.<br />
ACCESSORIES<br />
• Operator’s instruction manual<br />
• Set of test leads<br />
• Carrying pouch<br />
• 9 volt battery (IEC 6F22 JIS 006P NEDA 1604 type).<br />
18
<strong>CPS</strong> PRODUCTS, INC.<br />
1010 East 31st Street, Hialeah, Florida 33013, USA,<br />
Tel: 305-687-4121; 1-800-277-3808, Fax: 305-687-3743<br />
www.cpsproducts.com. e-mail: cpssales@cpsproducts.com<br />
<strong>CPS</strong> CANADA<br />
4605 Crysler Ave. Niagara Falls, Ontario L2E 3V6<br />
Phone - 905-358-3124; Fax - 905-358-7187<br />
Toll Free - 1-866-629-3895; e-Mail: cpscanada@bellnet.ca<br />
<strong>CPS</strong> PRODUCTS N.V.<br />
Krijgsbaan 241, 2070 Zwijndrecht, Belgium<br />
Tel: (323) 281 30 40; Fax: (323) 281 65 83<br />
<strong>CPS</strong> AUSTRALIA PTY. LTD.<br />
109 Welland Avenue, Welland, South Australia 5007<br />
Tel: +61 8 8340 7055, Fax: +61 8 8340 7033<br />
e-mail: sales@cpsaustralia.com.au<br />
<strong>CPS</strong> ASIA<br />
Ruby Industrial Complex #06-10, Genting Block 80 Genting Lane<br />
Singapore 349565<br />
Tel: (65) 8461056, Fax: (65) 8461054<br />
e-mail: cpsasia@singnet.com.sg