CHAMPTEK INCORPORATED
CHAMPTEK INCORPORATED
CHAMPTEK INCORPORATED

You also want an ePaper? Increase the reach of your titles
YUMPU automatically turns print PDFs into web optimized ePapers that Google loves.
SG300RFM<br />
WIRELESS HAND HELD SCANNER<br />
Programming Menu for Wireless Type
We Value Your ID’s.<br />
HQ<br />
<strong>CHAMPTEK</strong> <strong>INCORPORATED</strong><br />
5/F, No.2 Alley 2, Shin-Wei Lane,<br />
Chung Cheng Rd., Hsin Tien City 231,<br />
Taipei, Taiwan<br />
Tel:+886-2-2219-2385<br />
Fax:+886-2-2219-2387<br />
E-mail:sales@champtek.com<br />
www.champtek.com<br />
CHINA<br />
<strong>CHAMPTEK</strong> <strong>INCORPORATED</strong><br />
#901, No. 39, Wuzhong Rd., Shanghai<br />
200235, China<br />
Tel: +86-21-5489-0021<br />
Fax: +86-21-5489-1833<br />
EMEA<br />
SCANTECH-ID BV<br />
Amersfoortsestraat 124<br />
3769 AN Soesterberg<br />
The Netherlands<br />
Tel:+31-33-4698400<br />
Fax:+31-33-4650615<br />
E-mail:info@scantech-id.com<br />
www.scantech-id.com<br />
Notice<br />
The manufacturer shall not be liable for technical or<br />
editorial errors or omissions contained herein; nor for<br />
incidental or consequential damages in connection with<br />
1<br />
the furnishing, performance or use of the publication.
Content<br />
Introduction................................................................................ 1<br />
1.1 General .......................................................................1<br />
1.2 EMI certificated ...........................................................1<br />
1.3 Legislation and WEEE symbol ....................................1<br />
1.4 Pin Assignment ...........................................................2<br />
How to Configure....................................................................... 3<br />
2.1 Flow Chart...................................................................3<br />
2.2 General Process .........................................................3<br />
2.3 Start Over ....................................................................4<br />
2.4 Recall ..........................................................................4<br />
2.5 Set All Default..............................................................4<br />
2.6 Version Information .....................................................4<br />
Operation................................................................................... 5<br />
3.1 Beeper Option .............................................................5<br />
3.2 Output Characters.......................................................5<br />
3.3 Reverse Output Characters ........................................7<br />
3.4 Upper/Lower Case ......................................................7<br />
3.5 Interscan Code Delay..................................................8<br />
Code Type ............................................................................... 10<br />
4.1 Code Selection..........................................................10<br />
4.2 Bar Code ID ..............................................................14<br />
4.3 User Define Code ID .................................................15<br />
4.4 UPC/EAN/JAN ..........................................................17<br />
4.5 Code 39.....................................................................19<br />
4.6 Code 128...................................................................22<br />
4.7 Interleave 25 .............................................................24<br />
4.8 Industrial 25...............................................................26<br />
2
Content<br />
4.9 Matrix 25 ...................................................................28<br />
4.10 CODABAR/NW7 .....................................................29<br />
4.11 Code 93 ...................................................................32<br />
4.12 Code 11 ...................................................................33<br />
4.13 MSI/PLESSEY Code ...............................................35<br />
4.14 Code 2 of 6..............................................................37<br />
4.15 Telepen....................................................................38<br />
4.16 LCD 25 ....................................................................40<br />
4.17 RSS-14....................................................................41<br />
4.18 RSS Limited ............................................................42<br />
4.19 RSS Expanded........................................................43<br />
PREFIX/SUFFIX...................................................................... 44<br />
5.1 Standard Suffixes ......................................................44<br />
5.2 Insertion Data............................................................45<br />
5.3 Deletion Data.............................................................51<br />
Appendix ................................................................................. 57<br />
A-Decimal Value..............................................................57<br />
B-ASCII Table..................................................................58<br />
C-Function Key Table......................................................67<br />
3
Introduction<br />
1<br />
1.1 General<br />
SG300RFM has been factory configured with a set of default<br />
parameters. All factory default settings are shown with and<br />
bold in the following sections. You may make your own settings<br />
by following procedures in this manual. If you want to save the<br />
settings permanently, you should scan the Bar Code of “Save<br />
Parameters” in chapter 2, otherwise the settings will not be<br />
saved after the scanner power is off, and all settings will back<br />
to previous settings.<br />
By scanning “Set all default” Bar Code, the settings will go<br />
back to the factory default settings.<br />
1.2 EMI certificated<br />
CE standards<br />
The CE mark as shown here indicates this product had been<br />
tested in accordance with the procedures given in European<br />
Council Directive 89/336/EEC and confirmed to comply with<br />
the Europe an Standard EN55022:1994/ A1: 1995 Class B, EN<br />
55024/1998.<br />
1.3 Legislation and WEEE symbol<br />
1
This marking shown on the product or its literature, indicates<br />
that it should not be disposed with other households wastes at<br />
the end of its working life. To prevent possible harm to the<br />
environment or human healthy from uncontrolled waste<br />
disposal , please separate this from other types of wastes and<br />
recycle it responsibly to promote the sustainable reuse of<br />
material resources. Household users should contact either the<br />
retailer where they purchased this product, or their local<br />
government office, for details of when and how they can take<br />
this item fore environmentally safe recycling. Business users<br />
should contact their supplier and check the terms and<br />
conditions of the purchase.<br />
1.4 Pin Assignment<br />
1.4.1 PC Keyboard Output<br />
1.4.2 RS-232 Output<br />
2
How to Configure<br />
2<br />
2.1 Flow Chart<br />
Start<br />
Configuration<br />
Recall<br />
Parameters<br />
Set All<br />
Defaults<br />
Bar Codes<br />
Parameters<br />
About<br />
Configuration<br />
End<br />
Configuration<br />
Save<br />
Parameters<br />
2.2 General Process<br />
Step1<br />
Step2<br />
Step3<br />
Step4<br />
Step5<br />
Power on the scanner and cradle<br />
Scan Start of<br />
configuration<br />
Scan the barcodes for the desired features<br />
before scan End.<br />
Scan End of<br />
configuration<br />
Save<br />
The settings will be<br />
saved permanently.<br />
3
2.3 Start Over<br />
Abort configuration<br />
Scan Abort configuration when you want to terminate<br />
current programming status.<br />
2.4 Recall<br />
Replace the current<br />
parameters by the<br />
parameters saved last time.<br />
2.5 Set All Default<br />
Set all the parameters to the<br />
factory default settings.<br />
2.6 Version Information<br />
Display the decoder version<br />
information and<br />
date code.<br />
4
Operation<br />
3<br />
3.1 Beeper Option<br />
<br />
Medium<br />
Low<br />
Off<br />
3.2 Output Characters<br />
This function is related to the software of the host.<br />
The output results will be affected by the software.<br />
None<br />
Data are displayed<br />
continuously<br />
<br />
The cursor moves to the left<br />
once data are displayed, and<br />
it will move to the next line<br />
when the next data is ready to<br />
be displayed. (This function<br />
is related to the software of<br />
the host, and the results will<br />
be affected by the software)<br />
5
Enable CR Suffix – The<br />
scanner transmits a carriage<br />
return after each scan. The<br />
cursor moves to the left once<br />
data are displayed.<br />
Enable LF Suffix – The<br />
scanner transmits a line feed<br />
after each scan. The cursor<br />
moves to the next line once<br />
data are displayed.<br />
Enable Space<br />
Once data are displayed, the<br />
cursor will skip a space to get<br />
ready for the next data.<br />
Enable Tab(HT)<br />
Once data are displayed, the<br />
cursor will skip a tab to get<br />
ready for the next data.<br />
Enable ALT Method<br />
Send Character by Alt method<br />
Once this function is<br />
activated, no matter the<br />
keyboard is locked or<br />
unlocked, the output<br />
characters will not be affected<br />
by the keyboard settings.<br />
This function is only<br />
applicable when the scanner<br />
is used with PC.<br />
<br />
6
Number as keypad data<br />
Once this function is<br />
activated, the output of the<br />
scanning comes from the<br />
numerical pad’s code.<br />
<br />
Enable STX-ETX<br />
Before displaying a data, this<br />
function will add a STX ASCII<br />
code in front of the data, and<br />
an ETX ASCII code at the end<br />
of the data. This function is<br />
only limited to RS232<br />
interface.<br />
3.3 Reverse Output Characters<br />
Enable<br />
Example: 012345543210<br />
<br />
3.4 Upper/Lower Case<br />
<br />
The case of the output<br />
characters does not change.<br />
Enable Lower Case Output<br />
characters in lower case.<br />
The results will be affected by<br />
the keyboard settings. Thus,<br />
7
please lock the keyboard<br />
before testing the scanner.<br />
Enable Upper Case<br />
Output characters in upper<br />
case. The results will be<br />
affected by the keyboard<br />
settings. Thus, please lock<br />
the keyboard before testing<br />
the scanner.<br />
Enable CapsLock Detection<br />
Disable CapsLock Detection<br />
3.5 Interscan Code Delay<br />
<br />
Delay the characters output time.<br />
5 msec<br />
10 msec<br />
25 msec<br />
50 msec<br />
100 msec<br />
8
200 msec<br />
300 msec<br />
9
Code Type<br />
4<br />
4.1 Code Selection<br />
If “Enable” is selected for all the barcode types, then the<br />
scanner could read all types of barcode. If “Disable” is<br />
selected for a certain barcode type, then the scanner<br />
could not read the particular barcode. The symbol of “<<br />
>” means default settings.<br />
Enable All Bar Codes<br />
<br />
Disable UPC-A<br />
<br />
Disable UPC-E<br />
<br />
Disable EAN-13 / JAN-13<br />
10
Disable EAN-8 / JAN-8<br />
<br />
Disable CODE 39<br />
<br />
Disable CODE 128<br />
<br />
Disable CODABAR/NW7<br />
<br />
Disable Interleave 25<br />
Enable Industrial 25<br />
<br />
Enable Matrix 25<br />
<br />
11
Enable CODE 93<br />
<br />
Enable CODE 11<br />
<br />
Enable China Postage<br />
<br />
Enable MSI/PLESSE<br />
<br />
Enable CODE 2 OF 6<br />
<br />
Enable Telepen<br />
<br />
LCD25<br />
<br />
12
RSS-14<br />
<br />
RSS Limited<br />
<br />
RSS Expanded<br />
<br />
13
4.2 Bar Code ID<br />
With this function on, a leading character will be<br />
added to the output string while scanning code;<br />
user may refer to the following table to know what<br />
kind of barcode is being scanned.<br />
Enable Bar Code ID<br />
Disable Bar Code ID<br />
Default<br />
Code Type ID Code Type ID<br />
UPC-A A UPC-E B<br />
EAN-8 C EAN-13 D<br />
Code 39 E CODE 128 F<br />
Interleave 25 G Industrial 25 H<br />
Matrix 25 I Codabar/NW7 J<br />
CODE 93 K CODE 11 L<br />
China Postage M MSI/PLESSEY N<br />
Telepen T Code 2 of 6 P<br />
RSS-14 U RSS Limited V<br />
RSS Expanded<br />
W<br />
14
4.3 User Define Code ID<br />
User define code ID will override default value. It<br />
is possible to have more than two symbologies<br />
which have same code ID<br />
Step1<br />
Scan the Bar Code You wish to define<br />
Step2<br />
UPC-A<br />
Go to ASCII Table Appendix B, scan Bar Code(s)<br />
that represents the desired code ID<br />
UPC-E<br />
EAN-13/JAN-13<br />
EAN-8/JAN-8<br />
CODE 39<br />
CODE 128<br />
CODABAR/NW7<br />
Interleave 25<br />
Industrial 25<br />
Matrix 25<br />
15
CODE 93<br />
CODE 11<br />
China Postage<br />
MSI/PLESSEY<br />
Code 2 of 6<br />
Telepen<br />
LCD25<br />
Reserved 5<br />
Reserved 6<br />
RSS-14<br />
RSS Limited<br />
RSS Expanded<br />
16
4.4 UPC/EAN/JAN<br />
> Reading Type<br />
Enable UPC-A= EAN 13<br />
add 0 before UPC-A to make<br />
it 13 digits.<br />
<br />
Enable ISBN-10<br />
=Disable ISBN-13<br />
<br />
=Enable ISBN-13<br />
If you need to use ISBN-13, Please turn on EAN<br />
13 Check Digit Transmission Function as well.<br />
Enable ISSN<br />
<br />
Decode with Supplement<br />
<br />
Enable Expand UPC-E<br />
<br />
Enable EAN-8→EAN-13<br />
<br />
17
Enable GTIN format<br />
<br />
> Supplemental Setup<br />
<br />
Enable 2 Digit Supplemental<br />
Enable 5 Digit Supplemental<br />
Enable 2 & 5 Digit<br />
Supplemental<br />
> Check Digit Transmission<br />
If “Check Digit” is selected, the scanner will transmit<br />
the check digit. If “Disable” is selected, the scanner<br />
will not transmit the check digit.<br />
<br />
Disable UPC-A Check Digit<br />
Transmission<br />
<br />
Disable UPC-E Check Digit<br />
Transmission<br />
18
EAN-8 Check Digit<br />
Transmission><br />
Disable EAN-8 Check Digit<br />
Transmission<br />
< EAN-13 Check Digit<br />
Transmission><br />
Disable EAN-13 Check Digit<br />
Transmission<br />
< ISSN Check Digit<br />
Transmission><br />
Disable ISSN Check Digit<br />
Transmission<br />
4.5 Code 39<br />
> Reading Type<br />
< Standard Code 39><br />
Full ASCII Code 39<br />
Enable Italian<br />
Pharmacy/Code 32<br />
<br />
> Check Digit Transmission<br />
<br />
19
Calculate Check Digit and<br />
Transmit<br />
Calculate Check Digit and<br />
Not Transmit<br />
> Output Start / Stop Character<br />
<br />
Enable Start/Stop Character<br />
<br />
> Decode Asterisk<br />
Enable Decode Asterisk<br />
The scanner will decode the<br />
“*” symbol in code 39.<br />
<br />
The scanner will not decode<br />
the “*” symbol in code 39.<br />
> Setup Code Length<br />
1. Scan the “Set Begin” Bar Code (2 Sets<br />
Available)<br />
2. Go to Decimal Value Table in Appendix A, scan<br />
Bar Code(s) that represents the code length<br />
3. Scan the “Complete” Bar Code<br />
Repeat Steps 1-3 to set additional lengths<br />
< Variable><br />
The output would be the<br />
20
same as the barcode’s length.<br />
There is no limit in length for<br />
the reading output.<br />
Fix Length (2 sets Available)<br />
1 1 st Set Begin<br />
2 Decimal Value Appendix A<br />
3 1 st Set Complete<br />
1 2 nd Set Begin<br />
2 Decimal Value Appendix A<br />
3 2 nd Set Complete<br />
Minimum Length<br />
1 Minimum Length<br />
Set a minimum length<br />
for codes. If the length<br />
of a code is shorter<br />
than the minimum<br />
length, then the<br />
scanner will not output<br />
the data.<br />
2 Decimal Value Appendix A<br />
3 Minimum Length<br />
Complete<br />
21
4.6 Code 128<br />
> Check Digit Transmission<br />
Do Not Calculate Check<br />
Digit<br />
Calculate Check Digit and<br />
Transmit<br />
<br />
> Append FNC2<br />
“FNC2” is a multi codes-connection function for<br />
Code 128. Sometimes a Code 128 is divided into<br />
two barcodes for large amount of data.<br />
Enable FNC2<br />
“ON” means after reading a<br />
code 128 barcode with FNC2,<br />
you must read the next Code<br />
128 barcode with FNC2 in<br />
order to have a complete<br />
code output.<br />
<br />
means reading only one Code<br />
128 barcode.<br />
> Setup Code Length<br />
1. Scan the “Set Begin” Bar Code (2 Sets<br />
Available)<br />
2. Go to Decimal Value Table in Appendix A,<br />
scan Bar Code(s) that represents the code<br />
length<br />
3. Scan the Complete Bar Code<br />
Repeat Steps 1-3 to set additional lengths<br />
22
Variable><br />
The output would<br />
be the same as the<br />
barcode’s length.<br />
There is no limit in<br />
length for the<br />
reading output.<br />
Fix Length (2 sets Available)<br />
1 1st Set Begin<br />
2 Decimal Value Appendix A<br />
3 1 st Set Complete<br />
1 2 nd Set Begin<br />
2 Decimal Value Appendix A<br />
3 2 nd Set Complete<br />
Minimum Length<br />
1 Minimum Length<br />
Set a minimum<br />
length for codes.<br />
If the length of a<br />
code is shorter<br />
than the minimum<br />
length, then the<br />
scanner will not<br />
output the data.<br />
2 Decimal Value Appendix A<br />
23
3 Minimum Length<br />
Complete<br />
> UCC/EAN-128<br />
Enable UCC/EAN-128<br />
<br />
4.7 Interleave 25<br />
> Check Digit Transmission<br />
<br />
Calculate Check Digit and<br />
Transmit<br />
Calculate Check Digit and<br />
Not Transmit<br />
> Setup Number of Character<br />
<br />
“Even” means the Interleave<br />
25 code will be output in even<br />
numbers.<br />
Set up Digit Number as Odd<br />
“Odd” means odd numbers.<br />
24
Brazilian Banking Code<br />
Enable Brazilian Banking<br />
Code<br />
<br />
> Setup Code Length<br />
1. Scan the “Set Begin” Bar Code (2 Sets<br />
Available)<br />
2. Go to Decimal Value Table in Appendix A,<br />
scan Bar Code(s) that represents the code<br />
length<br />
3. Scan the “Complete” Bar Code<br />
Repeat Steps 1-3 to set additional lengths<br />
< Variable><br />
The output would be the<br />
same as the barcode’s length.<br />
There is no limit in length for<br />
the reading output.<br />
Fix Length (2 sets Available)<br />
1 1st Set Begin<br />
2 Decimal Value Appendix A<br />
3 1 st Set Complete<br />
1 2 nd Set Begin<br />
2 Decimal Value Appendix A<br />
3 2 nd Set Complete<br />
25
Minimum Length<br />
1 Minimum Length<br />
Set a minimum length<br />
for codes. If the<br />
length of a code is<br />
shorter than the<br />
minimum length, then<br />
the scanner will not<br />
output the data.<br />
2 Appendix A<br />
3 Minimum Length<br />
Complete<br />
4.8 Industrial 25<br />
> Check Digit Transmission<br />
<br />
Calculate Check Digit and<br />
Transmit<br />
Calculate Check Digit and<br />
Not Transmit<br />
> Setup Code Length<br />
1. Scan the “Set Begin” Bar Code (2 Sets<br />
Available)<br />
2. Go to Decimal Value Table in Appendix A,<br />
scan Bar Code(s) that represents the code<br />
length<br />
3. Scan the Complete Bar Code<br />
Repeat Steps 1-3 to set additional lengths<br />
< Variable><br />
The output would be the<br />
same as the barcode’s length.<br />
26
There is no limit in length for<br />
the reading output.<br />
Fix Length (2 Sets Available)<br />
1 1st Set Begin<br />
2 Decimal Value Appendix A<br />
3 1 st Set Complete<br />
1 2 nd Set Begin<br />
2 Decimal Value Appendix A<br />
3 2 nd Set Complete<br />
Minimum Length<br />
1 Minimum Length<br />
Set a minimum length<br />
for codes. If the<br />
length of a code is<br />
shorter than the<br />
minimum length, then<br />
the scanner will not<br />
output the data.<br />
2 Decimal Value Appendix A<br />
3 Minimum Length<br />
Complete<br />
27
IATA 25<br />
Enable IATA 25<br />
<br />
4.9 Matrix 25<br />
> Check Digit Transmission<br />
<br />
Calculate Check Digit and<br />
Transmit<br />
Calculate Check Digit and<br />
Not Transmit<br />
> Setup Code Length<br />
1. Scan the “Set Begin” Bar Code (2 Sets<br />
Available)<br />
2. Go to Decimal Value Table in Appendix A,<br />
scan Bar Code(s) that represents the code<br />
length<br />
3. Scan the “Complete” Bar Code<br />
Repeat Steps 1-3 to set additional lengths<br />
< Variable><br />
The output would be the<br />
same as the barcode’s length.<br />
There is no limit in length for<br />
the reading output.<br />
Fix Length (2 Sets Available)<br />
28
1 1st Set Begin<br />
2 Decimal Value Appendix A<br />
3 1 st Set Complete<br />
1 2 nd Set Begin<br />
2 Decimal Value Appendix A<br />
3 2 nd Set Complete<br />
Minimum Length<br />
1 Minimum Length<br />
Set a minimum length<br />
for codes. If the length<br />
of a code is shorter<br />
than the minimum<br />
length, then the<br />
scanner will not output<br />
the data.<br />
2 Decimal Value Appendix A<br />
3 Minimum Length<br />
Complete<br />
4.10 CODABAR/NW7<br />
> Start/Stop<br />
Enable Start/Stop<br />
characters<br />
29
> Transmission Type of Start/Stop<br />
<br />
<br />
A Start<br />
A Stop<br />
B Start<br />
B Stop<br />
C Start<br />
C Stop<br />
D Start<br />
D Stop<br />
30
Setup Code Length<br />
1. Scan the “Set Begin” Bar Code (2 Sets<br />
Available)<br />
2. Go to Decimal Value Table in Appendix A,<br />
scan Bar Code(s) that represents the code<br />
length<br />
3. Scan the “Complete” Bar Code<br />
Repeat Steps 1-3 to set additional lengths<br />
< Variable><br />
The output would be the<br />
same as the barcode’s length.<br />
There is no limit in length for<br />
the reading output.<br />
Fix Length (2 Sets Available)<br />
1 1st Set Begin<br />
2 Decimal Value Appendix A<br />
3 1 st Set Complete<br />
1 2 nd Set Begin<br />
2 Decimal Value Appendix A<br />
3 2 nd Set Complete<br />
Minimum Length<br />
1 Minimum Length<br />
Set a minimum length<br />
for codes. If the<br />
length of a code is<br />
shorter than the<br />
minimum length, then<br />
31
the scanner will not<br />
output the data.<br />
2 Decimal Value Appendix A<br />
3 Minimum Length<br />
Complete<br />
4.11 Code 93<br />
> Check Digit Transmission<br />
< Calculate Check 2 Digit &<br />
not Transmit><br />
Do not Calculate Check<br />
Digit<br />
> Setup Code Length<br />
1. Scan the “Set Begin” Bar Code (2 Sets<br />
Available)<br />
2. Go to Decimal Value Table in Appendix A,<br />
scan Bar Code(s) that represents the code<br />
length<br />
3. Scan the “Complete” Bar Code<br />
Repeat Steps 1-3 to set additional lengths<br />
< Variable><br />
The output would be the<br />
same as the barcode’s length.<br />
There is no limit in length for<br />
the reading output.<br />
Fix Length (2 Sets Available)<br />
1 1st Set Begin<br />
2 Decimal Value Appendix A<br />
32
3 1 st Set Complete<br />
1 2 nd Set Begin<br />
2 Decimal Value Appendix A<br />
3 2 nd Set Complete<br />
Minimum Length<br />
1 Minimum Length<br />
Set a minimum length<br />
for codes. If the<br />
length of a code is<br />
shorter than the<br />
minimum length, then<br />
the scanner will not<br />
output the data.<br />
2 Decimal Value Appendix A<br />
3 Minimum Length<br />
Complete<br />
4.12 Code 11<br />
> Check Digit Transmission<br />
<br />
Calculate Check 1 Digit and<br />
Transmit<br />
Calculate Check 1 Digit and<br />
Not Transmit<br />
33
Calculate Check 2 Digit and<br />
Transmit<br />
Calculate Check 2 Digit and<br />
Not Transmit<br />
> Setup Code Length<br />
1. Scan the “Set Begin” Bar Code (2 Sets<br />
Available)<br />
2. Go to Decimal Value Table in Appendix A,<br />
scan Bar Code(s) that represents the code<br />
length<br />
3. Scan the “Complete” Bar Code<br />
Repeat Steps 1-3 to set additional lengths<br />
< Variable><br />
The output would be the<br />
same as the barcode’s length.<br />
There is no limit in length for<br />
the reading output.<br />
Fix Length (2 Sets Available)<br />
1 1st Set Begin<br />
2 Decimal Value Appendix A<br />
3 1 st Set Complete<br />
1 2 nd Set Begin<br />
2 Decimal Value Appendix A<br />
3 2 nd Set Complete<br />
34
Minimum Length<br />
1 Minimum Length<br />
Set a minimum length<br />
for codes. If the<br />
length of a code is<br />
shorter than the<br />
minimum length, then<br />
the scanner will not<br />
output the data.<br />
2 Decimal Value Appendix A<br />
3 Minimum Length<br />
Complete<br />
4.13 MSI/PLESSEY Code<br />
> Check Digit Transmission<br />
<br />
Calculate Check Digit and<br />
Transmit<br />
Calculate Check Digit and<br />
Not Transmit<br />
> Setup Code Length<br />
1. Scan the “Set Begin” Bar Code (2 Sets<br />
Available)<br />
2. Go to Decimal Value Table in Appendix A,<br />
scan Bar Code(s) that represents the code<br />
length<br />
3. Scan the “Complete” Bar Code<br />
Repeat Steps 1-3 to set additional lengths<br />
35
Variable><br />
The output would be the<br />
same as the barcode’s length.<br />
There is no limit in length for<br />
the reading output.<br />
Fix Length (2 Sets Available)<br />
1 1st Set Begin<br />
2 Decimal Value Appendix A<br />
3 1 st Set Complete<br />
1 2 nd Set Begin<br />
2 Decimal Value Appendix A<br />
3 2 nd Set Complete<br />
Minimum Length<br />
1 Minimum Length<br />
Set a minimum length<br />
for codes. If the<br />
length of a code is<br />
shorter than the<br />
minimum length, then<br />
the scanner will not<br />
output the data.<br />
2 Decimal Value Appendix A<br />
3 Minimum Length<br />
Complete<br />
36
4.14 Code 2 of 6<br />
> Check Digit Transmission<br />
Do not Calculate Check<br />
Digit<br />
<br />
Calculate Check Digit and<br />
Not Transmit<br />
> Setup Code Length<br />
1. Scan the “Set Begin” Bar Code (2 Sets<br />
Available)<br />
2. Go to Decimal Value Table in Appendix A, scan<br />
Bar Code(s) that represents the code length<br />
3. Scan the “Complete” Bar Code<br />
Repeat Steps 1-3 to set additional lengths<br />
< Variable><br />
The output would be the<br />
same as the barcode’s length.<br />
There is no limit in length for<br />
the reading output.<br />
Fix Length (2 Sets Available)<br />
1 1st Set Begin<br />
2 Decimal Value Appendix A<br />
3 1 st Set Complete<br />
1 2 nd Set Begin<br />
2 Decimal Value Appendix A<br />
37
3 2 nd Set Complete<br />
Minimum Length<br />
1 Minimum Length<br />
Set a minimum length<br />
for codes. If the<br />
length of a code is<br />
shorter than the<br />
minimum length, then<br />
the scanner will not<br />
output the data.<br />
2 Decimal Value Appendix A<br />
3 Minimum Length<br />
Complete<br />
4.15 Telepen<br />
> Type of Code<br />
<br />
Telepen Numeric<br />
> Check Digit Transmission<br />
Do not Calculate Check<br />
Digit<br />
Calculate Check Digit and<br />
Transmit<br />
<br />
38
Setup Code Length<br />
1. Scan the “Set Begin” Bar Code (2 Sets<br />
Available)<br />
2. Go to Decimal Value Table in Appendix A,<br />
scan Bar Code(s) that represents the code<br />
length<br />
3. Scan the “Complete” Bar Code<br />
Repeat Steps 1-3 to set additional lengths<br />
< Variable><br />
The output would be the<br />
same as the barcode’s length.<br />
There is no limit in length for<br />
the reading output.<br />
Fix Length (2 Sets Available)<br />
1 1st Set Begin<br />
2 Decimal Value Appendix A<br />
3 1 st Set Complete<br />
1 2 nd Set Begin<br />
2 Decimal Value Appendix A<br />
3 2 nd Set Complete<br />
Minimum Length<br />
1 Minimum Length<br />
Set a minimum length<br />
for codes. If the<br />
length of a code is<br />
shorter than the<br />
minimum length, then<br />
39
the scanner will not<br />
output the data.<br />
2 Decimal Value Appendix A<br />
3 Minimum Length<br />
Complete<br />
3 Minimum Length<br />
Complete<br />
4.16 LCD 25<br />
> Check Digit Transmission<br />
Do not Calculate Check<br />
Digit<br />
Calculate Check Digit and<br />
Transmit<br />
<br />
> Setup Code Length<br />
1. Scan the “Set Begin” Bar Code (2 Sets<br />
Available)<br />
2. Go to Decimal Value Table in Appendix A,<br />
scan Bar Code(s) that represents the code<br />
length<br />
3. Scan the “Complete” Bar Code<br />
Repeat Steps 1-3 to set additional lengths<br />
< Variable><br />
The output would be the<br />
same as the barcode’s<br />
length. There is no limit in<br />
length for the reading<br />
output.<br />
40
Fix Length (2 Sets Available)<br />
1 1st Set Begin<br />
2 Decimal Value Appendix A<br />
3 1 st Set Complete<br />
1 2 nd Set Begin<br />
2 Decimal Value Appendix A<br />
3 2 nd Set Complete<br />
Minimum Length<br />
1 Minimum Length<br />
Set a minimum<br />
length for codes. If<br />
the length of a code<br />
is shorter than the<br />
minimum length,<br />
then the scanner will<br />
not output the data.<br />
2 Decimal Value Appendix A<br />
3 Minimum Length<br />
Complete<br />
4.17 RSS-14<br />
> Check Digit Transmission<br />
RSS-14 Check Digit<br />
Transmit<br />
41
RSS-14 Don’t Transmit<br />
Check Digit<br />
Transmit RSS-14<br />
Application ID<br />
Don’t Transmit RSS-14<br />
Application ID<br />
Transmit RSS-14<br />
Symbology ID<br />
Don’t Transmit RSS-14<br />
Symbology ID<br />
4.18 RSS Limited<br />
> Check Digit Transmission<br />
RSS Limited Check Digit<br />
Transmit<br />
RSS Limited Don’t Transmit<br />
Check Digit<br />
Transmit RSS Limited<br />
Application ID<br />
Don’t Transmit RSS Limited<br />
Application ID<br />
Transmit RSS Limited<br />
Symbology ID<br />
42
Don’t Transmit RSS Limited<br />
Symbology ID<br />
4.19 RSS Expanded<br />
> Check Digit Transmission<br />
Transmit RSS Expanded<br />
Symbology ID<br />
Don’t Transmit RSS<br />
Expanded Symbology ID<br />
43
PREFIX/SUFFIX<br />
5<br />
5.1 Standard Suffixes<br />
None<br />
Data are displayed<br />
continuously<br />
<br />
The cursor moves to the left<br />
once data are displayed, and<br />
it will move to the next line<br />
when the next data is ready to<br />
be displayed. (This function<br />
is related to the software of<br />
the host, and the results will<br />
be affected by the software)<br />
Enable CR Suffix – The<br />
scanner transmits a carriage<br />
return after each scan. The<br />
cursor moves to the left once<br />
data are displayed.<br />
Enable LF Suffix – The<br />
scanner transmits a line feed<br />
after each scan. The cursor<br />
moves to the next line once<br />
data are displayed.<br />
44
Enable Space<br />
Once data are displayed, the<br />
cursor will skip a space to get<br />
ready for the next data.<br />
Enable Tab(HT)<br />
Once data are displayed, the<br />
cursor will skip a tab to get<br />
ready for the next data.<br />
Enable STX-ETX<br />
Before displaying a data, this<br />
function will add a STX ASCII<br />
code in front of the data, and<br />
an ETX ASCII code at the end<br />
of the data. This function is<br />
only limited to RS232<br />
interface.<br />
5.2 Insertion Data<br />
You can insert character for up to 6 different<br />
barcode types.<br />
Steps 1. Scan the bar code for the desired Set<br />
2. Scan the bar code of the desire bar<br />
code type<br />
3. Scan Bar Code(s) that represents the<br />
position of digit number to be<br />
inserted.(99 = Last digit)<br />
4. Scan the Compete of “Character<br />
Position to be inserted”<br />
5. Go to Appendix B or Appendix C,<br />
scan Bar Code(s) that represents the<br />
desired characters to be inserted<br />
6. Scan the “Complete” Bar Code<br />
45
7. Scan “End”<br />
8. Scan “Save”<br />
Repeat Steps 1-6 to set additional set<br />
> Example Insert $ as Prefixes for Code UPC-A<br />
Start<br />
Set #1<br />
Scan the bar code for the<br />
desired Set<br />
Code UPC-A<br />
Scan the bar code of the<br />
desire bar code type<br />
1st digit<br />
Scan Bar Code(s) that<br />
represents the position of digit<br />
number to be inserted.(99 =<br />
Last digit)<br />
Complete<br />
$<br />
scan Bar Code(s) that<br />
represents the desired<br />
characters to be inserted<br />
Complete<br />
Scan “End” bar code<br />
46
Scan “Save” bar code<br />
> Insertion Set Number<br />
Set #1<br />
Set #2<br />
Set #3<br />
Set #4<br />
Set #5<br />
Set #6<br />
> Code Type to be inserted<br />
UPC-A<br />
UPC-E<br />
EAN-13/JAN-13<br />
EAN-8/JAN-8<br />
CODE 39<br />
47
CODE 128<br />
CODABAR/NW7<br />
Interleave 25<br />
Industrial 25<br />
Matrix 25<br />
CODE 93<br />
CODE 11<br />
China Postage<br />
MSI/PLESSEY<br />
Code 2 of 6<br />
Telepen<br />
Resvered 5<br />
LCD25<br />
RSS-14<br />
48
RSS Limited<br />
RSS Expanded<br />
All Codes<br />
None<br />
> Character Position to be inserted<br />
49
Complete<br />
> Character to be inserted<br />
Go to Appendix B (ASCII), Appendix C (Function Key)<br />
Complete<br />
End<br />
Save<br />
50
5.3 Deletion Data<br />
You can delete character for up to 6 different<br />
barcode types.<br />
Steps 1. Scan the bar code for the desired set.<br />
2. Scan the desire bar code type<br />
3. Scan Bar Code(s) that represents the<br />
digit number of start position to be<br />
deleted<br />
4. Scan the “Compete” Bar Code of<br />
Character Position to be deleted<br />
5. Scan the numbers of characters need to<br />
be deleted.<br />
6. Scan the “Compete” Bar Code of Number<br />
of Characters to be deleted.<br />
7. Scan “End”.<br />
8. Scan “Save”.<br />
Repeat Steps 1-6 to set additional set<br />
> Example Delete first 3 Digits for Code EAN-13<br />
Start<br />
Set #1<br />
Scan the bar code for the<br />
desired set<br />
Code EAN-13<br />
Scan the desire bar code type<br />
1st digit<br />
Scan start position to be<br />
deleted<br />
51
Complete<br />
3<br />
Scan the numbers of<br />
characters need to be deleted<br />
Complete<br />
End<br />
Save<br />
> Delectation Set Number<br />
Set #1<br />
Set #2<br />
Set #3<br />
Set #4<br />
Set #5<br />
Set #6<br />
> Code Type to be deleted<br />
52
UPC-A<br />
UPC-E<br />
EAN-13/JAN-13<br />
EAN-8/JAN-8<br />
CODE 39<br />
CODE 128<br />
CODABAR/NW7<br />
Interleave 25<br />
Industrial 25<br />
Matrix 25<br />
CODE 93<br />
CODE 11<br />
China Postage<br />
MSI/PLESSEY<br />
53
Code 2 of 6<br />
Telepen<br />
Resvered5<br />
LCD25<br />
RSS-14<br />
RSS Limited<br />
RSS Expanded<br />
All Codes<br />
None<br />
> Delete Start Position<br />
54
Complete<br />
> Number of Characters to be deleted<br />
55
Complete<br />
End<br />
Save<br />
56
Appendix<br />
A<br />
A-Decimal Value<br />
57
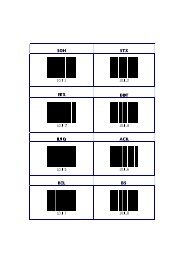
B-ASCII Table<br />
NULL<br />
ETX<br />
ACK<br />
HT<br />
FF<br />
SI<br />
DC2<br />
NAK<br />
CAN<br />
ESC<br />
GS<br />
RS<br />
STX<br />
58
ENQ<br />
BS<br />
VT<br />
SO<br />
DC1<br />
DC4<br />
ETB<br />
SUB<br />
SYN<br />
SOH<br />
EOT<br />
BEL<br />
LF<br />
CR<br />
59
DLE<br />
DC3<br />
%<br />
$<br />
&<br />
(<br />
'<br />
)<br />
+<br />
*<br />
,<br />
comma<br />
.<br />
period<br />
-<br />
minus<br />
/<br />
60
;<br />
:<br />
<<br />
Less than<br />
><br />
Greater than<br />
=<br />
<br />
@<br />
EM<br />
FS<br />
US<br />
SPACE<br />
″<br />
!<br />
#<br />
61
0<br />
Number Zero<br />
1<br />
Number One<br />
2<br />
3<br />
4<br />
5<br />
6<br />
7<br />
8<br />
9<br />
A<br />
B<br />
C<br />
D<br />
62
E<br />
F<br />
G<br />
H<br />
I<br />
Letter I<br />
J<br />
K<br />
L<br />
M<br />
N<br />
O<br />
Letter O<br />
P<br />
Q<br />
R<br />
63
S<br />
T<br />
U<br />
V<br />
W<br />
X<br />
Y<br />
Z<br />
a<br />
b<br />
c<br />
d<br />
e<br />
f<br />
64
g<br />
h<br />
i<br />
j<br />
k<br />
l<br />
m<br />
n<br />
o<br />
p<br />
q<br />
r<br />
s<br />
t<br />
65
u<br />
v<br />
w<br />
x<br />
y<br />
z<br />
~<br />
}<br />
DEL<br />
{<br />
[<br />
\<br />
_<br />
Underscore<br />
]<br />
66
^<br />
`<br />
C-Function Key Table<br />
F1<br />
F2<br />
F3<br />
F4<br />
F5<br />
F6<br />
F7<br />
F8<br />
F9<br />
F10<br />
F11<br />
67
F12<br />
lnsert<br />
Delete<br />
Home<br />
End<br />
Page UP<br />
Page Down<br />
Left<br />
Up<br />
Right<br />
Down<br />
68
Save<br />
Recall<br />
Set all default<br />
Start<br />
End<br />
Abort<br />
Version Information<br />
Ver 1.0