Owner Manual - AVR 158 (English EU) - Harman Kardon
Owner Manual - AVR 158 (English EU) - Harman Kardon
Owner Manual - AVR 158 (English EU) - Harman Kardon

Create successful ePaper yourself
Turn your PDF publications into a flip-book with our unique Google optimized e-Paper software.
<strong>AVR</strong> <strong>158</strong><br />
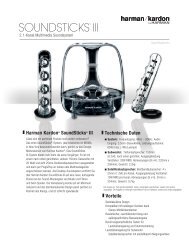
5. For each source device you connected to a digital audio input:<br />
a) use the remote’s up and down arrow buttons to select “Source.” use the left<br />
and right arrow buttons to change the listed source to one of the sources you<br />
connected to a digital audio input connector.<br />
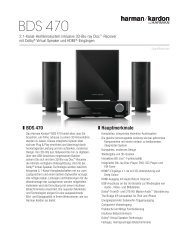
b) use the remote’s down arrow button to select “Audio In.”<br />
* INPUT SETUP *<br />
SOURCE : DVD<br />
TITLE:<br />
AUDIO IN : OPT 1<br />
AUTO POLL : ON<br />
BXR : OFF<br />
TONE : IN<br />
BASS : 0<br />
TREBLE : 0<br />
BACK TO MASTER MENU<br />
c) use the remote’s left and right arrow buttons to select the digital audio input<br />
where you connected the source device.<br />
Additional Input Setup Menu Items<br />
You can also adjust the following settings independently for each source:<br />
Title: You may change the display name for any source (except the radio). this feature<br />
may help you to select the correct source device even when you have forgotten which<br />
physical connections you used.<br />
1. Move the cursor to the title line and press the ok button. A block cursor will blink.<br />
2. use the up/down buttons to scroll through the alphabet in upper and lower case,<br />
the numbers and many punctuation marks. when you have selected the desired<br />
character, press the right button to move to the next space. press the right button<br />
twice to leave a blank space.<br />
3. press the ok button when you have finished.<br />
Auto Poll: the Auto poll feature is used when both an analogue audio and a digital<br />
audio connection have been made for one source device. If no digital signal is available,<br />
the AVr will automatically switch to the analogue input for the source. this situation<br />
can occur with some cable or satellite television broadcasts, where some channels are<br />
broadcast with digital audio and others with analogue audio, or when a dVd player is<br />
paused or stopped.<br />
For some sources such as dVd players, the Auto poll feature is unnecessary and may be<br />
undesirable. to turn Auto poll off, move the cursor to the Auto poll line and press the left/<br />
right buttons until off appears. with Auto poll turned off, the AVr will check for a signal<br />
only at the audio input assigned to the source.<br />
the remaining Input Setup menu items adjust the AVr’s audio performance for that<br />
source and may be skipped at this time. For most listening, we recommend leaving<br />
these settings at their factory defaults, allowing you to enjoy the sound mix created by<br />
your favourite movie and music artists.<br />
BXR: enhances bass performance when playing Mp3 tracks. Select on, or leave it at the<br />
default off setting for non-Mp3 audio sources.<br />
Tone: this setting determines whether the treble and bass controls are active. when this<br />
line is set to off, the tone controls are out of the circuit, with no changes to the sound.<br />
when this line is set to on, the bass and treble frequencies are boosted or cut, depending<br />
upon the bass and treble settings (see below).<br />
Bass and Treble: boost or cut the low or high frequencies by up to 10db by using the<br />
left/right buttons to change the setting by 2db at a time.<br />
when you’re finished, press the remote’s oSd button to turn off the on-screen menu.<br />
Operating Your <strong>AVR</strong><br />
Set Up the <strong>AVR</strong>, continued,<br />
and Operating Your <strong>AVR</strong><br />
now that you have installed your components and completed a basic configuration, you<br />
are ready to begin enjoying your home theatre system.<br />
Controlling the Volume<br />
Adjust the volume either by turning the front-panel Volume knob (clockwise to increase<br />
volume or counterclockwise to decrease volume) or by pressing the Volume up/down<br />
buttons on the remote. the volume is displayed as a negative number of decibels (db)<br />
below the 0db reference point.<br />
0db is the maximum recommended volume for your AVr. Although it’s possible to turn<br />
the volume to a higher level, doing so may damage your hearing and your speakers. For<br />
certain more dynamic audio materials, even 0db may be too high, allowing for damage<br />
to equipment. use caution with regard to volume levels.<br />
Muting the Sound<br />
to mute all speakers and the headphones, press the Mute button on the remote. Any<br />
recording in progress will not be affected. the Mute message will appear in the frontpanel<br />
display as a reminder. to restore the sound, press the Mute button again, or adjust<br />
the volume.<br />
Listening Through Headphones<br />
plug the 1/4-inch stereo plug on a pair of headphones into the front-panel phones<br />
jack for private listening. the default headphone bypass mode delivers a conventional<br />
two-channel signal to the headphones. press the Surround Modes button on the front<br />
panel or use the remote and oSd to switch to hArMAn headphone virtual surround<br />
processing, which emulates a 5.1-channel speaker system. no other surround modes<br />
are available for the headphones.<br />
Selecting a Source<br />
there are two different ways to select a source:<br />
• press the front-panel Source Select buttons.<br />
• directly select any source by pressing its Source Selector button on the remote.<br />
the AVr selects the audio and video inputs assigned to the source and any other<br />
settings you made during setup.<br />
the source name, the audio and video inputs assigned to the source, and the surround<br />
mode will appear on the front panel.<br />
Video Troubleshooting Tips<br />
If there is no picture:<br />
• check the source selection.<br />
• check all connections for a loose or incorrect connection.<br />
• check the video-input selection on the tV/display device.<br />
Additional Tips for Troubleshooting HDMI Connections<br />
• turn off all devices (including the tV, the AVr and any source components).<br />
• unplug the hdMI cables, starting with the cable between the AVr and the tV, and<br />
continuing with the cables between the AVr and each source device.<br />
• carefully reconnect the cables from the source devices to the AVr. connect the<br />
cable from the AVr to the tV last.<br />
• turn on the devices in this order: tV, AVr, source devices.<br />
NOTE: Depending upon the particular components involved, the complexity of<br />
the required communication between HDMI components may cause delays of<br />
up to a minute in the completion of some actions, such as input switching or<br />
switching between SD and HD channels.<br />
19<br />
ENGLISH