Owner Manual - AVR 158 (English EU) - Harman Kardon
Owner Manual - AVR 158 (English EU) - Harman Kardon
Owner Manual - AVR 158 (English EU) - Harman Kardon

Create successful ePaper yourself
Turn your PDF publications into a flip-book with our unique Google optimized e-Paper software.
<strong>AVR</strong> <strong>158</strong><br />
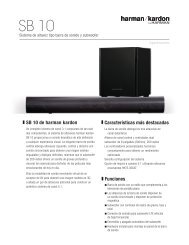
Audio recorders<br />
connect an analogue audio recorder’s inputs to the AVr’s analogue audio tape out<br />
connectors. You can record any analogue audio input signal.<br />
AVr Analogue Audio<br />
recorder connectors<br />
Stereo Audio cable<br />
(not supplied) to Stereo Analogue<br />
record Inputs<br />
Analogue recording device<br />
Video recorders<br />
connect an analogue video recorder’s video input connector to the AVr’s Video 2 out<br />
composite Video connector, and its audio input connectors to the AVr’s Video 2 out<br />
Analogue Audio connectors. You can record any composite video signal.<br />
AVr Analogue<br />
Audio connectors<br />
AVr Analogue<br />
Video connectors<br />
Analogue Audio/Video<br />
cable (not supplied)<br />
Analogue Video<br />
recording device<br />
to Analogue Audio/<br />
Video record Inputs<br />
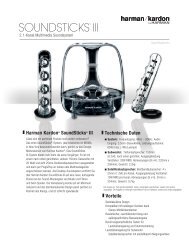
Connect the Radio Aerials<br />
• connect the supplied FM aerial to the AVr’s FM 75Ω<br />
radio Aerial connector. For the<br />
best reception, extend the FM aerial as far as possible.<br />
• bend and fold the base of the supplied AM aerial as shown and connect the aerial<br />
wires to the AVr’s AM and gnd connectors. (You can connect either wire to either<br />
connector.) rotate the aerial as necessary to minimise background noise.<br />
AVr radio Aerial<br />
connectors<br />
AM Aerial<br />
(supplied)<br />
FM Aerial (supplied)<br />
bend and fold base<br />
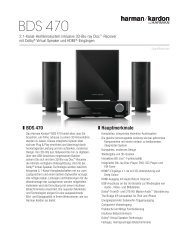
Connect the 12V Trigger Output<br />
Making Connections, continued,<br />
and Set Up the Remote Control<br />
If your system has equipment that can be controlled by a dc trigger signal, connect it to<br />
the AVr’s 12V trigger connector with a mono 1/8-inch (3.5mm) mini-plug interconnect<br />
cable. the AVr will supply a 12V dc (100mA) trigger signal at this connection whenever<br />
it is powered on.<br />
AVr<br />
device with trigger<br />
in connector<br />
Mono 1/8-inch<br />
(3.5mm)<br />
Mini-plug<br />
Interconnect<br />
(not supplied)<br />
Connect to AC Power<br />
connect the Ac power cord to the AVr’s Ac Input connector and then to a working Ac<br />
power outlet.<br />
AVr Ac<br />
Input connector<br />
Set Up the Remote Control<br />
power cord<br />
(supplied)<br />
Install the Batteries in the Remote Control<br />
Ac power<br />
outlet<br />
remove the remote control’s battery cover, insert the three supplied AAA batteries as<br />
shown in the illustration, and replace the battery cover.<br />
NOTE: remove the protective plastic from the AVr’s front panel to keep it from reducing<br />
the remote control’s effectiveness.<br />
15<br />
ENGLISH