Use of the Zeiss LSM 510 Meta
Use of the Zeiss LSM 510 Meta
Use of the Zeiss LSM 510 Meta

You also want an ePaper? Increase the reach of your titles
YUMPU automatically turns print PDFs into web optimized ePapers that Google loves.
1<br />
<strong>Use</strong> <strong>of</strong> <strong>the</strong> <strong>Zeiss</strong> <strong>LSM</strong> <strong>510</strong> <strong>Meta</strong><br />
Firstly please be aware that this microscope should be treated with respect and care at all times.<br />
Rules <strong>of</strong> use:<br />
<br />
<br />
<br />
<br />
This Microscope can only be used by Masters by Research or PhD students, Postdocs and members <strong>of</strong> staff.<br />
You must receive training from Ann Wheeler before you use this microscope..<br />
The microscope lenses must be cleaned after every usage and <strong>the</strong> equipment treated carefully at all times.<br />
If you have any problems at all with <strong>the</strong> microscope, no matter how trivial <strong>the</strong>y may seem please see Ann<br />
Wheeler, Amanda Wilson (or in an emergency Gary Warnes) immediately.<br />
REMEMBER: You have 2GB <strong>of</strong> disk space on this microscope. Check before you start if you have room for your<br />
experiment. If not delete your old data.<br />
To switch on <strong>the</strong> microscope.<br />
Switch on <strong>the</strong> Mercury arc bulb<br />
Switch on <strong>the</strong> remote control button<br />
Switch on <strong>the</strong> computer<br />
Clean <strong>the</strong> objective lens you want to use before you start work<br />
Login to <strong>the</strong> computer.<br />
Open <strong>the</strong> s<strong>of</strong>tware by hitting AIM s<strong>of</strong>tware shortcut button<br />
Choose SCAN new images and EXPERT mode from <strong>the</strong> menu.
2<br />
To take a picture:<br />
<br />
<br />
<br />
First you need to set up a folder to store your images. Go to File and select <strong>the</strong> New icon.<br />
Set <strong>the</strong> location <strong>of</strong> <strong>the</strong> database to be in <strong>the</strong> E: drive in your user area<br />
Name your image database.<br />
o Danger if you do not have a database <strong>the</strong> images you take will not be stored.<br />
1. Switch on lasers.<br />
Go to Acquire menu and Select Laser (fig 1)<br />
<strong>the</strong> laser menu will appear (fig 2)<br />
Switch on <strong>the</strong> lasers needed for your experiment<br />
Fig. 1 Acquire menu<br />
Fig. 2 Menu for turning on lasers<br />
Argon laser: switch it onto standby,<br />
wait until it has warmed up and switch on.<br />
Set output to 6.1A.<br />
Fig. 3 Menu for configuration<br />
2. Select <strong>the</strong> Configuration you need<br />
Pick Config from <strong>the</strong> acquire menu (Fig 1).<br />
Select Multitrack (Fig 3)<br />
‐ click on config button (looks like a disk)<br />
‐ go to drop down menu (Fig 4)<br />
Fig. 4 Drop down menu for multi‐tracking<br />
‐ Select <strong>the</strong> configuration you need<br />
‐ Hit Apply<br />
‐ Optional If you have custom made a configuration hit Store
3<br />
3. Set <strong>the</strong> Microscope up and find your specimen<br />
Fig 5. Microscope control menu<br />
‐ Select Micro from <strong>the</strong> Acquire menu.<br />
The microscope control menu will appear<br />
(Fig 5.)<br />
In <strong>the</strong> microscope control menu:<br />
<br />
<br />
<br />
Select <strong>the</strong> objective you want<br />
Select <strong>the</strong> different objective lens and filters<br />
using reflector (red/blue/green)<br />
Click reflected light to open <strong>the</strong> fluorescence<br />
shutter<br />
4. Start collecting confocal images –<br />
Pull slider <strong>the</strong> right hand side <strong>of</strong> <strong>the</strong> microscope fully out.<br />
Select Scan from <strong>the</strong> menu.<br />
Fig 6. Part <strong>of</strong> <strong>the</strong><br />
scan control menu<br />
The scan control menu will appear (Fig 6)<br />
‐ Pick Fast XY<br />
‐ Go to channel and adjust <strong>the</strong> following ‐<br />
zoom: 1, rotation: 0, <strong>of</strong>fset: middle<br />
‐ Select Split XY (splits <strong>the</strong> image according to wavelength)<br />
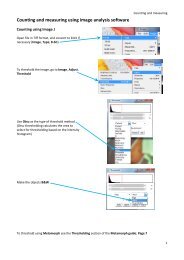
‐ On <strong>the</strong> image menu (fig 9), click palette
4<br />
‐ Select range indicator<br />
‐ The image will now go grey or Red and Blue<br />
(You want your image to be grey ideally with no red and blue)<br />
5. Align <strong>the</strong> laser light to <strong>the</strong> Photomultiplier tubes (detectors)<br />
In <strong>the</strong> Scan menu <strong>the</strong>re are two menus :<br />
Mode and Channel ‐ Select Channel (Fig 7)<br />
Fig 7. Scan control toolbar – Channels menu<br />
To align <strong>the</strong> detector go into <strong>the</strong> different channels<br />
(red/green/blue) and change <strong>the</strong> following in each to<br />
obtain good image:<br />
1) Pinhole : click on 1 to make pinhole 1 airy unit<br />
2) Detector gain: increase level until you see red, <strong>the</strong>n<br />
reduce again until red just disappears<br />
3) Offset: decrease level until you see blue, <strong>the</strong>n increase<br />
again until blue just disappears<br />
Once image in all channels is fine click STOP<br />
6. Set up <strong>the</strong> scanning parameters<br />
Now select Mode in scan toolbar and check parameters:<br />
Generally for a nice detailed picture:<br />
Fig 8. Scan control toolbar – Mode menu<br />
‐ Frame size should be 1024x1024<br />
‐ Scan speed: 7<br />
‐ Data depth should be 12 bit<br />
‐ Scan average should be 4
5<br />
7. Take <strong>the</strong> picture<br />
Click Single in <strong>the</strong> scan menu<br />
1. To get your RGB image back,<br />
‐ Click Palette in <strong>the</strong> image menu (fig 9)<br />
‐ Select No palette (to obtain colour image)<br />
‐ Close palette menu<br />
To save your image hit Save right hand side <strong>of</strong> your image<br />
‐ The image is now saved in <strong>the</strong> database you created at <strong>the</strong> beginning <strong>of</strong> your session<br />
If you want <strong>the</strong> RGB merge image go to <strong>the</strong> menu on <strong>the</strong> left hand side <strong>of</strong> your image and choose xy<br />
To convert image to tif. Go to File on <strong>the</strong> acquire menu (Fig 1).<br />
Go to Export, select tif and save in <strong>LSM</strong>4 format<br />
Choose ‘contents <strong>of</strong> image window’ from <strong>the</strong> drop down menu.<br />
Fig 9. Image menu<br />
7. To take a z stack<br />
1. Check z stack on <strong>the</strong> scan control toolbar (Fig 7 and 8)<br />
<br />
<br />
Enter your required interval for z stack<br />
Select Keep interval.<br />
<br />
<br />
<br />
<br />
<br />
Start scanning using Fast XY scan<br />
Move to <strong>the</strong> top <strong>of</strong> <strong>the</strong> z stack and click mark first<br />
Move to <strong>the</strong> bottom <strong>of</strong> <strong>the</strong> z stack and hit mark last<br />
Check scan speed in Mode menu<br />
Hit start