

ROLLER STAND - Harbor Freight Tools
ROLLER STAND - Harbor Freight Tools
ROLLER STAND - Harbor Freight Tools

Create successful ePaper yourself
Turn your PDF publications into a flip-book with our unique Google optimized e-Paper software.
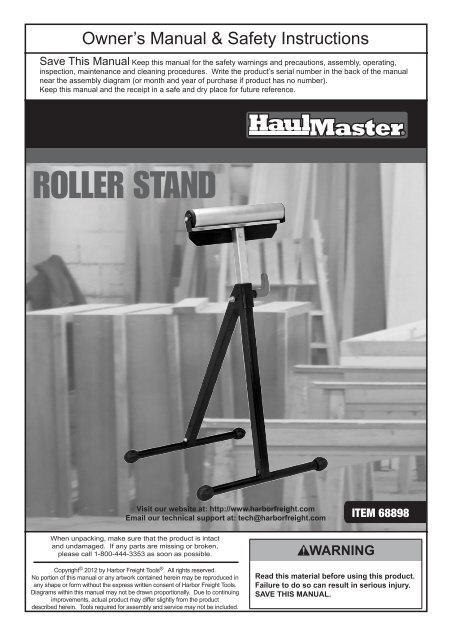
Owner’s Manual & Safety Instructions<br />
Save This Manual Keep this manual for the safety warnings and precautions, assembly, operating,<br />
inspection, maintenance and cleaning procedures. Write the product’s serial number in the back of the manual<br />
near the assembly diagram (or month and year of purchase if product has no number).<br />
Keep this manual and the receipt in a safe and dry place for future reference.<br />
<strong>ROLLER</strong> <strong>STAND</strong><br />
Visit our website at: http://www.harborfreight.com<br />
Email our technical support at: tech@harborfreight.com<br />
When unpacking, make sure that the product is intact<br />
and undamaged. If any parts are missing or broken,<br />
please call 1-800-444-3353 as soon as possible.<br />
Copyright © 2012 by <strong>Harbor</strong> <strong>Freight</strong> <strong>Tools</strong> ® . All rights reserved.<br />
No portion of this manual or any artwork contained herein may be reproduced in<br />
any shape or form without the express written consent of <strong>Harbor</strong> <strong>Freight</strong> <strong>Tools</strong>.<br />
Diagrams within this manual may not be drawn proportionally. Due to continuing<br />
improvements, actual product may differ slightly from the product<br />
described herein. <strong>Tools</strong> required for assembly and service may not be included.<br />
ITEM 68898<br />
Read this material before using this product.<br />
Failure to do so can result in serious injury.<br />
SAVE THIS MANUAL.
Specifications<br />
Adjustable Height 26-3/4" – 42-3/4"<br />
Ball Bearing Roller 11-1/4" L<br />
Important Safety Information<br />
Assembly Precautions<br />
1. Assemble only according to these<br />
instructions. Improper assembly<br />
can create hazards.<br />
2. Wear ANSI-approved safety goggles<br />
and heavy-duty work gloves<br />
during assembly.<br />
3. Keep assembly area clean and well lit.<br />
4. Keep bystanders out of the<br />
area during assembly.<br />
5. Do not assemble when tired<br />
or when under the influence<br />
of drugs or medication.<br />
6. Weight capacity and other product<br />
capabilities apply to properly and<br />
completely assembled product only.<br />
Page 2 For technical questions, please call 1-800-444-3353. Item 68898
Use Precautions<br />
1. Wear ANSI-approved safety goggles<br />
and heavy-duty work gloves during use.<br />
2. Do not exceed the Roller Stand’s<br />
maximum weight capacity of 132 lb.<br />
Be aware of dynamic loading!<br />
Sudden load movement may<br />
briefly create excess load<br />
causing product failure.<br />
3. Use the Roller Stand on a flat,<br />
level surface capable of supporting<br />
the weight of the Stand and the<br />
weight of the workpiece.<br />
4. Do not wear loose clothing or<br />
jewelry as they can be caught in<br />
moving parts. Protective, electrically<br />
non-conductive clothes and non-skid<br />
footwear are recommended when<br />
working. Wear restrictive hair<br />
covering to contain long hair.<br />
Item 68898<br />
5. This product is not a toy. Do not allow<br />
children to play with or near this item.<br />
6. Use as intended only. Do<br />
not use the Roller Stand to<br />
support people or animals.<br />
7. Inspect before every use; do not use<br />
if parts are loose or damaged.<br />
8. Maintain product labels and<br />
nameplates. These carry important<br />
safety information. If unreadable<br />
or missing, contact <strong>Harbor</strong> <strong>Freight</strong><br />
<strong>Tools</strong> for a replacement.<br />
9. The warnings, cautions, and instructions<br />
discussed in this instruction manual<br />
cannot cover all possible conditions<br />
and situations that may occur. It must<br />
be understood by the operator that<br />
common sense and caution are factors<br />
which cannot be built into this product,<br />
but must be supplied by the operator.<br />
For technical questions, please call 1-800-444-3353.<br />
Page 3
Assembly Instructions<br />
1. Insert a Barrel Nut (12) into the hole at<br />
the bottom of each Leg with the hole in<br />
Barrel Nut facing down. See Figure A.<br />
Base<br />
Bar (2)<br />
Figure A<br />
Barrel<br />
Nut (12)<br />
Leg<br />
(1a/1b)<br />
Small<br />
Screw (7)<br />
2. Place the Base Bar (hole facing up)<br />
onto the Leg (1a, 1b). Insert the<br />
Small Screw (7) through the hole<br />
in the Leg so that it fastens to the<br />
Barrel Nut, locking the Base Bar (2)<br />
to the Leg. See Figure B below.<br />
Figure B<br />
Legs (1a, 1b)<br />
Base Bars (2)<br />
3. Fasten the two Legs (1a & 1b) together:<br />
a. Lean the Long Leg (1a) against the<br />
Short Leg (1b) (bracket end up).<br />
b. Put a Large Screw (6) through<br />
a Large Washer (8) and insert<br />
through one side of the frame, both<br />
holes at the top of the Long Leg<br />
and the other hole on the frame.<br />
c. Fasten with another Large<br />
Washer (8) and a Large Nut (10).<br />
4. Slide the Extendable Arm (5) into<br />
the top opening of the short Leg (1b)<br />
with its holes at the top and facing<br />
the front and back of the stand. If the<br />
holes face the sides of the stand,<br />
the Extendable Arm cannot lock<br />
in place. See Figure C below.<br />
Roller<br />
Head (4)<br />
Extendable<br />
Arm (5)<br />
Figure C<br />
Lock<br />
Handle (3)<br />
Small<br />
Screw and<br />
Washer<br />
(7, 9)<br />
5. Fasten the Lock Handle (3) to the frame<br />
at the top of the Short Leg (1b).<br />
See Figure C.<br />
6. Extend the Long Leg (1a) from<br />
the Stand so that it is level with<br />
the other Leg (1b), making the<br />
Roller Stand balanced.<br />
7. Slide a Small Screw (7) through a Small<br />
Washer (9) and use them to fasten<br />
the Roller Head (4) to the top of the<br />
Extendable Arm. Tighten with a Small<br />
Nut (11). Make sure the Screw<br />
fits all the way through the Arm<br />
and that the Roller Head (4) is<br />
fastened tightly. See Figure C.<br />
Page 4 For technical questions, please call 1-800-444-3353. Item 68898
Operation<br />
1. Before use, be sure the Roller Stand is situated on a flat, level surface, capable<br />
of supporting the weight of the Stand plus the weight of your work piece.<br />
2. You can adjust the height of your Roller Stand from 26-3/4” to 42-3/4” H. To do so,<br />
loosen the Lock Handle (3). Raise or lower the Extension Arm (5) to the desired height.<br />
3. Tighten the Lock Handle (3) again. Tighten the Handle fully before using the Stand.<br />
4. Place the Roller Stand in the desired location in the work area. Make sure<br />
the Stand is set at the appropriate height for the task at hand. Also, always<br />
ensure that the workpiece supported by the Stand is stable and level.<br />
Maintenance<br />
1. Periodically check Roller Head (4) and all hardware for tightness.<br />
2. Periodically clean the Roller Stand with warm water and a soft cloth.<br />
Item 68898<br />
For technical questions, please call 1-800-444-3353.<br />
Page 5
Parts List<br />
Part Description Qty<br />
1a Long Leg 1<br />
1b Short Leg 1<br />
2 Base Bar 2<br />
3 Lock Handle 1<br />
4 Roller Head 1<br />
5 Extendable Arm 1<br />
6 Large Screw 1<br />
7 Small Screw 2<br />
8 Large Washer 2<br />
9 Small Washer 2<br />
10 Large Nut 1<br />
11 Small Nut 2<br />
12 Barrel Nut 2<br />
Page 6 For technical questions, please call 1-800-444-3353. Item 68898<br />
1a<br />
3<br />
1b<br />
6 7 8 9<br />
2<br />
10 11 12<br />
4<br />
5
PLEASE READ THE FOLLOWING CAREFULLY<br />
THE MANUFACTURER AND/OR DISTRIBUTOR HAS PROVIDED THE PARTS LIST AND ASSEMBLY<br />
DIAGRAM IN THIS DOCUMENT AS A REFERENCE TOOL ONLY. NEITHER THE MANUFACTURER<br />
OR DISTRIBUTOR MAKES ANY REPRESENTATION OR WARRANTY OF ANY KIND TO THE<br />
BUYER THAT HE OR SHE IS QUALIFIED TO MAKE ANY REPAIRS TO THE PRODUCT, OR<br />
THAT HE OR SHE IS QUALIFIED TO REPLACE ANY PARTS OF THE PRODUCT. IN FACT, THE<br />
MANUFACTURER AND/OR DISTRIBUTOR EXPRESSLY STATES THAT ALL REPAIRS AND PARTS<br />
REPLACEMENTS SHOULD BE UNDERTAKEN BY CERTIFIED AND LICENSED TECHNICIANS,<br />
AND NOT BY THE BUYER. THE BUYER ASSUMES ALL RISK AND LIABILITY ARISING OUT OF<br />
HIS OR HER REPAIRS TO THE ORIGINAL PRODUCT OR REPLACEMENT PARTS THERETO,<br />
OR ARISING OUT OF HIS OR HER INSTALLATION OF REPLACEMENT PARTS THERETO.<br />
Record Serial Number Here:<br />
Note: If product has no serial number, record month and year of purchase instead.<br />
Note: Some parts are listed and shown for illustration purposes only,<br />
and are not available individually as replacement parts.<br />
Item 68898<br />
For technical questions, please call 1-800-444-3353.<br />
Page 7
Limited 90 Day Warranty<br />
<strong>Harbor</strong> <strong>Freight</strong> <strong>Tools</strong> Co. makes every effort to assure that its products meet high quality<br />
and durability standards, and warrants to the original purchaser that this product is free from<br />
defects in materials and workmanship for the period of 90 days from the date of purchase.<br />
This warranty does not apply to damage due directly or indirectly, to misuse, abuse, negligence<br />
or accidents, repairs or alterations outside our facilities, criminal activity, improper installation,<br />
normal wear and tear, or to lack of maintenance. We shall in no event be liable for death,<br />
injuries to persons or property, or for incidental, contingent, special or consequential damages<br />
arising from the use of our product. Some states do not allow the exclusion or limitation of<br />
incidental or consequential damages, so the above limitation of exclusion may not apply to you.<br />
THIS WARRANTY IS EXPRESSLY IN LIEU OF ALL OTHER WARRANTIES, EXPRESS OR<br />
IMPLIED, INCLUDING THE WARRANTIES OF MERCHANTABILITY AND FITNESS.<br />
To take advantage of this warranty, the product or part must be returned to us with transportation<br />
charges prepaid. Proof of purchase date and an explanation of the complaint must accompany<br />
the merchandise. If our inspection verifies the defect, we will either repair or replace<br />
the product at our election or we may elect to refund the purchase price if we cannot readily<br />
and quickly provide you with a replacement. We will return repaired products at our expense,<br />
but if we determine there is no defect, or that the defect resulted from causes not within<br />
the scope of our warranty, then you must bear the cost of returning the product.<br />
This warranty gives you specific legal rights and you may also<br />
have other rights which vary from state to state.<br />
3491 Mission Oaks Blvd. • PO Box 6009 • Camarillo, CA 93011 • (800) 444-3353


