Evaluation Kit 5 USER MANUAL - Wavecor
Evaluation Kit 5 USER MANUAL - Wavecor
Evaluation Kit 5 USER MANUAL - Wavecor

You also want an ePaper? Increase the reach of your titles
YUMPU automatically turns print PDFs into web optimized ePapers that Google loves.
<strong>USER</strong> <strong>MANUAL</strong><br />
<strong>Evaluation</strong> <strong>Kit</strong> 5<br />
Copyright © 2008 by <strong>Wavecor</strong> Ltd., GuangZhou, China. All rights reserved.<br />
<strong>Wavecor</strong> ® is a registered trademark of <strong>Wavecor</strong> Ltd.<br />
Page
<strong>USER</strong> <strong>MANUAL</strong><br />
<strong>Evaluation</strong> <strong>Kit</strong> 5<br />
Congratulations with your purchase.<br />
The speaker kit you have purchased is not only designed to give you years of high quality<br />
sound. It is also designed as a product that will keep you updated at all times as the loudspeaker<br />
technology continues to develop and as <strong>Wavecor</strong> over time produces new and exiting speaker<br />
units. Due to the flexible design of this <strong>Evaluation</strong> <strong>Kit</strong>, it is possible to replace the baffle easily<br />
and thereby allowing for using other <strong>Wavecor</strong> drive units when available/required.<br />
The kit is designed in a way so anybody is able to put it together. The only tools required are a<br />
soldering iron and a screw driver.<br />
Once put together this kit will take you well into the world of high-end audiophile listening.<br />
Happy listening!<br />
<strong>Wavecor</strong><br />
Index<br />
•<br />
•<br />
•<br />
•<br />
Package content<br />
Putting the parts together<br />
Getting the best out of your <strong>Wavecor</strong> kit<br />
Setting up<br />
- Height over the floor<br />
- Distance to rear wall<br />
- Distance to side walls<br />
- Distance to room corners<br />
- Listening angle<br />
- Other room considerations<br />
Copyright © 2008 by <strong>Wavecor</strong> Ltd., GuangZhou, China. All rights reserved.<br />
<strong>Wavecor</strong> ® is a registered trademark of <strong>Wavecor</strong> Ltd.<br />
Page
<strong>USER</strong> <strong>MANUAL</strong><br />
<strong>Evaluation</strong> <strong>Kit</strong> 5<br />
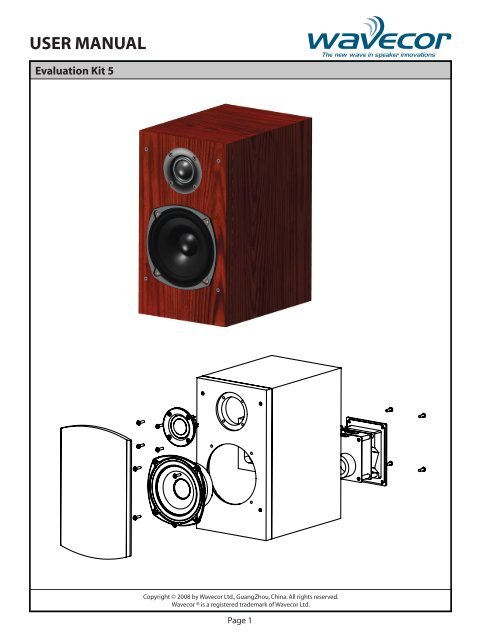
Package content<br />
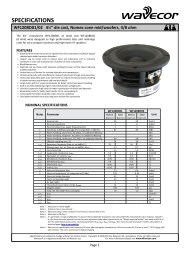
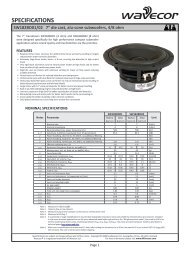
If you have purchased your <strong>Wavecor</strong> <strong>Evaluation</strong> <strong>Kit</strong> 5 as a complete kit, the package should contain the following<br />
parts:<br />
1 piece main cabinet (sides/top/bottom/back panels assembled) including white cabinet stuffing and<br />
port tube<br />
1 piece mid/woofer model WF138WA02 with gasket for cabinet sealing<br />
1 piece tweeter model TW030WA01 with gasket for cabinet sealing<br />
1 piece separate cabinet baffle with gasket, including the following screws<br />
4 pcs M4 for mounting the tweeter<br />
4 pcs M4 for mounting the woofer<br />
1 piece crossover/terminal cup assembly with gasket for cabinet sealing and 4 wires for connecting the<br />
drive units, including 4 pieces wood screws<br />
1 piece front grille with grille cloth<br />
Putting the parts together<br />
Assembly instructions.<br />
CAUTION! Always work with the cabinet on a soft, clean surface to avoid scratches.<br />
Be careful not to over-tighten any of the screws during assembling.<br />
STEP 1<br />
Mount the crossover/terminal cup assembly in the rear cut-out hole. Attach it with the 4 wood screws and make<br />
sure the four wires are pulled through the white stuffing inside the cabinet all the way through to where the drive<br />
units will be located.<br />
STEP 2<br />
Solder the wires to the woofer terminals (the wide terminal is the positive) and then attach the woofer using the<br />
four M4 screws.<br />
STEP 4<br />
Solder the wires to the tweeter terminals (the wide terminal is the positive) and then attach the tweeter using the<br />
four remaining M4 screws.<br />
DONE!<br />
Copyright © 2008 by <strong>Wavecor</strong> Ltd., GuangZhou, China. All rights reserved.<br />
<strong>Wavecor</strong> ® is a registered trademark of <strong>Wavecor</strong> Ltd.<br />
Page
<strong>USER</strong> <strong>MANUAL</strong><br />
<strong>Evaluation</strong> <strong>Kit</strong> 5<br />
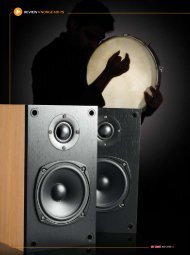
Getting the best out of your <strong>Wavecor</strong> <strong>Kit</strong><br />
<strong>Wavecor</strong> <strong>Evaluation</strong> <strong>Kit</strong>s are designed to be 100% true to the input signal without any coloration or distortion:<br />
What goes in also comes out.<br />
The kits are intended to give the most accurate picture of what <strong>Wavecor</strong> speakers are all about: Details, dynamics,<br />
low distortion: Full of life, atmosphere, and reality.<br />
<strong>Wavecor</strong> speaker kits will work with any audio system but the true qualities are only exposed if connected to a<br />
real high-end audio system.<br />
<strong>Evaluation</strong> <strong>Kit</strong> 5 is a 4 ohm speaker but not a very difficult load for the amplifier. It can handle significant amounts<br />
of power but will also shine with relative small power amplifiers of high quality.<br />
<strong>Evaluation</strong> <strong>Kit</strong> 5 is prepared for bi-wiring, which we recommend.<br />
For critical listening we recommend leaving off the front grille. The front grille is designed for minimal influence<br />
on the sound and with as open grille cloth as possible. However, the front grille and the cloth do attenuate the<br />
treble level around 1dB at 20kHz and the grille does cause limited midrange reflections.<br />
Please read below about positioning of the speakers as this is an important part of obtaining the best possible<br />
sound.<br />
Setting up<br />
Height over the floor<br />
The <strong>Wavecor</strong> <strong>Evaluation</strong> <strong>Kit</strong> 5 is designed to be positioned on stable, good quality speaker stands that ensure a<br />
correct height for optimal listening. The correct height is obtained when the tweeter is roughly at same height<br />
over the floor as the listener’s ears.<br />
Distance to rear wall<br />
The <strong>Evaluation</strong> <strong>Kit</strong> 5 features a rear firing port to minimize the audible effect of any port resonances or midrange<br />
sound waves from inside the cabinet.<br />
In order for the rear port to function properly it is recommended that the speaker be placed at least 30cm (1 ft.)<br />
from the rear wall. See also fig. 1 below.<br />
The speaker may be moved further away from the rear wall depending on the specific room and on the listener’s<br />
preferences. Generally, the bass will vary with the distance to the wall in a way so the bass level is reduced when<br />
the speaker is moved further away from the wall.<br />
Distance to side walls<br />
The side walls will reflect the sound at certain frequencies and may in some cases reduce the accuracy of the stereo<br />
image of the speakers. It is recommended to keep some distance (“D” in fig. 1) to the side walls and experiment<br />
until the best speaker position is found.<br />
Like the rear wall, approaching the speakers to the side walls may also increase the bass level.<br />
Distance to room corners<br />
Placing the speakers close to the corners of the room will boost the bass - in some cases considerably.<br />
Again, it is recommended to experiment with different distances and positions as this may change the low<br />
frequency response of the speaker. Do not stop until you have exactly the bass response that you prefer.<br />
Copyright © 2008 by <strong>Wavecor</strong> Ltd., GuangZhou, China. All rights reserved.<br />
<strong>Wavecor</strong> ® is a registered trademark of <strong>Wavecor</strong> Ltd.<br />
Page
<strong>USER</strong> <strong>MANUAL</strong><br />
<strong>Evaluation</strong> <strong>Kit</strong> 5<br />
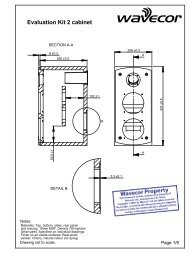
Minimum 30cm (1 ft.)<br />
D<br />
Left speaker<br />
Right speaker<br />
D<br />
90 deg.<br />
90 deg.<br />
15 deg.<br />
15 deg.<br />
Listening position<br />
Fig. 1. Theoretical ideal position and angles for setting up <strong>Evaluation</strong> <strong>Kit</strong> 5.<br />
Listening angle<br />
<strong>Evaluation</strong> <strong>Kit</strong> 5 is designed to be toed slightly outwards compared to the listener. If angled outwards around 15<br />
degrees, a completely flat anechoic frequency response is obtained. See fig. 1.<br />
See also the black frequency response curve in fig. 4.<br />
It is recommended to experiment with the angle in order to obtain the best possible sound in the actual setup.<br />
Not only does the room influence how the speakers sound, but all the other components in the audio system<br />
will make a difference on the sound. As an example, if a very bright amplifier is used, it might be a good idea to<br />
increase the speaker angle to more than 15 degrees.<br />
Copyright © 2008 by <strong>Wavecor</strong> Ltd., GuangZhou, China. All rights reserved.<br />
<strong>Wavecor</strong> ® is a registered trademark of <strong>Wavecor</strong> Ltd.<br />
Page
<strong>USER</strong> <strong>MANUAL</strong><br />
<strong>Evaluation</strong> <strong>Kit</strong> 5<br />
Left speaker<br />
Right speaker<br />
90 deg. 90 deg.<br />
Listening position<br />
Fig. 2. Pointing the speakers directly towards the listener for increased treble<br />
level (more “air”). Shown as the blue curve in fig. 4.<br />
Copyright © 2008 by <strong>Wavecor</strong> Ltd., GuangZhou, China. All rights reserved.<br />
<strong>Wavecor</strong> ® is a registered trademark of <strong>Wavecor</strong> Ltd.<br />
Page
<strong>USER</strong> <strong>MANUAL</strong><br />
<strong>Evaluation</strong> <strong>Kit</strong> 5<br />
Left speaker<br />
Right speaker<br />
90 deg.<br />
90 deg.<br />
Larger angle<br />
than 15 deg.<br />
Larger angle<br />
than 15 deg.<br />
Listening position<br />
Fig. 3. Pointing the speakers further away from the listener, meaning angles<br />
larger than 15 degrees. This yields attenuated treble response at the listening<br />
position - larger angle means more treble attenuation.<br />
Copyright © 2008 by <strong>Wavecor</strong> Ltd., GuangZhou, China. All rights reserved.<br />
<strong>Wavecor</strong> ® is a registered trademark of <strong>Wavecor</strong> Ltd.<br />
Page
<strong>USER</strong> <strong>MANUAL</strong><br />
<strong>Evaluation</strong> <strong>Kit</strong> 5<br />
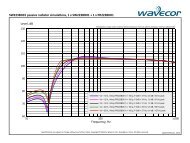
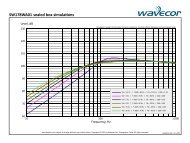
SPL, dB<br />
Principal frequency response curve as a function of listening angle<br />
20 Hz 50 100 200 500 1K 2K 5K 10K 20K 40K<br />
: Speakers angled 15 deg. away from listener (recommended)<br />
: Speakers angled directly towards listener<br />
: Speakers angled more than 15 deg. away from listener. Darker red is larger angle.<br />
Frequency, Hz<br />
Fig. 4. Treble attenuation for speaker turned to different angles - in principle.<br />
Copyright © 2008 by <strong>Wavecor</strong> Ltd., GuangZhou, China. All rights reserved.<br />
<strong>Wavecor</strong> ® is a registered trademark of <strong>Wavecor</strong> Ltd.<br />
Page