AC Advantage Basic Meter Instructions - Accu-Chek
AC Advantage Basic Meter Instructions - Accu-Chek
AC Advantage Basic Meter Instructions - Accu-Chek

Create successful ePaper yourself
Turn your PDF publications into a flip-book with our unique Google optimized e-Paper software.
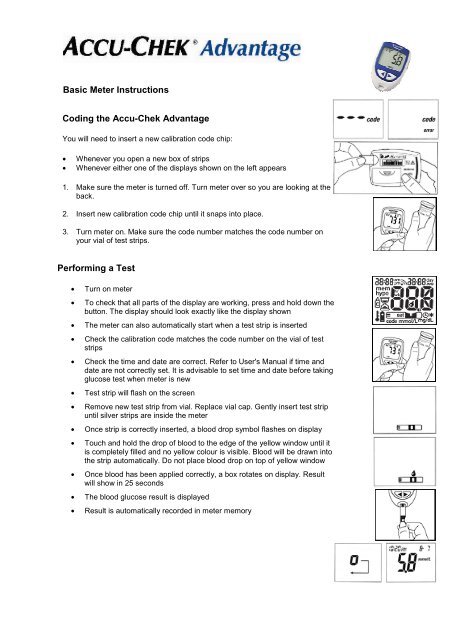
<strong>Basic</strong> <strong>Meter</strong> <strong>Instructions</strong><br />
Coding the <strong>Accu</strong>-<strong>Chek</strong> <strong>Advantage</strong><br />
You will need to insert a new calibration code chip:<br />
• Whenever you open a new box of strips<br />
• Whenever either one of the displays shown on the left appears<br />
1. Make sure the meter is turned off. Turn meter over so you are looking at the<br />
back.<br />
2. Insert new calibration code chip until it snaps into place.<br />
3. Turn meter on. Make sure the code number matches the code number on<br />
your vial of test strips.<br />
Performing a Test<br />
• Turn on meter<br />
• To check that all parts of the display are working, press and hold down the<br />
button. The display should look exactly like the display shown<br />
• The meter can also automatically start when a test strip is inserted<br />
• Check the calibration code matches the code number on the vial of test<br />
strips<br />
• Check the time and date are correct. Refer to User's Manual if time and<br />
date are not correctly set. It is advisable to set time and date before taking<br />
glucose test when meter is new<br />
• Test strip will flash on the screen<br />
• Remove new test strip from vial. Replace vial cap. Gently insert test strip<br />
until silver strips are inside the meter<br />
• Once strip is correctly inserted, a blood drop symbol flashes on display<br />
• Touch and hold the drop of blood to the edge of the yellow window until it<br />
is completely filled and no yellow colour is visible. Blood will be drawn into<br />
the strip automatically. Do not place blood drop on top of yellow window<br />
• Once blood has been applied correctly, a box rotates on display. Result<br />
will show in 25 seconds<br />
• The blood glucose result is displayed<br />
• Result is automatically recorded in meter memory
Changing the batteries<br />
Battery power is saved by automatically turning off after 5 minutes of nonuse.<br />
If the meter does automatically shut off, any tests in memory are<br />
saved.<br />
Note: Time and date will need to be reset when the batteries are replaced.<br />
1. Slide battery cover from back of meter.<br />
2. Insert the two 1.5 volt AAA batteries one at a time.<br />
3. Slide battery cover back in place. Wait 5 seconds, then turn meter<br />
ON.<br />
Note: Temperature symbol will appear when batteries are first inserted. This<br />
is normal and disappears after 30 seconds.<br />
Cleaning the meter<br />
• You can clean the outside of the meter with a slightly dampened, soft cloth<br />
• Do not get moisture into the calibration code chip slot or the test strip slot<br />
“For people with diabetes. Use only as directed and see your healthcare professional for medical advice.”<br />
<strong>Accu</strong>-<strong>Chek</strong> Integra is a trademark of Roche. © 2008 Roche Diagnostics<br />
Roche Diagnostics Australia Pty. Ltd<br />
ABN 29 003 001 205<br />
<strong>Accu</strong>-<strong>Chek</strong> Enquiry Line 1800 251 816<br />
www.accu-chek.com.au