fine tuning your compound bow - Martin Archery
fine tuning your compound bow - Martin Archery
fine tuning your compound bow - Martin Archery

You also want an ePaper? Increase the reach of your titles
YUMPU automatically turns print PDFs into web optimized ePapers that Google loves.
BASIC SETUP<br />
Your new <strong>Martin</strong> <strong>bow</strong> takes little setup to get started shooting. Please read<br />
and familiarize <strong>your</strong>self with these starting procedures before shooting. Many<br />
of these procedures will have been completed by <strong>your</strong> authorized <strong>Martin</strong> dealer.<br />
After completing these simple steps, you will be more accurate and will have<br />
greater success from the start. A careful and thorough initial setup will make<br />
the <strong>tuning</strong> process much easier.<br />
CABLE GUARD INSTALLATION<br />
All <strong>Martin</strong> <strong>compound</strong> <strong>bow</strong> models* feature smooth<br />
bore holes in the riser that allow direct, bracket-free<br />
installation of the cable guard rod. There are set screws<br />
within the riser that will secure the rod.<br />
The cable guard rod should be rotated toward the grip to<br />
provide adequate fletching clearance. Caution should be<br />
taken against over-rotating the rod as excessive clearance<br />
can cause unnecessary pressures on the limb tips and axle<br />
bushings. Only 9/16” offset is necessary to provide<br />
adequate fletching clearance.<br />
Though most <strong>bow</strong> models allow either an upper (above<br />
the arrow rest) or lower (below the grip) mounting, <strong>Martin</strong><br />
<strong>Archery</strong> recommends the upper mounting position on all<br />
Fuzion single cam models.<br />
*As of this writing, the Scepter II and Rage models did<br />
not allow the direct installation of a cable guard rod. A<br />
mounting bracket is supplied with these models that threads<br />
into the threaded holes provided in the back of the riser.<br />
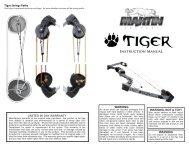
SETTING DRAW LENGTH<br />
Z Cams and Mini Z Cams<br />
The Z Cam uses draw length modules to adjust the<br />
draw length. The size of each module is designated by a<br />
number followed by an 'X'. These modules are sized from<br />
2X to 9X. The 9X makes the longest draw and the length<br />
decreases one inch for each number. To change the draw<br />
length on these cams, simply remove the two screws<br />
holding the module to the cam. Take a look at the module<br />
number and select a new module that will give you the<br />
correct draw length. Install the new modules, making sure<br />
that the numbers on each module match.<br />
NOTE: Do not draw <strong>your</strong> <strong>bow</strong> without the modules installed.<br />
It will cause damage to <strong>your</strong> harness system.<br />
Cable<br />
Guard<br />
6