Windows Movie Maker: Transitions and Video Effects
Windows Movie Maker: Transitions and Video Effects
Windows Movie Maker: Transitions and Video Effects

You also want an ePaper? Increase the reach of your titles
YUMPU automatically turns print PDFs into web optimized ePapers that Google loves.
<strong>Windows</strong> <strong>Movie</strong> <strong>Maker</strong>: Capture <strong>Video</strong> from a Camcorder<br />
<strong>Video</strong> that has been recorded on a camcorder must be captured into a video editing program. <strong>Video</strong> taping<br />
cannot be imported into a computer like images. <strong>Video</strong> can be captured by hooking the camcorder into the computer or<br />
by hooking a capture device into the computer. This h<strong>and</strong>out will cover how to hook the camera into the computer.<br />
1. Camcorders need to be installed before use, please submit a help desk issue requesting the<br />
camcorder be installed. Be sure to provide the name of the computer you want to use the<br />
camcorder on. Please note that some of the older camcorders will require a capture device as<br />
they are not USB capable.<br />
2. Hook the camcorder up to the computer’s USB port<br />
3. Turn the camcorder on <strong>and</strong> change the mode to VCR or Play/Edit<br />
4. If the camcorder has a touch screen, click stream on the LCD screen. If the camcorder does not<br />
have a touch screen, the camcorder will automatically go to streaming mode.<br />
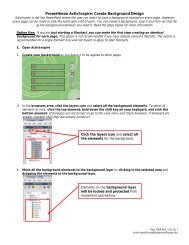
5. Open <strong>Windows</strong> <strong>Movie</strong> <strong>Maker</strong>, which can be found under start, then programs, then in the<br />
multimedia menu.<br />
6. Click on the “capture from video device” in the left menu<br />
7. Set the audio device to USB audio device<br />
April 2009 Rev. 1 BL Pg 1<br />
<strong>Windows</strong><strong>Movie</strong><strong>Maker</strong>Capture<strong>Video</strong>Camcorder.doc
8. Enter an appropriate title for the captured video segment <strong>and</strong> save the file to an appropriate<br />
location. To change the saving location click the browse button <strong>and</strong> navigate to the<br />
location the file should be saved to. It is recommended to save the file to a C: drive location, like the<br />
desktop, <strong>and</strong> then copy it to a network location once the capture is completed. Once you have named<br />
the captured segment <strong>and</strong> have chosen a save location, click the next button.<br />
9. It is recommended to set the radio button to best quality unless you are using the end project for<br />
web integration or something similar. Contact the Help Desk if you need assistance deciding the<br />
appropriate setting. Please keep in mind that the better the captured video quality, the larger the file<br />
size. If you are capturing hours of video, you will not be able to fit the large files in your network<br />
space. Once you have selected your quality setting, click the next button.<br />
April 2009 Rev. 1 BL Pg 2<br />
<strong>Windows</strong><strong>Movie</strong><strong>Maker</strong>Capture<strong>Video</strong>Camcorder.doc
10. Click play on the camcorder <strong>and</strong> fast-forward the movie to the area you want to begin your<br />
capture. Once you have the video in the correct location, click the start capture button. You will<br />
see the video playing in the preview window. Once you have captured the desired segment, click the<br />
stop capture button. You may start <strong>and</strong> stop capture as many times as you desire. Please<br />
note that stopping the capture will not create a different clip in <strong>Movie</strong> <strong>Maker</strong>, but will continue to add<br />
to the main captured video segment. All video captured will become one clip that the user must splice<br />
later if desired. Once you have captured all video segments needed, click the finish button.<br />
You can see the amount of<br />
video captured in both<br />
seconds <strong>and</strong> in file size.<br />
11. Once you click finish the video segment will appear in your collections. To view all your<br />
captured videos, click the collections icon on the top of the screen.<br />
April 2009 Rev. 1 BL Pg 3<br />
<strong>Windows</strong><strong>Movie</strong><strong>Maker</strong>Capture<strong>Video</strong>Camcorder.doc
You have a few options for getting multiple movie clips imported.<br />
Option one: use the start <strong>and</strong> stop capture buttons to capture all the desired clips in one large<br />
video file. Begin playing the imported video clip by clicking on the clip <strong>and</strong> then clicking the play button<br />
on the preview window. Once the video reaches a point that should be another video segment, click the split<br />
into two clips icon <strong>and</strong> the video will be split at the point you click the button. Following this<br />
method, you will end up with multiple clips in one collection.<br />
Option two: go through the whole capture process for every segment you desire. For example: I<br />
have a video of a Spring concert, a classroom play <strong>and</strong> students reading a poem. I need small portions of the<br />
Spring concert <strong>and</strong> the students reading a poem. I will get the tape to the portion of the Spring concert I need<br />
<strong>and</strong> use the stop capture <strong>and</strong> finish buttons. Then I will fast forward the tape to the students reading a<br />
poem <strong>and</strong> start a new capture. Following this option, you will end up with multiple videos in the<br />
collections area.<br />
April 2009 Rev. 1 BL Pg 4<br />
<strong>Windows</strong><strong>Movie</strong><strong>Maker</strong>Capture<strong>Video</strong>Camcorder.doc