Kitty Quillow ( PDF ) - McCalls Quilting
Kitty Quillow ( PDF ) - McCalls Quilting
Kitty Quillow ( PDF ) - McCalls Quilting

You also want an ePaper? Increase the reach of your titles
YUMPU automatically turns print PDFs into web optimized ePapers that Google loves.
compliments of<br />
www.quickquilts.com<br />
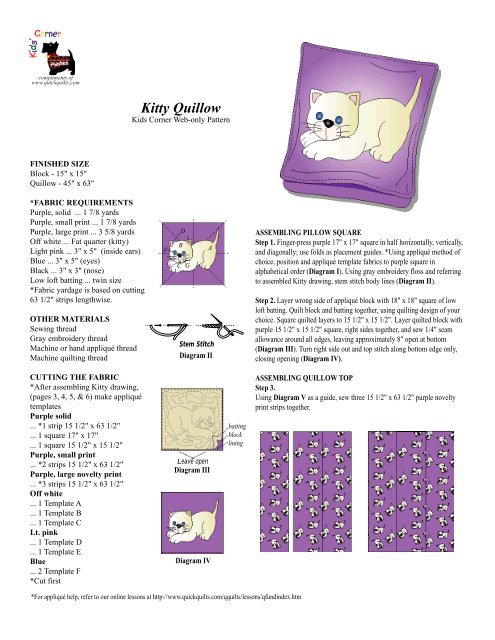
<strong>Kitty</strong> <strong>Quillow</strong><br />
Kids Corner Web-only Pattern<br />
FINISHED SIZE<br />
Block - 15" x 15"<br />
<strong>Quillow</strong> - 45" x 63"<br />
*FABRIC REQUIREMENTS<br />
Purple, solid ... 1 7/8 yards<br />
Purple, small print ... 1 7/8 yards<br />
Purple, large print ... 3 5/8 yards<br />
Off white ... Fat quarter (kitty)<br />
Light pink ... 3" x 5" (inside ears)<br />
Blue ... 3" x 5" (eyes)<br />
Black ... 3" x 3" (nose)<br />
Low loft batting ... twin size<br />
*Fabric yardage is based on cutting<br />
63 1/2" strips lengthwise.<br />
OTHER MATERIALS<br />
Sewing thread<br />
Gray embroidery thread<br />
Machine or hand appliqué thread<br />
Machine quilting thread<br />
F<br />
D<br />
B<br />
C<br />
G<br />
A<br />
Stem Stitch<br />
Diagram II<br />
ASSEMBLING PILLOW SQUARE<br />
Step 1. Finger-press purple 17" x 17" square in half horizontally, vertically,<br />
and diagonally; use folds as placement guides. *Using appliqué method of<br />
choice, position and appliqué template fabrics to purple square in<br />
alphabetical order (Diagram I). Using gray embroidery floss and referring<br />
to assembled <strong>Kitty</strong> drawing, stem stitch body lines (Diagram II).<br />
Step 2. Layer wrong side of appliqué block with 18" x 18" square of low<br />
loft batting. Quilt block and batting together, using quilting design of your<br />
choice. Square quilted layers to 15 1/2" x 15 1/2". Layer quilted block with<br />
purple 15 1/2" x 15 1/2" square, right sides together, and sew 1/4" seam<br />
allowance around all edges, leaving approximately 8" open at bottom<br />
(Diagram III). Turn right side out and top stitch along bottom edge only,<br />
closing opening (Diagram IV).<br />
CUTTING THE FABRIC<br />
*After assembling <strong>Kitty</strong> drawing,<br />
(pages 3, 4, 5, & 6) make appliqué<br />
templates<br />
Purple solid<br />
... *1 strip 15 1/2" x 63 1/2"<br />
... 1 square 17" x 17"<br />
... 1 square 15 1/2" x 15 1/2"<br />
Purple, small print<br />
... *2 strips 15 1/2" x 63 1/2"<br />
Purple, large novelty print<br />
... *3 strips 15 1/2" x 63 1/2"<br />
Off white<br />
... 1 Template A<br />
... 1 Template B<br />
... 1 Template C<br />
Lt. pink<br />
... 1 Template D<br />
... 1 Template E<br />
Blue<br />
... 2 Template F<br />
*Cut first<br />
Leave open<br />
Diagram III<br />
Diagram IV<br />
batting<br />
block<br />
lining<br />
ASSEMBLING QUILLOW TOP<br />
Step 3.<br />
Using Diagram V as a guide, sew three 15 1/2" x 63 1/2" purple novelty<br />
print strips together.<br />
*For appliqué help, refer to our online lessons at http://www.quickquilts.com/qquilts/lessons/qfundindex.htm
FINISHING QUILLOW<br />
Step 4. Using Diagram VI as a guide, sew two 15 1/2" x 63 1/2" purple<br />
small print strips to a 15 1/2" x 63 1/2" solid purple strip to make quillow<br />
lining.<br />
Step 5. Layer top and lining, right sides together, on flat surface. Spread<br />
low loft batting on top, making three layers. Pin layers together and<br />
carefully turn layers over. Trim batting to fit quillow top and lining. Using<br />
an even-feed presser foot, machine stitch a 1/4" seam through all the layers,<br />
leaving a 10" opening along the bottom for turning the quillow inside out.<br />
After turning quillow, blind stitch opening to close. Machine quilt or "tie"<br />
layers together.<br />
Step 6. Referring to Diagram VII, center the finished pillow, appliqué side<br />
down, along top edge of the lining side of the quilted layers. Backstitching<br />
at the beginning and end of seam, top stitch 1/8" seam along sides and top<br />
of pillow. Leave bottom of finished pillow open to form pocket.<br />
Diagram VI<br />
FOLDING QUILLOW<br />
Step 7. Lay quillow on a flat surface, pillow side down. Fold the quilt into<br />
thirds vertically (Diagram VIII).<br />
Step 8. Reach under the folded quilt and grab the bottom edge of the<br />
pillow, pulling up and over until it has been turned inside out. The top<br />
edges of the quilt should now be inside of the pillow pocket and the<br />
appliqué side of pillow is on top (Diagram IX)<br />
Step 9. Fold the quillow into thirds lengthwise (Diagram X). Referring to<br />
Diagram XI, stuff folded quillow into pillow pocket. Hand-smooth<br />
unwanted folds and lumps.<br />
Begin<br />
top<br />
stitch<br />
Leave<br />
bottom<br />
open<br />
End<br />
top<br />
stitch<br />
Diagram VII<br />
Fold<br />
pillow<br />
up<br />
and<br />
over<br />
First fold<br />
Second fold<br />
Diagram VIII<br />
Diagram IX Diagram X Diagram XI<br />
Due to variations in materials and equipment, quickquilts.com disclaims any liability of untoward results in doing the project presented. Because quickquilts.com has no<br />
control over your choice of materials or procedures quickquilts.com assumes no responsibility for the use of this data. Groups or individuals wishing to use this pattern<br />
to make quilts for humanitarian-related efforts are welcome to copy and distribute it to participating quilters. Please include our web site address, www.quickquilts.com,<br />
on any patterns distributed. No part of this site may be reproduced for commercial use in any form. © Copyright 2002 PRIMEDIA Enthusiast Group, Inc. All rights<br />
reserved.
Section 1<br />
D<br />
B<br />
E<br />
Align left edge of Section 2 with broken line ... tape sections together<br />
F
Section 2<br />
Appliqué <strong>Kitty</strong> Pattern<br />
For 15" Block<br />
compliments of www.quickquilts.com<br />
A
Align bottom edge of Sections 1-2 with broken line --- tape together<br />
F<br />
G<br />
stem stitch<br />
C<br />
Align left edge of Section 4 with broken line ... tape sections together<br />
Section 3
Align bottom edge of Sections 1-2 with broken line --- tape together<br />
Section 4<br />
© Copyright 2002 Primedia Enthusiast Group, Inc.
Kids' Corner Coloring Page • Compliments of www.quickquilts.com • © Copyright 2002 Primedia Enthusiast Group, Inc.