You also want an ePaper? Increase the reach of your titles
YUMPU automatically turns print PDFs into web optimized ePapers that Google loves.
Version-E120911<br />
<strong>Manual</strong>
<strong>Manual</strong><br />
<strong>GAZ5</strong><br />
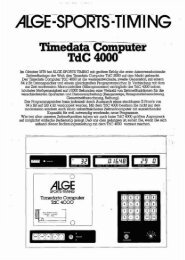
1 .................. rotation switch<br />
2 .................. toggle switch (format setting)<br />
up = ID-number and rank<br />
middle = minutes/seconds/1/100<br />
down = hours/minutes/seconds<br />
3 .................. toggle switch (function setting)<br />
up = RS485 operation<br />
middle = RS232 operation<br />
down = internal clock<br />
4 .................. data input/output<br />
banana socket yellow and black – RS232 - identical on other side<br />
5 .................. data input/output: banana socket white and blue – RS485<br />
6 .................. data input/output : banana socket white and blue – RS485<br />
7 .................. Amphenol connection (RS232 and power supply - double-sided)<br />
8 .................. on/off switch*<br />
9 .................. fuse for battery (T3.15A)*<br />
10 ................ battery condition LED*<br />
11 ................ AC-power and charging LED**<br />
12 ................ fuse for mains **<br />
13 ................ plug for mains (90-132 VAC or 187 – 264 VAC / 50 or 60 Hz)**<br />
* Only display boards with integrated powerpack PP5<br />
** Only display boards with integrated powerpack PP5 or power supply unit PS5<br />
Page 2
General<br />
<strong>Manual</strong><br />
<strong>GAZ5</strong><br />
Important Information<br />
Before using your ALGE-TIMING device read the complete manual carefully. It is part of the device and<br />
contains important information about installation, safety and its intended use. This manual cannot cover<br />
all conceivable applications. For further information or in case of problems that are mentioned not at<br />
all or not sufficiently detailed, please contact your ALGE-TIMING representative. You can find contact<br />
details on our homepage www.alge-timing.com<br />
Safety<br />
Apart from the information of this manual all general safety and accident prevention regulations of the<br />
legislator must be taken into account.<br />
The device must only be used by trained persons. The setting-up and installation must only be executed<br />
according to the manufacturer’s data.<br />
Intended Use<br />
The device must only be used for its intended applications. Technical modifications and any misuse<br />
are prohibited because of the risks involved! ALGE-TIMING is not liable for damages that are caused by<br />
improper use or incorrect operation.<br />
Power supply<br />
The stated voltage on the type plate must correspond to voltage of the power source. Check all connections<br />
and plugs before usage. Damaged connection wires must be replaced immediately by an<br />
authorized electrician. The device must only be connected to an electric supply that has been installed<br />
by an electrician according to IEC 60364-1. Never touch the mains plug with wet hands! Never touch<br />
live parts!<br />
Cleaning<br />
Please clean the outside of the device only with a smooth cloth. Detergents can cause damage. Never<br />
submerge in water, never open or clean with wet cloth. The cleaning must not be carried out by hose<br />
or high-pressure (risk of short circuits or other damage).<br />
Liability Limitations<br />
All technical information, data and information for installation and operation correspond to the latest<br />
status at time of printing and are made in all conscience considering our past experience and<br />
knowledge. Information, pictures and description do not entitle to base any claims. The manufacturer<br />
is not liable for damage due to failure to observe the manual, improper use, incorrect repairs, technical<br />
modifications, use of unauthorized spare parts. Translations are made in all conscience. We assume<br />
no liability for translation mistakes, even if the translation is carried out by us or on our behalf.<br />
Disposal<br />
If a label is placed on the device showing a crossed out dustbin on wheels (see drawing),<br />
the European directive 2002/96/EG applies for this device.<br />
Please get informed about the applicable regulations for separate collection of electrical and electronical<br />
waste in your country and do not dispose of the old devices as household waste. Correct<br />
disposal of old equipment protects the environment and humans against negative<br />
consequences!<br />
Copyright by ALGE-TIMING GmbH<br />
All rights reserved. Any duplication, either in full or in part, requires the prior written consent of the<br />
copyright holder.<br />
Page 3
<strong>Manual</strong><br />
<strong>GAZ5</strong><br />
Table of Contents<br />
1 DEVICE DESCRIPTION ............................................................................................. 5<br />
2 POWER SUPPLY ....................................................................................................... 5<br />
2.1 Powerpack PP5 .......................................................................................................... 5<br />
2.2 Battery Voltage „END“ ................................................................................................ 5<br />
2.3 Power Supply PS5 ...................................................................................................... 6<br />
2.4 External Battery .......................................................................................................... 6<br />
2.5 Interconnection of display boards ............................................................................... 6<br />
3 OPERATING METHODS AND SWITCH SETTINGS.................................................. 7<br />
3.1 Operating methods ..................................................................................................... 7<br />
3.2 Function Settings (Toggle Switch 3) ............................................................................ 7<br />
3.3 Format Settings (Toggle Switch 2) .............................................................................. 7<br />
3.4 Rotation Switch (1) ..................................................................................................... 8<br />
3.5 Shift output format by one digit ................................................................................... 9<br />
4 DISPLAY BOARD CONTROLLED BY TIMING DEVICE ..........................................10<br />
4.1 Display Board <strong>GAZ5</strong> controlled by ALGE TDC ............................................................10<br />
4.2 <strong>GAZ5</strong> controlled by ALGE Timy ...................................................................................11<br />
4.3 <strong>GAZ5</strong> controlled by ALGE Timer S4 ............................................................................11<br />
4.4 <strong>GAZ5</strong> controlled by Comet .........................................................................................12<br />
5 CLOCK ......................................................................................................................13<br />
5.1 Start stopwatch at 0:00:00.00 ....................................................................................13<br />
5.2 Clock starts from pre-adjusted time ............................................................................13<br />
6 COUNTDOWN WITH TIMEOUT ................................................................................14<br />
7 TECHNICAL DATA OF <strong>GAZ5</strong> ...................................................................................15<br />
7.1 Interface format..........................................................................................................17<br />
7.1.1 Serial Interface RS232: ........................................................................................................................ 17<br />
7.1.2 Interface RS485: .................................................................................................................................. 17<br />
7.1.3 Interface protocol for RS232 and RS485 ............................................................................................. 17<br />
8 SETTINGS FOR <strong>GAZ5</strong> ..............................................................................................19<br />
9 RANKING BOARD ....................................................................................................21<br />
Page 4
<strong>Manual</strong><br />
<strong>GAZ5</strong><br />
1 DEVICE DESCRIPTION<br />
The ALGE display boards of the fifth generation feature state-of-the-art techniques (C-MOS,<br />
microprocessor with watchdog).<br />
In a shapely, plastic coated aluminium casing 7-segment digits are integrated to form the<br />
scoreboard. Available in 15, 25, 45 cm digit height, the digits guarantee a perfect readability.<br />
Due to the low energy consumption, an operation with built-in rechargeable batteries is possible<br />
– on request, we assemble the PP5 into the display board.<br />
ALGE display boards are ideal for far viewable displays of numerical data like time, speed,<br />
width, height, laps, valuation, weights, prices, temperatures, winning figures, exchange rates,<br />
etc. ...<br />
The display board can be used as data receiver (e.g. of ALGE timing devices or of the handyterminal<br />
ALGE Comet or Timy) or as autonomous clock.<br />
ATTENTION!!<br />
If the display board is often or continuously used outdoor, we recommend executing the digit<br />
test more often than during indoor use. So you can avoid segments blockage.<br />
2 POWER SUPPLY<br />
There are different possibilities for the power supply of the display board <strong>GAZ5</strong>.<br />
The power supply is carried out by power pack (PP5), power supply (PS5) or an external<br />
supply.<br />
2.1 Powerpack PP5<br />
The power pack PP5 is built in on request. The power pack consists of NiMh-batteries (12V,<br />
4.5Ah) and a charger (90-132 VAC and 187 – 264 VAC / 50 or 60 Hz).<br />
A mains operation is even possible with empty batteries!<br />
We do not offer the 45 cm figure height models with PP5.<br />
Charging of the NiMh-batteries:<br />
• Switch off the display board with switch (8), if no operation is necessary during the charging<br />
process.<br />
• Connect provided line cord on the right side of the GAZ (13) and on 220V net.<br />
• Charge pilot lamp (11) lights up.<br />
• The charging time for full charging is approx. 14 hours (the charger is guarded by a<br />
charging protection).<br />
Operation time after full charging as regular clock:<br />
• GAZ with 15 cm digit height: approx. 70 hours<br />
• GAZ with 25 cm digit height: approx. 35 hours<br />
At low temperatures, the operating time decreases (at –20°C = 20% less performance).<br />
2.2 Battery Voltage „END“<br />
If the display shows “End”, it means that the battery voltage is too low. The microprocessor<br />
switches off and the display board must be charged. If you connect the display board to the<br />
net, the display board automatically switches on. Previous adjustments like Refresh are<br />
stored und continue functioning.<br />
Page 5
<strong>Manual</strong><br />
<strong>GAZ5</strong><br />
2.3 Power Supply PS5<br />
A power supply unit is built into the display board on request. With a special plug, you can<br />
connect the display board directly to mains (90-132 VAC or 187 – 264 VAC / 50 or 60 Hz).<br />
2.4 External Battery<br />
A 12V battery (car battery) with at least 2Ah must<br />
be connected to the display board. Please pay<br />
attention to the fact that the polarity of the battery<br />
clips is right [connect (+) with (+) and (-) with (-)].<br />
2.5 Interconnection of display boards<br />
If two display boards are interconnected (e.g. rank/bib board and time board), only one display<br />
board should be connected to a power pack, a power supply or to a battery. Please use<br />
the cable 033-01.<br />
cable 033-XX<br />
Page 6
<strong>Manual</strong><br />
<strong>GAZ5</strong><br />
3 OPERATING METHODS AND SWITCH SETTINGS<br />
3.1 Operating methods<br />
The display board can be used as data receiver or as an autonomous (independent) clock.<br />
Data receiver of:<br />
- ALGE TdC 8001 - ALGE Timy / Timy2<br />
- ALGE TdC 8000 - ALGE Videotimer VT2<br />
- ALGE TdC 4000 - ALGE Comet<br />
- ALGE OPTIc2 - ALGE Timer S4<br />
- ALGE OPTIc - ALGE Timer S3<br />
- ALGE OPTI 1sw - ALGE Self Timer SF2<br />
- PC<br />
Autonomous clock:<br />
• Clock, counting up from 0:00.00<br />
• Clock with pre-adjusted time<br />
• Countdown with Timeout<br />
3.2 Function Settings (Toggle Switch 3)<br />
Switch between different interfaces and the internal clock with the toggle switch (3).<br />
Toggle Switch (3) up:<br />
Display board shows data from RS485 interface<br />
Toggle Switch (3) in middle position:<br />
Display board shows data from RS232 interface<br />
Toggle Switch (3) down:<br />
Display board shows the internal clock<br />
3.3 Format Settings (Toggle Switch 2)<br />
The toggle switch (2) controls the output format. The above mentioned data correspond to a<br />
6 digits standard display board.<br />
Toggle Switch (3) up:<br />
- Rotation switch (1) at 0: display of start number (3 digits) and rank (2 digits) if a<br />
ALGE TdC is connected<br />
- Rotation switch (1) at 13: display of ID-number (3 digits) and hours (2 digits) if<br />
ALGE TDC is connected<br />
Toggle Switch (3) in middle position:<br />
- Rotation Switch (1) at 0: display of time in minutes, seconds, tenth and hundredth<br />
- Rotation Switch (1) at 13: display of time in minutes (1-digit), seconds, thousandths<br />
Toggle Switch (3) down:<br />
- Rotation Switch (1) at 0: display of time in hours, minutes and seconds<br />
- Rotation Switch (1) at 13: display of time in hours (1 digit), minutes, seconds and<br />
tenths<br />
Page 7
<strong>Manual</strong><br />
<strong>GAZ5</strong><br />
3.4 Rotation Switch (1)<br />
The rotation switch (1) has 16 different types of settings. Used as data receiver, you work in<br />
position 0 or 13 (all outputs are shifted by one position to the left)<br />
The functions for the autonomous clock will be active in position 14 and 15<br />
Switch<br />
0 ............... Standard<br />
1 - 10 ........ GAZ address<br />
11 ............. Test<br />
12 ............. Refresh<br />
13 ............. Shift left<br />
14 ............. Count down<br />
15 ............. Clock<br />
Standard 0<br />
If the GAZ works as data receiver of ALGE timing device the switch is<br />
set to position 0.<br />
GAZ address 1 – 10 Settings 1 to 10 are used for addressing at operations with ALGE<br />
Selftimer or interconnected display boards.<br />
Test 11<br />
Setting 11 contains a test program, with which you can check every<br />
single digit. With the toggle switch (3) you can chose different kinds of<br />
testing programs.<br />
test switch and signal input<br />
DL….shortcut / DH….open<br />
all digits count up, one by one<br />
all digits change between the display of 8 and blank<br />
Refresh 12<br />
Shift 13<br />
Setting 12 is responsible for the refresh. The refresh causes that the<br />
GAZ writes all figures anew every 10 seconds.<br />
This feature is used for GAZ e.g. mounted on a car-top. In this case it<br />
may happen that the figures are not written correctly due to vibrations<br />
of the car. After switching on “refresh”, the display shows „r on“. Adjust<br />
the shift switch to the requested position.<br />
Setting 13 shifts all digits by one position to the left.<br />
Apart from that, it has the same function as setting 0.<br />
Shift is necessary if tenth or thousandth seconds must be shown at<br />
the last digit of the display board (e.g. car sports, speed skating,<br />
cross country skiing, skeleton...)<br />
Countdown 14 Setting 14 is responsible for the countdown operation (see chapter 6).<br />
Clock 15 Setting on 15 is responsible for the internal clock (see chapter 5)<br />
Page 8
<strong>Manual</strong><br />
<strong>GAZ5</strong><br />
3.5 Shift output format by one digit<br />
It is possible to shift the output format of the GAZ by one digit to the left. Set the switch (1) to<br />
position 13. This is required for sports, where tenth or thousandth seconds must be shown<br />
(e.g. motor sports, speed skating, and skeleton)<br />
Position of<br />
Toggle<br />
Switch (2)<br />
Positon of<br />
Rotation<br />
Switch (1)<br />
Digit<br />
6<br />
Digit<br />
5<br />
Digit<br />
4<br />
Digit<br />
3<br />
Digit<br />
2<br />
Digit<br />
1<br />
Nh Nz NE Rz Re top 0<br />
M M S S z h middle 0<br />
H H M M S S bottom 0<br />
Nh Nz NE H H top 13<br />
M S S z h t middle 13<br />
H M M S S z bottom 13<br />
Nh ................. Start number (hundredth digit)<br />
Nz ................. Start number (tenth digit)<br />
Ne ................. Start number (1 digit)<br />
Rz ................. Rank (tenth digit)<br />
Re ................. Rank (1 digit)<br />
H ................... Hour<br />
M .................. Minute<br />
S ................... Second<br />
z .................... 1/10 Seconds<br />
h ................... 1/100 Seconds<br />
t .................... 1/1000 Seconds<br />
Page 9
<strong>Manual</strong><br />
<strong>GAZ5</strong><br />
4 DISPLAY BOARD CONTROLLED BY TIMING DEVICE<br />
4.1 Display Board <strong>GAZ5</strong> controlled by ALGE TDC<br />
• Connect data line 010-10 or 037-10 to ALGE TdC and attach the GAZ (4) with a 2-wire<br />
cable. Pay attention to the polarity of the GAZ plugs (4), black banana plug to black<br />
socket and yellow banana plug to yellow socket.<br />
• Place rotation switch (1) at „0“ or „13“.<br />
• Adjust requested display configurations with toggle switch (3) (see chapter 3.3).<br />
o Start number / rank<br />
o Minutes, seconds, hundredth, (thousandth)<br />
o Hours, minutes, seconds (tenth)<br />
• Switch power on<br />
o For GAZ with integrated powerpack use switch (7)<br />
o For GAZ without powerpack through external power supply (e.g. 12 V battery,<br />
mains as described in chapter 2).<br />
• The display board signalizes the program version and subsequently with displaying<br />
„ALGE“ the operational readiness.<br />
• Switch on ALGE TdC and the display board goes blank.<br />
• Select the program that you want use in TdC and start timing. As soon as the TdC<br />
shows a running time it also shows on the display.<br />
For the ALGE TDC4000 use cable 010-01. As soon as the display of the ALGE TDC4000<br />
shows a running time, the GAZ should also show it (otherwise twist the connection plug<br />
at ALGE TDC4000 by 180° degrees).<br />
Page 10
<strong>Manual</strong><br />
<strong>GAZ5</strong><br />
4.2 <strong>GAZ5</strong> controlled by ALGE Timy<br />
• Connect data line 037-10 to ALGE Timy and attach the GAZ (4) with a 2-wire cable.<br />
Pay attention to the polarity of the GAZ plugs (4), black banana plug to black socket<br />
and yellow banana plug to yellow socket.<br />
• Place rotation switch (1) at „0“ or „13“.<br />
• Adjust requested display configurations with toggle switch (3) (see chapter 3.3).<br />
o Start number / rank<br />
o Minutes, seconds, hundredth, (thousandth)<br />
o Hours, minutes, seconds (tenth)<br />
• Switch power on<br />
o For GAZ with integrated powerpack use switch (7)<br />
o For GAZ without powerpack through external power supply (e.g. 12 V battery,<br />
mains as described in chapter 2).<br />
• The display board signalizes the program version and subsequently with displaying<br />
„ALGE“ the operational readiness.<br />
• Switch on ALGE Timy and the display board goes blank.<br />
• Select the program that you want use in Timy and start timing. As soon as the Timy<br />
shows a running time it also shows on the display.<br />
4.3 <strong>GAZ5</strong> controlled by ALGE Timer S4<br />
• Connect data line 010-10, 037-10 or 060-10 to ALGE Timer S4 and attach the GAZ (4)<br />
with a 2-wire cable. Pay attention to the polarity of the GAZ plugs (4), black banana<br />
plug to black socket and yellow banana plug to yellow socket.<br />
• Place rotation switch (1) at „0“ or „13“.<br />
• Adjust requested display configurations with toggle switch (3) (see chapter 3.3).<br />
o Minutes, seconds, hundredth, (thousandth)<br />
o Hours, minutes, seconds (tenth)<br />
• Switch power on<br />
o For GAZ with integrated powerpack use switch (7)<br />
o For GAZ without powerpack through external power supply (e.g. 12 V battery,<br />
mains as described in chapter 2).<br />
• The display board signalizes the program version and subsequently with displaying<br />
„ALGE“ the operational readiness.<br />
• Switch on ALGE Timer S4 and the display board goes blank.<br />
Page 11
<strong>Manual</strong><br />
<strong>GAZ5</strong><br />
• Select the program that you want use in Timer S4 and start timing. As soon as the<br />
timing device shows a running time it also shows on the display.<br />
Cable 010-10, 037-10 or 060-10 from ALGE Timer S4 to the display board can be lengthened<br />
with a 2-wire cable (for approx. 1km). You can also use ALGE cable reels KT300 (300m) or<br />
KT500 (500m) as extension.<br />
4.4 <strong>GAZ5</strong> controlled by Comet<br />
• Connect data line 030-10 to ALGE Comet and attach the GAZ (4) with a 2-wire cable.<br />
Pay attention to the polarity of the GAZ plugs (4), black banana plug to black socket<br />
and yellow banana plug to yellow socket.<br />
• Place rotation switch (1) at „0“ or „13“.<br />
• Adjust requested display configurations with toggle switch (3) (see chapter 3.3).<br />
o Minutes, seconds, hundredth, (thousandth)<br />
o Hours, minutes, seconds (tenth)<br />
• Switch power on<br />
o For GAZ with integrated powerpack use switch (7)<br />
o For GAZ without powerpack through external power supply (e.g. 12 V battery,<br />
mains as described in chapter 2).<br />
• The display board signalizes the program version and subsequently with displaying<br />
„ALGE“ the operational readiness.<br />
• Switch on ALGE Comet and the display board goes blank.<br />
• Select the program that you want use in the Comet and start timing. As soon as the<br />
timing device shows a running time it also shows on the display.<br />
Cable 030-10 is a 3-wire cable, which supplies the ALGE Comet from the display board.<br />
Cable 060-10 is a 2-wire cable, which is particularly used in connection with cable reels<br />
KT300 or KT500. With these cables, ALGE Comet is not supplied from the display board.<br />
Page 12
<strong>Manual</strong><br />
<strong>GAZ5</strong><br />
5 CLOCK<br />
5.1 Start stopwatch at 0:00:00.00<br />
• Place rotation switch (1) at position 15.<br />
• Select time format with toggle switch (2) on middle position (min, sec, 1/100) or down<br />
position (hour, min, sec).<br />
• Put toggle switch (3) in middle position (RS232).<br />
• Connect push-button 023-02 to <strong>GAZ5</strong> banana plugs (4) or use toggle switch (3) as<br />
switch (position start/stop gives a start or stop impulse).<br />
• Switch GAZ on and wait until it shows 0:00.00.<br />
• Trigger push-button, clock starts.<br />
• Trigger push-button again and time stops (intermediate time).<br />
• Trigger push-button again and time continues (after intermediate time).<br />
• Reset the clock to 0:00.00 by pushing the push-button until „ALGE“ appears.<br />
5.2 Clock starts from pre-adjusted time<br />
• Place rotation switch (1) at position 15.<br />
• Select time format with toggle switch (2) on middle position (min, sec, 1/100) or down<br />
position (hour, min, sec).<br />
• Put toggle switch (3) in middle position (RS232).<br />
• Connect push-button 023-02 to <strong>GAZ5</strong> banana plugs (4) or use toggle switch (3) as<br />
switch (position start/stop gives a start or stop impulse).<br />
• Switch on GAZ and wait until it shows 0:00.00.<br />
• Set the start time by pressing the push-button until the first digit that you want to<br />
change shows zero (0).<br />
• Trigger push-button until it shows the desired value and keep it pressed until it shows<br />
the next digit that you want to change.<br />
• Continue until you have adjusted the start time.<br />
• Trigger push-button to start the clock.<br />
• Trigger push-button again and time stops (intermediate time).<br />
• Trigger push-button again and time continues (after intermediate time).<br />
• Reset the clock to 0:00.00 by pushing the push-button, until „ALGE“ appears.<br />
Page 13
<strong>Manual</strong><br />
<strong>GAZ5</strong><br />
6 COUNTDOWN WITH TIMEOUT<br />
As countdown time, you can at the most indicate 99 hours, 59 minutes and 59 seconds.<br />
The countdown starts at the pre-adjusted time and ends at zero.<br />
• Place rotation switch (1) at position 14.<br />
• Select time format with toggle switch (2) on middle position (min, sec, 1/100) or down<br />
position (hour, min, sec).<br />
• Put toggle switch (3) in middle position (RS232).<br />
• Connect push-button 023-02 to <strong>GAZ5</strong> banana plugs (4) or use toggle switch (3) as<br />
switch (position start/stop gives a start or stop impulse).<br />
• Switch GAZ on and wait until it shows 0:00.00.<br />
• Set the countdown start time by pressing the push-button until the first digit that you<br />
want to change shows zero (0).<br />
• Trigger push-button until it shows the value that you want on this digit and keep it<br />
pressed until it shows the next number that you want to change.<br />
• Continue until you have adjusted the countdown time.<br />
• Trigger push-button to start the countdown.<br />
• Trigger push-button again to stop the countdown (timeout).<br />
• Trigger push-button again and time continues to count down.<br />
• Reset the clock to 0:00.00 by pushing the hand switch, until „ALGE“ appears.<br />
Page 14
<strong>Manual</strong><br />
<strong>GAZ5</strong><br />
7 TECHNICAL DATA OF <strong>GAZ5</strong><br />
Electronic:<br />
Display elements:<br />
Casing:<br />
Time Base:<br />
Microprocessor technology in CMOS-technique with watchdog.<br />
Bistable 7-segment digits, yellow on black ground, minor electric<br />
power consumption, best readability, great operating safety<br />
Aluminium casing, plastics coated (black) with plexi cover, designed<br />
for outdoor usage<br />
Quartz oscillator with 9.2160 MHz<br />
Power Consumption: Standby Current: 10 mA (Surge current per segment in operating<br />
moment (every second at running clock))<br />
Connections:<br />
Figure Height max. Current Impulse Duration<br />
150 mm 123 mA 120 ms<br />
250 mm 360 mA 120 ms<br />
450 mm 360 mA 150 ms<br />
Two Amphenol plugs (left and right on each side of display board)<br />
1 ...... +11 to 20 Volt<br />
2 ...... 0 Volt<br />
3 ...... no connection<br />
E ...... Data<br />
Two data plugs for RS232:<br />
Data line (RXD)......... yellow<br />
Ground ................. black<br />
Two data plugs for RS485: a ............................... white<br />
b ............................... blue<br />
Fuses:<br />
1 x T 2 A / 220 V ......... mains fuse<br />
1 x T 3.15 A / 220 V .... battery fuse<br />
Power supply: external: 11 - 20 V DC, 2 A<br />
Power Pack PP5: rechargeable battery and charger are built into<br />
display board (on request).<br />
• Rechargeable Battery: NiMh rechargeable batteries<br />
• Capacity:<br />
4.5 Ah / 12 V<br />
• Charging time:<br />
14 hours<br />
• Operating duration: approx. 30 hours (25 cm digit height)<br />
• Charging connection: 90-132 VAC and 187–264 VAC / 50 –<br />
60Hz (built-in high voltage protection)<br />
Power Supply PS5: built in power supply (on request).<br />
• Mains supply: 90-132 VAC and 187 – 264 VAC / 50<br />
- 60 Hz<br />
Temperature range: -25 to 50°C (-13 to 122 F)<br />
Page 15
<strong>Manual</strong><br />
<strong>GAZ5</strong><br />
Dimensions and weights:<br />
Model kg<br />
A<br />
(mm)<br />
B<br />
(mm)<br />
C<br />
(mm)<br />
D<br />
(mm)<br />
Depth<br />
(mm)<br />
Readability<br />
approx. m<br />
Operation time<br />
approx. h*<br />
<strong>GAZ5</strong> 515 12 290 956 556 375 100 75 60<br />
<strong>GAZ5</strong> 615 13 290 956 556 375 100 75 60<br />
<strong>GAZ5</strong> 525 20 393 1493 1093 480 100 125 20<br />
<strong>GAZ5</strong> 625 21 393 1493 1093 480 100 125 20<br />
<strong>GAZ5</strong> 545 45 664 2490 2090 738 120 225 11<br />
<strong>GAZ5</strong> 645 48 664 2490 2090 738 120 225 11<br />
* At temperatures below 0°C, the operating duration decreases (at –20°C = approx. 20%)<br />
Page 16
<strong>Manual</strong><br />
<strong>GAZ5</strong><br />
7.1 Interface format<br />
7.1.1 Serial Interface RS232:<br />
Signal compatible with RS232C interface, serial, no handshake operation.<br />
Standard Settings<br />
2400 Baud (adjusted)<br />
1 Start bit<br />
8 Data ASCII-Bit<br />
1 Stop bit<br />
No Parity bit<br />
7.1.2 Interface RS485:<br />
Adjusted Baud rate: 2400 Baud<br />
7.1.3 Interface protocol for RS232 and RS485<br />
On the following page the protocols are indicated which can be sent of the ALGE timing devices<br />
to the display boards.<br />
J Identifier for interconnected display board A to J (A = board 1, B = board 2, C = board 3... J = board 10)<br />
Nt Start number (thousandth-digit)<br />
Nh Start number (hundredth-digit)<br />
Nz Start number (tenth-digit)<br />
Ne Start number (1-digit)<br />
H Hours<br />
M Minutes<br />
S Seconds<br />
z 1/10 Seconds<br />
h 1/100 Seconds<br />
t 1/1000 Seconds<br />
Rz Rank (tenth-digit)<br />
Re Rank (1-digit)<br />
X Carriage Return (0D Hex.) or Line Feed (0A Hex.) and Carriage Return (0D Hex.)<br />
. Identifier for running time if dot on fourth digit.<br />
A ALGE TdC 4000: Identifier for intermediate time 1 (at fourth digit)<br />
B ALGE TdC 4000: Identifier for intermediate time 2 (at fourth digit)<br />
C ALGE TdC 4000: Identifier for ending time (at fourth digit)<br />
D ALGE TdC 4000: Identifier for total time (at fourth digit)<br />
K Comet: 1 = Start channel, 2 = Start channel, 4 = Stop channel or 8 = Stop channel<br />
Tc Timer identification at the Comet (Timer A or B)<br />
Tt Timer S4 Split and 3-Parcours: Identification parcours A, B or C<br />
Pr Identification for Timer S4 parcours<br />
PZ Timer S4 Show Jumping: fault points (tenth-digit)<br />
PE Timer S4 Show Jumping: fault points (1-digit)<br />
Pz Timer S4 Show Jumping: fault points (1/10 points)<br />
Ph Timer S4 Show Jumping: fault points (1/100 points)<br />
#h Timer S4 18-Channel-Timer: continuous number (hundredth-digit)<br />
#z Timer S4 18-Channel-Timer: continuous number (tenth-digit)<br />
#e Timer S4 18-Channel-Timer: continuous number (1-digit)<br />
Pp Timer S4 Parallel slalom: Identification for show jumping<br />
r Timer S4 Parallel slalom: Identification for red parcours (ASCII r)<br />
b Timer S4 Parallel slalom: Identification for blue parcours (ASCII b)<br />
S Timer S4 Speed: Identification for speed timing<br />
§ Timer S4 Speed: Identifier for measurement (01Hex=km/h, 02Hex=m/s or 03Hex=mph)<br />
Z Timer S4 Speed: Speed<br />
F Timer S4 Swim: Identifier for interconnected display board A to H (A=Tafel1, B=Tafel2... H=Tafel8)<br />
Page 17
<strong>Manual</strong><br />
<strong>GAZ5</strong><br />
Page 18
<strong>Manual</strong><br />
<strong>GAZ5</strong><br />
8 SETTINGS FOR <strong>GAZ5</strong><br />
The display board can be adjusted to the requested display format – depending on the usage<br />
– with the toggle switch (3) or the rotation switch (1)<br />
The following examples are based on a standard display board <strong>GAZ5</strong> with 6 or 5 digits.<br />
Minutes, seconds, 1/100 seconds:<br />
0<br />
Hours, minutes, seconds:<br />
0<br />
Minutes, seconds, 1/1000 seconds:<br />
13<br />
Hours, minutes, seconds, 1/10 seconds:<br />
13<br />
Page 19
<strong>Manual</strong><br />
<strong>GAZ5</strong><br />
Start number / rank:<br />
You can use a 5-digit or 6-digit display board. At the 6-digit display board, the fourth<br />
digit left will always be black (blank).<br />
0<br />
Counter (with Comet program Commander):<br />
0<br />
Speed measurement:<br />
The speed can be displayed – depending on the timing device – in km/h, m/s or mph.<br />
0<br />
Toggle switch middle and rotation switch on 0 1.23 km/h<br />
Toggle switch middle and rotation switch on 13 12.3 km/h<br />
Toggle switch down and rotation switch on 0 123 km/h<br />
Points:<br />
Points can be controlled by a Comet (program Commander), Timer S4 (program equestrian)<br />
or by a personal computer.<br />
0<br />
Page 20
<strong>Manual</strong><br />
<strong>GAZ5</strong><br />
9 RANKING BOARD<br />
What is a ranking display board for<br />
To display 2 to 10 lines with the appropriate bib and rank. It is possible to scroll a ranking list.<br />
Usage of a ranking board:<br />
At big events for display of the latest intermediate and end results.<br />
What is required for a ranking board<br />
• 1 ALGE TdC<br />
• 1 PC<br />
• 1 Software ALGE-TimeNET2<br />
• 2 to 10 pcs. ALGE GAZ (bib / rank)<br />
• 2 to 10 pcs. ALGE GAZ (time)<br />
• 1 charger NGAZ/R for all display boards<br />
• 1 x cable reel KT300 or 2-wired cable<br />
• 1 adapter 069-02<br />
• X x cable 033-01<br />
• X x cable 033-10<br />
• 1 x cable 010-01<br />
Page 21
<strong>Manual</strong><br />
<strong>GAZ5</strong><br />
Subject to alternations!<br />
Copyright by<br />
ALGE-TIMING GmbH<br />
Rotkreuzstr. 39<br />
6890 Lustenau / Austria<br />
www.alge-timing.com<br />
Page 22