SDU-xcite Smart Display Unit Installation Instructions - Trend Controls
SDU-xcite Smart Display Unit Installation Instructions - Trend Controls
SDU-xcite Smart Display Unit Installation Instructions - Trend Controls

Create successful ePaper yourself
Turn your PDF publications into a flip-book with our unique Google optimized e-Paper software.
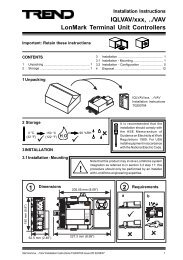
<strong>Installation</strong> <strong>Instructions</strong><br />
<strong>SDU</strong>-<strong>xcite</strong><br />
<strong>Smart</strong> <strong>Display</strong> <strong>Unit</strong><br />
Important: Retain these instructions<br />
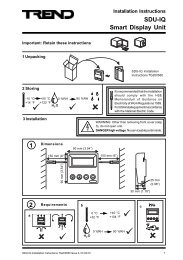
1 Unpacking<br />
<strong>SDU</strong>-<strong>xcite</strong> <strong>Installation</strong><br />
<strong>Instructions</strong> TG200643<br />
2 Storing<br />
-10 °C<br />
+114 °F<br />
+50 °C<br />
+122 °F<br />
0 <br />
0 %RH 95 %RH<br />
3 <strong>Installation</strong><br />
It is recommended that the installation should<br />
comply with the HSE Memorandum of Guidance<br />
on Electricity at Work Regulations 1989.<br />
For USA install equipment in accordance<br />
with the National Electric Code.<br />
WARNING: Other than removing<br />
front cover (step 3), do not open<br />
unit.<br />
DANGER high voltage. No serviceable parts<br />
inside.<br />
1<br />
Dimensions<br />
90 mm (3.54”)<br />
150 mm (6”) 150 mm (6”)<br />
90 mm (3.54”)<br />
25 mm<br />
(0.98”)<br />
30 mm (1.18”)<br />
<strong>SDU</strong>-<strong>xcite</strong> <strong>Installation</strong> <strong>Instructions</strong> TG200643 Issue 1/E 20/11/06 1
5 2 - /<br />
<strong>SDU</strong>-<strong>xcite</strong><br />
<strong>Installation</strong> <strong>Instructions</strong><br />
3 <strong>Installation</strong> (Continued)<br />
2<br />
Requirements<br />
a<br />
b<br />
c<br />
-10 °C<br />
+114 °F<br />
+40 °C<br />
+104 °F<br />
0 <br />
0 %RH 90 %RH<br />
3<br />
Remove Front Cover<br />
c<br />
a<br />
b<br />
4<br />
Check <strong>SDU</strong> type<br />
6<br />
Configure <strong>SDU</strong><br />
to change operating mode, restrictive set, or<br />
language<br />
a<br />
Connect Input Power<br />
<strong>SDU</strong><br />
+<br />
+24 Vdc<br />
0 Vdc<br />
24 Vdc Power<br />
Supply<br />
24 Vdc<br />
10 mA<br />
Check <strong>SDU</strong>-XCITE<br />
5<br />
Route Cable<br />
+<br />
<strong>SDU</strong><br />
+<br />
+24 Vac (L)<br />
+24 Vac (N)<br />
24 Vac Power<br />
Supply<br />
24 Vac<br />
10 mA<br />
* If one side of the 24 Vac input power is connected to 0<br />
V, that side must be connected to the <strong>SDU</strong> - (negative)<br />
terminal<br />
*<br />
b<br />
Switch on Power<br />
<strong>SDU</strong><br />
<br />
24 V<br />
1<br />
! "<br />
2<br />
<strong>SDU</strong>-<strong>xcite</strong> <strong>Installation</strong> <strong>Instructions</strong> TG200643 Issue 1/E 20/11/06
5 2 - /<br />
1 2 3 4<br />
SP<br />
ENG<br />
<strong>Installation</strong> <strong>Instructions</strong> - Sheet n<br />
<strong>SDU</strong>-<strong>xcite</strong><br />
3 <strong>Installation</strong> (Continued)<br />
6<br />
Configure <strong>SDU</strong> (Continued)<br />
c<br />
Connect to PC<br />
SET,<br />
<strong>SDU</strong>-Tool<br />
<strong>SDU</strong> DOWNLOAD ADAPTOR (EJ105174)<br />
Cable/EJ101442<br />
<strong>SDU</strong>-<strong>xcite</strong><br />
RJ11<br />
RJ11<br />
+<br />
9 way D type Female<br />
RJ11<br />
Socket<br />
24 V<br />
Power Supply<br />
<br />
CAUTION: The <strong>SDU</strong>-<strong>xcite</strong> must be connected to the PC using adapter<br />
cable, <strong>SDU</strong> DOWNLOAD ADAPTOR. Failure to use this cable may<br />
result in damage to the <strong>SDU</strong> or PC.<br />
d<br />
Set up <strong>SDU</strong> Configuration File<br />
Set up:<br />
SET,<br />
<strong>SDU</strong>-Tool<br />
Mode<br />
Backup File to Disk<br />
Home Page<br />
Alarm log<br />
Restrictive mode list<br />
Language<br />
Note set to Mode 0 or 1 to enable<br />
alarm log for IQ3 >=V1.2<br />
Unrestricted/Restricted/<strong>Display</strong> &<br />
Directory<br />
Show/Don’t Show<br />
Skip (IQ3 will return ‘None’ if<br />
included)<br />
Select required modules<br />
Translation of standard text<br />
e<br />
Set <strong>SDU</strong> into Download Mode<br />
Config Update<br />
f<br />
Download Language<br />
SET,<br />
<strong>SDU</strong>-Tool<br />
Set Language<br />
Download to <strong>SDU</strong><br />
! "<br />
5 2 - /<br />
<strong>SDU</strong> Data Sheet TA200559<br />
<strong>SDU</strong> Tool Manual TE200600<br />
g<br />
Download Completed<br />
h<br />
Switch off Power<br />
<strong>SDU</strong><br />
! "<br />
O<br />
I<br />
24 V<br />
Config Update<br />
Download Complete<br />
<strong>SDU</strong>-<strong>xcite</strong> <strong>Installation</strong> <strong>Instructions</strong> TG200643 Issue 1/E 20/11/06 3
100-240 V<br />
1 2 3<br />
1 + 0<br />
4 5 6<br />
2 + 0<br />
7 8 9<br />
3 + 0<br />
10 11 12<br />
4 + 0<br />
13 14 15 16 17 18 19 20 21 22 23 24 25 26 27 28 29 30<br />
5 6<br />
7 8<br />
9 10<br />
+ 0 + 0 + 0 + 0 + 0 + 0<br />
OK RX<br />
24 V<br />
A<br />
0 V<br />
24 V<br />
P<br />
11 12 13 14 15 16<br />
P 0 P 0 P 0 P 0 P 0 P 0<br />
31 32 33 34 35 36 37 38 39 40 41 42 43 44 45 46 47 48<br />
<strong>SDU</strong>-<strong>xcite</strong><br />
<strong>Installation</strong> <strong>Instructions</strong><br />
3 <strong>Installation</strong> (Continued)<br />
7<br />
Connect to IQ3<br />
Note that supervisor port address should set to zero (default)<br />
Note that label lengths should be restricted to a maximum of 20 characters<br />
IQ3<strong>xcite</strong><br />
RD/<strong>SDU</strong>-IQ2COMMSCABLE/3M<br />
RD/<strong>SDU</strong>-IQ2COMMSCABLE/10M<br />
<strong>SDU</strong>-<strong>xcite</strong><br />
rear view<br />
local supervisor<br />
port<br />
RJ11<br />
RJ11<br />
maximum distance 25 m (28 yds)<br />
+<br />
If required a cable can be made to the required length, wired as below<br />
25 m (28 yds) maximum<br />
<br />
$<br />
#<br />
!<br />
"<br />
4 4 <br />
"<br />
!<br />
#<br />
$ <br />
Note that the IQ controller may be connected while powered; if not power up controller.<br />
8<br />
Mount <strong>Unit</strong><br />
60 mm<br />
9<br />
Replace Cover<br />
standard UK electrical or panel<br />
back box<br />
60 mm<br />
50 mm<br />
46 mm<br />
2 off Ø4 mm<br />
(M3.5 x 30 mm screws provided)<br />
Ø4 mm<br />
(M3.5 screw)<br />
10<br />
Check Start Up Reset<br />
1 2 3 4<br />
Communications failure<br />
<strong>SDU</strong>-<strong>xcite</strong> V1.0<br />
<strong>Display</strong>s first labelled sensor<br />
- if set to defaults<br />
5 A I H <br />
. H 5 F = A 6 A F<br />
! , A C +<br />
Firmware version<br />
4<br />
<strong>SDU</strong>-<strong>xcite</strong> <strong>Installation</strong> <strong>Instructions</strong> TG200643 Issue 1/E 20/11/06
<strong>Installation</strong> <strong>Instructions</strong> - Sheet n<br />
<strong>SDU</strong>-<strong>xcite</strong><br />
3 <strong>Installation</strong> (Continued)<br />
11<br />
Check Operation - Monitor<br />
Note that the full sequence given below may only be shown in Unrestricted modes. The Restricted<br />
Modes show only those pages on the Restricted list, and <strong>Display</strong> and Directory modules show<br />
directories at level 1, and display pages at level 2. The Home page is optional (see step 6d).<br />
Plant Room 1<br />
20/03/02 08:04<br />
5 A I H <br />
. H 5 F = A 6 A F<br />
! , A C +<br />
5 A I H <br />
. H 5 F = A 6 A F<br />
! , A C +<br />
1 2 3 4<br />
1 2 3 4<br />
1 2 3 4<br />
Home page<br />
Sensor<br />
Sensor 1<br />
Knob<br />
Sensor 2<br />
Switch<br />
Sensor 3<br />
Driver<br />
Sensor (last)<br />
Digital Input<br />
Time Zone<br />
Note that only the configured<br />
modules (not necessarily sequential)<br />
are displayed<br />
Time<br />
<strong>SDU</strong>-<strong>xcite</strong> <strong>Installation</strong> <strong>Instructions</strong> TG200643 Issue 1/E 20/11/06 5
<strong>SDU</strong>-<strong>xcite</strong><br />
<strong>Installation</strong> <strong>Instructions</strong><br />
3 <strong>Installation</strong> (Continued)<br />
12<br />
Check Operation - Adjust<br />
Knob 1<br />
Room 1 Setpoint<br />
20.01 DegC<br />
Knob 1<br />
Room 1 Setpoint<br />
20.01 DegC<br />
Knob 1<br />
Room 1 Setpoint<br />
20.01 DegC<br />
1 2 3 4<br />
1 2 3 4<br />
1 2 3 4<br />
Digital<br />
OFF<br />
Analogue<br />
<strong>Unit</strong>s<br />
20.32<br />
ON<br />
if PIN required see<br />
step 13<br />
Tenths<br />
20.32<br />
Hundredths<br />
20.32<br />
13<br />
Enter PIN<br />
If required<br />
2 1 # <br />
5 A I H <br />
. H 5 F = A 6 A F<br />
! , A C +<br />
1 2 3 4<br />
1 2 3 4<br />
a<br />
b<br />
PIN 5 * * *<br />
c PIN X 5 * *<br />
d<br />
e PIN X X 5 *<br />
f<br />
g PIN X X X 5<br />
h<br />
6<br />
<strong>SDU</strong>-<strong>xcite</strong> <strong>Installation</strong> <strong>Instructions</strong> TG200643 Issue 1/E 20/11/06
<strong>Installation</strong> <strong>Instructions</strong> - Sheet n<br />
<strong>SDU</strong>-<strong>xcite</strong><br />
3 <strong>Installation</strong> (Continued)<br />
14<br />
Set <strong>SDU</strong> Mode<br />
If required<br />
a Remove front cover - see step 3<br />
b<br />
Set mode<br />
Default - <strong>Display</strong> Mode 2:<br />
Unrestricted, no home page, alarm log disabled<br />
Set to Mode 0 or 1 to enable alarm log if IQ3 >=V1.2<br />
5 A I H <br />
. H 5 F = A 6 A F<br />
! , A C +<br />
! "<br />
5 2 - /<br />
5 A I H <br />
. H 5 F = A 6 A F<br />
! , A C +<br />
<strong>Display</strong> Mode = 1<br />
<strong>Display</strong> Mode = 11<br />
Mode<br />
Page Set<br />
0 Unrestricted<br />
1 Unrestricted<br />
2 Unrestricted<br />
3 Unrestricted<br />
4 Restricted<br />
5 Restricted<br />
6 Restricted<br />
7 Restricted<br />
8 <strong>Display</strong><br />
and Directory<br />
9 <strong>Display</strong><br />
and Directory<br />
10<br />
<strong>Display</strong><br />
and Directory<br />
11<br />
<strong>Display</strong><br />
and Directory<br />
Home<br />
Page<br />
Alarm<br />
Log<br />
No<br />
Ye s<br />
Ye<br />
s Ye s<br />
No<br />
No<br />
Ye<br />
s No<br />
No<br />
No<br />
Ye<br />
s No<br />
No<br />
No<br />
Ye<br />
s No<br />
No<br />
No<br />
Ye<br />
s No<br />
No<br />
No<br />
Ye<br />
s No<br />
Note that if the home page is enabled, the controllers identifier [R(D)] should be set up, otherwise the<br />
first line of the home page will show the label of the previous item displayed.<br />
c Replace front cover - see step 9<br />
Note that if alarm log is enabled or IQ3
<strong>SDU</strong>-<strong>xcite</strong><br />
<strong>Installation</strong> <strong>Instructions</strong><br />
4 Disposal<br />
WEEE Directive :<br />
At the end of their useful life the packaging,<br />
and product should be disposed of by a<br />
suitable recycling centre.<br />
Do not dispose of with normal household waste.<br />
Do not burn.<br />
Manufactured for and on behalf of the Environmental and Combustion <strong>Controls</strong> Division of Honeywell Technologies Sàrl, Ecublens, Route<br />
du Bois 37,Switzerland by its Authorized Representative, <strong>Trend</strong> Control Systems Limited.<br />
<strong>Trend</strong> Control Systems Limited reserves the right to revise this publication from time to time and make changes to the content hereof<br />
without obligation to notify any person of such revisions or changes.<br />
<strong>Trend</strong> Control Systems Limited<br />
P.O. Box 34, Horsham, West Sussex, RH12 2YF, UK. Tel:+44 (0)1403 21888 Fax:+44 (0)1403 241608 www.trend-controls.com<br />
<strong>Trend</strong> Control Systems USA<br />
6670 185th Avenue NE, Redmond, Washington 98052, USA. Tel: (425)897-3900, Fax: (425)869-8445 www.trend-controls.com<br />
8<br />
<strong>SDU</strong>-<strong>xcite</strong> <strong>Installation</strong> <strong>Instructions</strong> TG200643 Issue 1/E 20/11/06