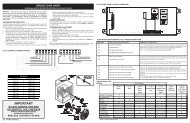
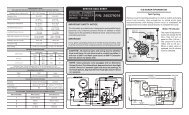
Wiring Diagram
Wiring Diagram
Wiring Diagram

Create successful ePaper yourself
Turn your PDF publications into a flip-book with our unique Google optimized e-Paper software.
SERVICE DATA SHEET<br />
Electric Ranges with ES 100/105 Electronic Oven Control<br />
Electronic Oven Control<br />
(E.O.C. rear view)<br />
NOTICE - This service data sheet is intended for use by<br />
persons having electrical and mechanical training and a level of<br />
knowledge of these subjects generally considered acceptable<br />
in the appliance repair trade. The manufacturer cannot be<br />
responsible, nor assume any liability for injury or damage of any<br />
kind arising from the use of this data sheet.<br />
SAFE SERVICING PRACTICES<br />
To avoid the possibility of personal injury and/or property damage, it is<br />
important that safe servicing practices be observed. The following are<br />
examples, but without limitation, of such practices.<br />
1. Before servicing or moving an appliance remove power cord from<br />
electrical outlet, trip circuit breaker to OFF, or remove fuse.<br />
2. Never interfere with the proper installation of any safety device.<br />
3. GROUNDING: The standard color coding for safety ground wires is<br />
GREEN or GREEN WITH YELLOW STRIPES. Ground leads are<br />
not to be used as current carrying conductors. It is extremely<br />
important that the service technician reestablish all safety<br />
grounds prior to completion of service. Failure to do so will<br />
create a potential safety hazard.<br />
4. Prior to returning the product to service, ensure that:<br />
• All electric connections are correct and secure.<br />
• All electrical leads are properly dressed and secured away from<br />
sharp edges, high-temperature components, and moving parts.<br />
• All uninsulated electrical terminals, connectors, heaters, etc. are<br />
adequately spaced away from all metal parts and panels.<br />
• All safety grounds (both internal and external) are correctly and<br />
securely reassembled.<br />
Oven Calibration<br />
Set the electronic oven control for normal baking at 350°F. Obtain an<br />
average oven temperature after a minimum of 5 cycles. Press CANCEL<br />
or CLEAR to end bake mode.<br />
Electronic Oven Control (E.O.C.) connections (J1)<br />
IMPORTANT<br />
DO NOT REMOVE THIS BAG<br />
OR DESTROY THE CONTENTS<br />
WIRING DIAGRAMS AND SERVICE<br />
INFORMATION ENCLOSED<br />
REPLACE CONTENTS IN BAG<br />
p/n 316441457 Rev A (1001)<br />
Oven Temperature Adjustment (available on some models)<br />
1. Press and hold the Bake key pad and release after the display shows the<br />
factory temperature setting of 00. Note: If the oven temperature has been<br />
previously adjusted from the factory setting, the latest adjusted value will<br />
appear in the display instead.<br />
2. You may increase the oven temperature in 5°F increments with each press<br />
of the UP ARROW key pad. You may also adjust the oven temperature<br />
downward in 5°F increments with each press of the DOWN ARROW key<br />
pad (total adjustment range is +35°F to -35° F).<br />
3. To accept the change, wait until the oven control provides the acceptance<br />
beep (See Notes below).<br />
4. The oven temperature adjustment has been accepted by the oven control<br />
and the display will return to the time of day.<br />
Notes:<br />
• If at any time during the process of adjusting the oven temperature feature<br />
you decide not to make the change, press the Stop, Clear Off or Cancel<br />
key pad once before the acceptance beep.<br />
• The oven temperature adjustment feature can not be modified if Bake or<br />
Broil is active.<br />
• The oven temperature adjustment may be made if your oven control has been<br />
set for °C (Celsius) temperature display mode. In this case each press<br />
of the UP ARROW or DOWN ARROW key pad will adjust in 1°C increments<br />
upward (maximum +18°C) or downward (maximum -18°C), depending on<br />
which arrow key pad is pressed.<br />
Resistance Temperature Detector Scale<br />
Temperature (°F)<br />
RTD SCALE<br />
Resistance (ohms)<br />
32 ± 1.9 1000 ± 4.0<br />
75 ± 2.5 1091 ± 5.3<br />
250 ± 4.4 1453 ± 8.9<br />
350 ± 5.4 1654 ± 10.8<br />
450 ± 6.9 1852 ± 13.5<br />
550 ± 8.2 2047 ± 15.8<br />
650 ± 9.6 2237 ± 18.5<br />
900 ± 13.6 2697 ± 24.4<br />
Resistance Temperature Detector<br />
Electronic Oven Control Fault Code Descriptions (some models / models that display F1 or F3)<br />
Note: Only two fault codes are displayed by this control - F1 or F3. Generally, F1 display implies the electronic oven control itself has detected an internal<br />
malfunction. F3 implies the control has detected a sensor probe failure. In either case, an alarm will accompany a displayed F1 or F3.<br />
Fault Code<br />
F1<br />
F3<br />
Fault Code<br />
F10<br />
F11<br />
F13<br />
F30<br />
F31<br />
Likely Failure Condition/Cause<br />
1. Shorted keypad.<br />
2. Control's internal checksum may have become corrupted.<br />
3. Control has sensed a potential runaway oven condition. Control<br />
may have shorted relay, RTD sensor probe may have gone bad.<br />
1. Open RTD sensor probe. Note: The EOC will initially display an F1<br />
for this condition. The EOC thinks a runaway oven condition exists.<br />
2. Shorted RTD sensor probe. Note: The F3 for shorted probe should<br />
only occur when the oven is active or when an attempt is made to<br />
enter a mode.<br />
Likely Failure Condition/Cause<br />
Runaway Temperature.<br />
Shorted Keypad.<br />
Bad Micro Identification.<br />
Bad EEPROM Identification/Checksum error.<br />
Open probe connection.<br />
Shorted Probe connection.<br />
Suggested Corrective Action<br />
1. Disconnect power, wait 30 seconds and reapply power. If fault returns<br />
upon power-up, replace EOC.<br />
2. Check RTD sensor probe and replace if necessary. If oven is<br />
overheating, disconnect power. If oven continues to overheat when<br />
the power is reapplied, replace EOC. Severe overheating may require<br />
the entire oven to be replaced, should damage be extensive.<br />
3. Replace EOC.<br />
1. Check resistance at room temperature and compare to RTD sensor<br />
resistance chart. If resistance does not match the chart, replace RTD<br />
sensor probe.<br />
2. Check resistance at room temperature, if less than 500 ohms, replace<br />
RTD sensor probe.<br />
Electronic Oven Control Fault Code Descriptions (some models-models that display F10, F11, F13, F30 or F31)<br />
Circuit Analysis Matrix<br />
Suggested Corrective Action<br />
1. (F10 only) Check RTD Sensor Probe & replace if necessary. If oven is overheating,<br />
disconnect power. If oven continues to overheat when the power is reapplied, replace EOC.<br />
Severe overheating may require the entire oven to be replaced should damage be extensive.<br />
2. (F11 & 13) Disconnect power, wait 30 seconds and reapply power.<br />
3. (F11 & 13) If fault returns upon power-up, replace EOC.<br />
1. (F30 or F31) Check resistance at room temperature & compare to RTD Sensor resistance<br />
chart. If resistance does not match the RTD chart replace RTD Sensor Probe. Check Sensor<br />
wiring harness between EOC & Sensor Probe connector.<br />
2. (F30 or F31) Check resistance at room temperature, if less than 500 ohms, replace RTD Sensor<br />
Probe. Check for shorted Sensor Probe harness between EOC & Probe connector.
General Troubleshooting <strong>Diagram</strong><br />
General Troubleshooting Schematic