The Installation Handbook - Howarth Timber
The Installation Handbook - Howarth Timber
The Installation Handbook - Howarth Timber

You also want an ePaper? Increase the reach of your titles
YUMPU automatically turns print PDFs into web optimized ePapers that Google loves.
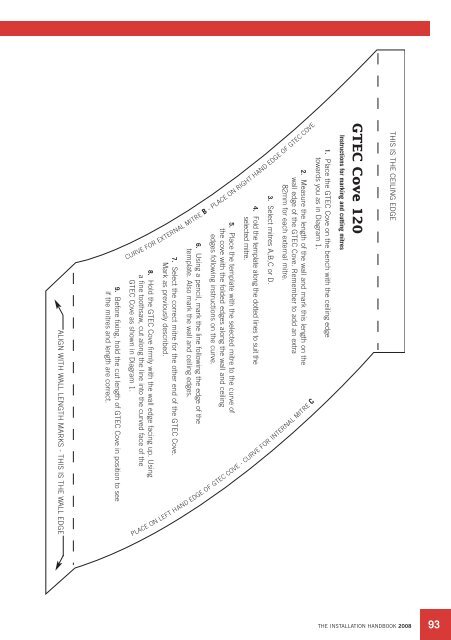
Instructions for marking and cutting mitres<br />
1. Place the GTEC Cove on the bench with the ceiling edge<br />
towards you as in Diagram 1.<br />
2. Measure the length of the wall and mark this length on the<br />
wall edge of the GTEC Cove. Remember to add an extra<br />
82mm for each external mitre.<br />
3. Select mitres A,B,C or D.<br />
4. Fold the template along the dotted lines to suit the<br />
selected mitre.<br />
5. Place the template with the selected mitre to the curve of<br />
the cove with the folded edges along the wall and ceiling<br />
edges following instructions on the curve.<br />
6. Using a pencil, mark the line following the edge of the<br />
template. Also mark the wall and ceiling edges.<br />
7. Select the correct mitre for the other end of the GTEC Cove.<br />
Mark as previously described.<br />
8. Hold the GTEC Cove firmly with the wall edge facing up. Using<br />
a fine toothsaw, cut along the line into the curved face of the<br />
GTEC Cove as shown in Diagram 1.<br />
9. Before fixing, hold the cut length of GTEC Cove in position to see<br />
if the mitres and length are correct.<br />
ALIGN WITH WALL LENGTH MARKS - THIS IS THE WALL EDGE<br />
CURVE FOR EXTERNAL MITRE B - PLACE ON RIGHT HAND EDGE OF GTEC COVE<br />
PLACE ON LEFT HAND EDGE OF GTEC COVE - CURVE FOR INTERNAL MITRE C<br />
THIS IS THE CEILING EDGE<br />
GTEC Cove 120<br />
THE INSTALLATION HANDBOOK 2008<br />
93