Body Side Moldings Installation Instructions - Bernardi Acura Parts ...
Body Side Moldings Installation Instructions - Bernardi Acura Parts ...
Body Side Moldings Installation Instructions - Bernardi Acura Parts ...

You also want an ePaper? Increase the reach of your titles
YUMPU automatically turns print PDFs into web optimized ePapers that Google loves.
INSTALLATION<br />
INSTRUCTIONS<br />
Accessory<br />
BODY SIDE MOLDINGS<br />
Application<br />
2010 MDX<br />
Publications No.<br />
BII 42078-43271<br />
Issue Date<br />
JAN 2010<br />
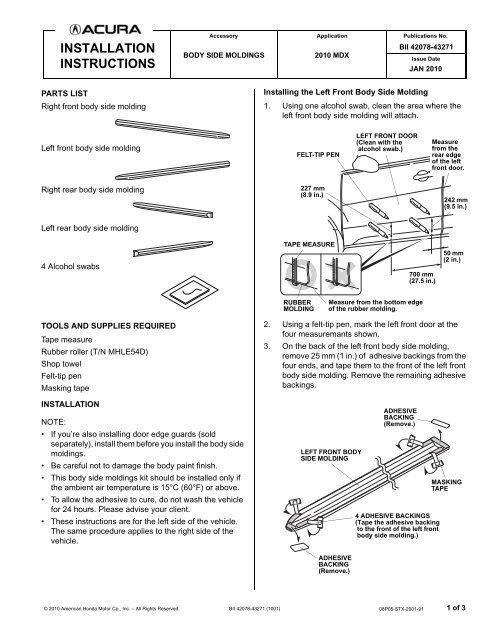
PARTS LIST<br />
Right front body side molding<br />
Installing the Left Front <strong>Body</strong> <strong>Side</strong> Molding<br />
1. Using one alcohol swab, clean the area where the<br />
left front body side molding will attach.<br />
Left front body side molding<br />
FELT-TIP PEN<br />
LEFT FRONT DOOR<br />
(Clean with the<br />
alcohol swab.)<br />
Measure<br />
from the<br />
rear edge<br />
of the left<br />
front door.<br />
Right rear body side molding<br />
227 mm<br />
(8.9 in.)<br />
242 mm<br />
(9.5 in.)<br />
Left rear body side molding<br />
4 Alcohol swabs<br />
TAPE MEASURE<br />
700 mm<br />
(27.5 in.)<br />
50 mm<br />
(2 in.)<br />
RUBBER<br />
MOLDING<br />
Measure from the bottom edge<br />
of the rubber molding.<br />
960301AJ<br />
TOOLS AND SUPPLIES REQUIRED<br />
Tape measure<br />
Rubber roller (T/N MHLE54D)<br />
Shop towel<br />
Felt-tip pen<br />
Masking tape<br />
INSTALLATION<br />
NOTE:<br />
• If you’re also installing door edge guards (sold<br />
separately), install them before you install the body side<br />
moldings.<br />
• Be careful not to damage the body paint finish.<br />
• This body side moldings kit should be installed only if<br />
the ambient air temperature is 15°C (60°F) or above.<br />
• To allow the adhesive to cure, do not wash the vehicle<br />
for 24 hours. Please advise your client.<br />
• These instructions are for the left side of the vehicle.<br />
The same procedure applies to the right side of the<br />
vehicle.<br />
2. Using a felt-tip pen, mark the left front door at the<br />
four measuremants shown.<br />
3. On the back of the left front body side molding,<br />
remove 25 mm (1 in.) of adhesive backings from the<br />
four ends, and tape them to the front of the left front<br />
body side molding. Remove the remaining adhesive<br />
backings.<br />
LEFT FRONT BODY<br />
SIDE MOLDING<br />
ADHESIVE<br />
BACKING<br />
(Remove.)<br />
4 ADHESIVE BACKINGS<br />
(Tape the adhesive backing<br />
to the front of the left front<br />
body side molding.)<br />
MASKING<br />
TAPE<br />
ADHESIVE<br />
BACKING<br />
(Remove.)<br />
960302AJ<br />
© 2010 American Honda Motor Co., Inc. – All Rights Reserved. BII 42078-43271 (1001) 08P05-STX-2001-91 1 of 3
4. Position the left front body side molding on the left<br />
front door, and align it with the two marks made in<br />
step 2.<br />
NOTE: If door edge guards are installed, match the<br />
rear edge of the left front body side molding with the<br />
door edge guard.<br />
4 ADHESIVE<br />
BACKINGS<br />
LEFT FRONT DOOR<br />
MARK<br />
Installing the Left Rear <strong>Body</strong> <strong>Side</strong> Molding<br />
7. Using one alcohol swab, clean the area where the<br />
left rear body side molding will attach.<br />
Measure<br />
from the<br />
front edge<br />
of the left<br />
rear door.<br />
FELT-TIP<br />
PEN<br />
244 mm<br />
(9.6 in.)<br />
LEFT REAR DOOR<br />
(Clean with the<br />
alcohol swab.)<br />
247 mm<br />
(9.7 in.)<br />
MARK<br />
TAPE MEASURE<br />
DOOR<br />
EDGE<br />
GUARD<br />
Align to the<br />
edge of the<br />
door edge<br />
guard.<br />
With Door Edge Guards<br />
LEFT FRONT BODY<br />
SIDE MOLDING<br />
Align to<br />
the end of<br />
the curved<br />
surface.<br />
LEFT FRONT<br />
DOOR<br />
960308AJ<br />
5. While applying pressure on the left front body side<br />
molding, carefully remove the four adhesive<br />
backings. Hold the left front body side molding firmly<br />
against the left front door with the palm of your<br />
hands, particularly at both edges, for 30 seconds.<br />
6. Wipe off the marks from the left front door.<br />
400 mm<br />
(15.7 in.)<br />
50 mm<br />
(2 in.)<br />
Measure from the bottom<br />
edge of the rubber molding.<br />
RUBBER<br />
MOLDING<br />
960304AJ<br />
8. Using a felt-tip pen, mark the left rear door at the four<br />
points shown.<br />
9. On the back of the left rear body side molding,<br />
remove 25 mm (1 in.) of adhesive backings from the<br />
four ends, and tape them to the front of the left rear<br />
body side molding. Remove the remaining adhesive<br />
backings.<br />
ADHESIVE<br />
BACKING<br />
(Remove.)<br />
LEFT REAR BODY<br />
SIDE MOLDING<br />
MASKING<br />
TAPE<br />
ADHESIVE<br />
BACKING<br />
(Remove.)<br />
4 ADHESIVE BACKINGS<br />
(Tape the adhesive<br />
backing to the front of the<br />
left rear body side<br />
molding.)<br />
960305AJ<br />
2 of 3 BII 42078-43271 (1001) © 2010 American Honda Motor Co., Inc. – All Rights Reserved.
10. Position the left rear body side molding on the left<br />
rear door, and align it with the two marks made in<br />
step 8.<br />
13. Using a rubber roller, apply pressure along the entire<br />
length of the left front and left rear body side<br />
moldings.<br />
4 ADHESIVE<br />
BACKINGS<br />
LEFT REAR DOOR<br />
MARK<br />
MARK<br />
2 mm<br />
(0.1 in.)<br />
LEFT FRONT BODY<br />
SIDE MOLDING<br />
LEFT REAR<br />
DOOR<br />
LEFT REAR BODY<br />
SIDE MOLDING<br />
END OF THE<br />
CURVED SURFACE<br />
960306AJ<br />
11. While applying pressure on the left rear body side<br />
molding, carefully remove the four adhesive<br />
backings. Hold the left rear body side molding firmly<br />
against the left rear door with the palm of your hands,<br />
particularly at both edges, for 30 seconds.<br />
12. Wipe off the marks from the left rear door.<br />
LEFT FRONT<br />
BODY SIDE<br />
MOLDING RUBBER<br />
ROLLER<br />
LEFT REAR<br />
BODY SIDE<br />
MOLDING<br />
14. Repeat steps 1 thru 13 to install the body side<br />
moldings on the right side of the vehicle.<br />
960307AJ<br />
© 2010 American Honda Motor Co., Inc. – All Rights Reserved. BII 42078-43271 (1001) 3 of 3