How to configure my IP of the Obtain IP automatically? - Edimax
How to configure my IP of the Obtain IP automatically? - Edimax
How to configure my IP of the Obtain IP automatically? - Edimax

You also want an ePaper? Increase the reach of your titles
YUMPU automatically turns print PDFs into web optimized ePapers that Google loves.
<strong>How</strong> <strong>to</strong> <strong>configure</strong> <strong>my</strong> <strong>IP</strong> address as<br />
“<strong>Obtain</strong> <strong>IP</strong> address au<strong>to</strong>matically”<br />
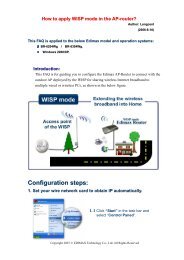
Author: Longcent<br />
(2006.11.6)<br />
This FAQ is applied <strong>to</strong> <strong>the</strong> below operation systems:<br />
Windows 2000/XP.<br />
Introduction:<br />
This FAQ is for guiding you <strong>to</strong> <strong>configure</strong> <strong>the</strong> <strong>IP</strong> address <strong>of</strong> your network card as<br />
“<strong>Obtain</strong> <strong>IP</strong> address au<strong>to</strong>matically”. In some cases, <strong>the</strong> failure <strong>of</strong> <strong>the</strong> Internet access is<br />
due <strong>to</strong> that your <strong>IP</strong> address is not set as “<strong>Obtain</strong> <strong>IP</strong> address au<strong>to</strong>matically”.<br />
Configuration Steps:<br />
Setp1. Click “Start” in <strong>the</strong> task bar and select “Control Paned”.<br />
Step 2. Click “Switch <strong>to</strong> Classic View” on <strong>the</strong> left <strong>to</strong>p.<br />
Copyright 2007 © EDIMAX Technology Co., Ltd. All Rights Reserved
Step 3. Double-click <strong>the</strong> “Network Connection” icon.<br />
4. Rick-click <strong>the</strong> “Local Area Connection” and select “Properties”.<br />
5 Select “Internet Pro<strong>to</strong>col” and click “Properties”.<br />
Copyright 2007 © EDIMAX Technology Co., Ltd. All Rights Reserved
6 Ensure <strong>the</strong> option “<strong>Obtain</strong> an <strong>IP</strong> au<strong>to</strong>matically” and “<strong>Obtain</strong> DNS address<br />
au<strong>to</strong>matically” is checked and click “OK”.<br />
7. Now, <strong>the</strong> configuration is complete.<br />
Copyright 2007 © EDIMAX Technology Co., Ltd. All Rights Reserved