April 2009 - Kitchener Waterloo Aquarium Society
April 2009 - Kitchener Waterloo Aquarium Society
April 2009 - Kitchener Waterloo Aquarium Society

Create successful ePaper yourself
Turn your PDF publications into a flip-book with our unique Google optimized e-Paper software.
A P R I L 2 0 0 9<br />
More Than a Hole in the Ground...<br />
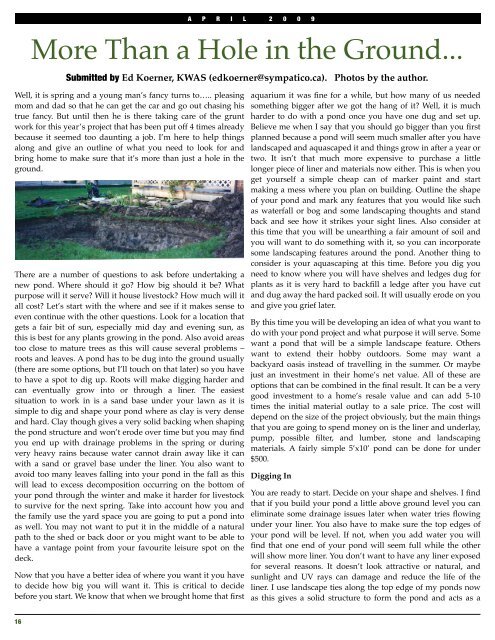
Submitted by Ed Koerner, KWAS (edkoerner@sympatico.ca). Photos by the author.<br />
Well, it is spring and a young man’s fancy turns to….. pleasing<br />
mom and dad so that he can get the car and go out chasing his<br />
true fancy. But until then he is there taking care of the grunt<br />
work for this year’s project that has been put off 4 times already<br />
because it seemed too daunting a job. I’m here to help things<br />
along and give an outline of what you need to look for and<br />
bring home to make sure that it’s more than just a hole in the<br />
ground.<br />
There are a number of questions to ask before undertaking a<br />
new pond. Where should it go How big should it be What<br />
purpose will it serve Will it house livestock How much will it<br />
all cost Let’s start with the where and see if it makes sense to<br />
even continue with the other questions. Look for a location that<br />
gets a fair bit of sun, especially mid day and evening sun, as<br />
this is best for any plants growing in the pond. Also avoid areas<br />
too close to mature trees as this will cause several problems –<br />
roots and leaves. A pond has to be dug into the ground usually<br />
(there are some options, but I’ll touch on that later) so you have<br />
to have a spot to dig up. Roots will make digging harder and<br />
can eventually grow into or through a liner. The easiest<br />
situation to work in is a sand base under your lawn as it is<br />
simple to dig and shape your pond where as clay is very dense<br />
and hard. Clay though gives a very solid backing when shaping<br />
the pond structure and won’t erode over time but you may find<br />
you end up with drainage problems in the spring or during<br />
very heavy rains because water cannot drain away like it can<br />
with a sand or gravel base under the liner. You also want to<br />
avoid too many leaves falling into your pond in the fall as this<br />
will lead to excess decomposition occurring on the bottom of<br />
your pond through the winter and make it harder for livestock<br />
to survive for the next spring. Take into account how you and<br />
the family use the yard space you are going to put a pond into<br />
as well. You may not want to put it in the middle of a natural<br />
path to the shed or back door or you might want to be able to<br />
have a vantage point from your favourite leisure spot on the<br />
deck.<br />
Now that you have a better idea of where you want it you have<br />
to decide how big you will want it. This is critical to decide<br />
before you start. We know that when we brought home that first<br />
aquarium it was fine for a while, but how many of us needed<br />
something bigger after we got the hang of it Well, it is much<br />
harder to do with a pond once you have one dug and set up.<br />
Believe me when I say that you should go bigger than you first<br />
planned because a pond will seem much smaller after you have<br />
landscaped and aquascaped it and things grow in after a year or<br />
two. It isn’t that much more expensive to purchase a little<br />
longer piece of liner and materials now either. This is when you<br />
get yourself a simple cheap can of marker paint and start<br />
making a mess where you plan on building. Outline the shape<br />
of your pond and mark any features that you would like such<br />
as waterfall or bog and some landscaping thoughts and stand<br />
back and see how it strikes your sight lines. Also consider at<br />
this time that you will be unearthing a fair amount of soil and<br />
you will want to do something with it, so you can incorporate<br />
some landscaping features around the pond. Another thing to<br />
consider is your aquascaping at this time. Before you dig you<br />
need to know where you will have shelves and ledges dug for<br />
plants as it is very hard to backfill a ledge after you have cut<br />
and dug away the hard packed soil. It will usually erode on you<br />
and give you grief later.<br />
By this time you will be developing an idea of what you want to<br />
do with your pond project and what purpose it will serve. Some<br />
want a pond that will be a simple landscape feature. Others<br />
want to extend their hobby outdoors. Some may want a<br />
backyard oasis instead of travelling in the summer. Or maybe<br />
just an investment in their home’s net value. All of these are<br />
options that can be combined in the final result. It can be a very<br />
good investment to a home’s resale value and can add 5-10<br />
times the initial material outlay to a sale price. The cost will<br />
depend on the size of the project obviously, but the main things<br />
that you are going to spend money on is the liner and underlay,<br />
pump, possible filter, and lumber, stone and landscaping<br />
materials. A fairly simple 5’x10’ pond can be done for under<br />
$500.<br />
Digging In<br />
You are ready to start. Decide on your shape and shelves. I find<br />
that if you build your pond a little above ground level you can<br />
eliminate some drainage issues later when water tries flowing<br />
under your liner. You also have to make sure the top edges of<br />
your pond will be level. If not, when you add water you will<br />
find that one end of your pond will seem full while the other<br />
will show more liner. You don’t want to have any liner exposed<br />
for several reasons. It doesn’t look attractive or natural, and<br />
sunlight and UV rays can damage and reduce the life of the<br />
liner. I use landscape ties along the top edge of my ponds now<br />
as this gives a solid structure to form the pond and acts as a<br />
16