CALIBRATION CERTIFICATE
CALIBRATION CERTIFICATE CALIBRATION CERTIFICATE
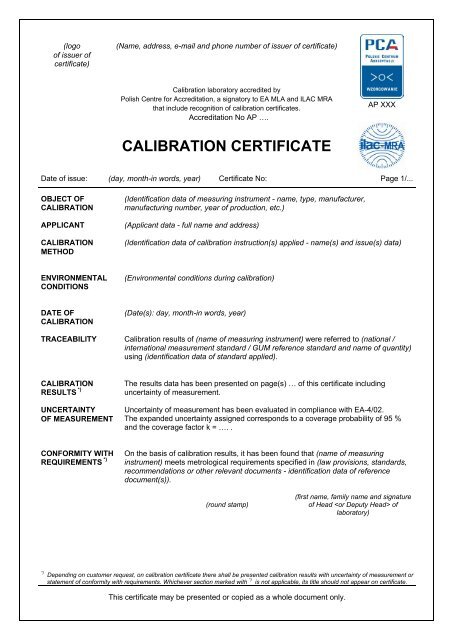
(logo of issuer of certificate) (Name, address, e-mail and phone number of issuer of certificate) Calibration laboratory accredited by Polish Centre for Accreditation, a signatory to EA MLA and ILAC MRA that include recognition of calibration certificates. Accreditation No AP …. AP XXX CALIBRATION CERTIFICATE Date of issue: (day, month-in words, year) Certificate No: Page 1/... OBJECT OF CALIBRATION APPLICANT CALIBRATION METHOD (Identification data of measuring instrument - name, type, manufacturer, manufacturing number, year of production, etc.) (Applicant data - full name and address) (Identification data of calibration instruction(s) applied - name(s) and issue(s) data) ENVIRONMENTAL CONDITIONS (Environmental conditions during calibration) DATE OF CALIBRATION (Date(s): day, month-in words, year) TRACEABILITY Calibration results of (name of measuring instrument) were referred to (national / international measurement standard / GUM reference standard and name of quantity) using (identification data of standard applied). CALIBRATION RESULTS *) UNCERTAINTY OF MEASUREMENT The results data has been presented on page(s) … of this certificate including uncertainty of measurement. Uncertainty of measurement has been evaluated in compliance with EA-4/02. The expanded uncertainty assigned corresponds to a coverage probability of 95 % and the coverage factor k = …. . CONFORMITY WITH REQUIREMENTS *) On the basis of calibration results, it has been found that (name of measuring instrument) meets metrological requirements specified in (law provisions, standards, recommendations or other relevant documents - identification data of reference document(s)). (round stamp) (first name, family name and signature of Head of laboratory) *) Depending on customer request, on calibration certificate there shall be presented calibration results with uncertainty of measurement or statement of conformity with requirements. Whichever section marked with *) is not applicable, its title should not appear on certificate. This certificate may be presented or copied as a whole document only.
(logo<br />
of issuer of<br />
certificate)<br />
(Name, address, e-mail and phone number of issuer of certificate)<br />
Calibration laboratory accredited by<br />
Polish Centre for Accreditation, a signatory to EA MLA and ILAC MRA<br />
that include recognition of calibration certificates.<br />
Accreditation No AP ….<br />
AP XXX<br />
<strong>CALIBRATION</strong> <strong>CERTIFICATE</strong><br />
Date of issue: (day, month-in words, year) Certificate No: Page 1/...<br />
OBJECT OF<br />
<strong>CALIBRATION</strong><br />
APPLICANT<br />
<strong>CALIBRATION</strong><br />
METHOD<br />
(Identification data of measuring instrument - name, type, manufacturer,<br />
manufacturing number, year of production, etc.)<br />
(Applicant data - full name and address)<br />
(Identification data of calibration instruction(s) applied - name(s) and issue(s) data)<br />
ENVIRONMENTAL<br />
CONDITIONS<br />
(Environmental conditions during calibration)<br />
DATE OF<br />
<strong>CALIBRATION</strong><br />
(Date(s): day, month-in words, year)<br />
TRACEABILITY Calibration results of (name of measuring instrument) were referred to (national /<br />
international measurement standard / GUM reference standard and name of quantity)<br />
using (identification data of standard applied).<br />
<strong>CALIBRATION</strong><br />
RESULTS *)<br />
UNCERTAINTY<br />
OF MEASUREMENT<br />
The results data has been presented on page(s) … of this certificate including<br />
uncertainty of measurement.<br />
Uncertainty of measurement has been evaluated in compliance with EA-4/02.<br />
The expanded uncertainty assigned corresponds to a coverage probability of 95 %<br />
and the coverage factor k = …. .<br />
CONFORMITY WITH<br />
REQUIREMENTS *)<br />
On the basis of calibration results, it has been found that (name of measuring<br />
instrument) meets metrological requirements specified in (law provisions, standards,<br />
recommendations or other relevant documents - identification data of reference<br />
document(s)).<br />
(round stamp)<br />
(first name, family name and signature<br />
of Head of<br />
laboratory)<br />
*)<br />
Depending on customer request, on calibration certificate there shall be presented calibration results with uncertainty of measurement or<br />
statement of conformity with requirements. Whichever section marked with *)<br />
is not applicable, its title should not appear on certificate.<br />
This certificate may be presented or copied as a whole document only.
<strong>CALIBRATION</strong> <strong>CERTIFICATE</strong> issued by ACCREDITED LABORATORY No AP …<br />
Date of issue: (day, month-in words, year) Certificate No: Page 2/..<br />
<strong>CALIBRATION</strong><br />
RESULTS<br />
Calibration results are the following:<br />
Checked by:<br />
*)<br />
(signature of a person responsible for<br />
acceptance of essential contents of<br />
certificate)<br />
*) The signature shall be placed on each page of calibration certificate that holds calibration results.<br />
Recommended dimensions:<br />
Size of bordering frame on calibration certificate:<br />
[190 x 275] mm<br />
Height of head on first page of certificate, separated with line:<br />
75 mm<br />
Height of head on the second and subsequent pages of certificate, separated with line: 20 mm


