Injection Troubleshooting Chart - Plenco
Injection Troubleshooting Chart - Plenco
Injection Troubleshooting Chart - Plenco

You also want an ePaper? Increase the reach of your titles
YUMPU automatically turns print PDFs into web optimized ePapers that Google loves.
P L A S T I C S E N G I N E E R I N G C O M P A N Y<br />
S H E B O Y G A N , W I S C O N S I N 5 3 0 8 2 - 0 7 5 8 U . S . A<br />
3518 LAKESHORE ROAD<br />
POST OFFICE BOX 758<br />
PHONE 920 - 458 - 2121<br />
F A X 920 - 458 - 1923<br />
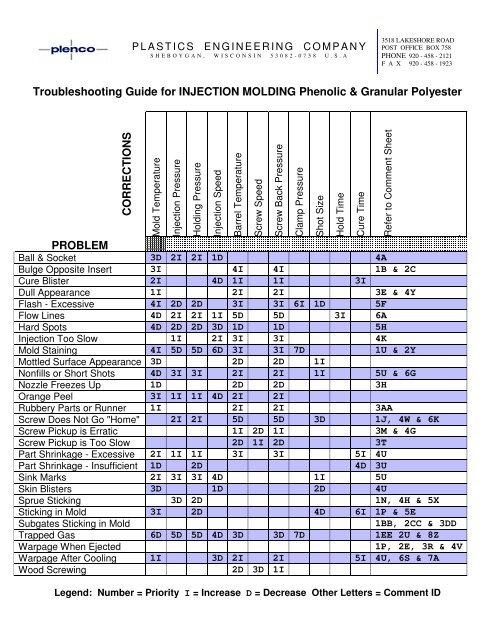
<strong>Troubleshooting</strong> Guide for INJECTION MOLDING Phenolic & Granular Polyester<br />
CORRECTIONS<br />
Mold Temperature<br />
<strong>Injection</strong> Pressure<br />
Holding Pressure<br />
<strong>Injection</strong> Speed<br />
Barrel Temperature<br />
PROBLEM<br />
Ball & Socket 3D 2I 2I 1D 4A<br />
Bulge Opposite Insert 3I 4I 4I 1B & 2C<br />
Cure Blister 2I 4D 1I 1I 3I<br />
Dull Appearance 1I 2I 2I 3E & 4Y<br />
Flash - Excessive 4I 2D 2D 3I 3I 6I 1D 5F<br />
Flow Lines 4D 2I 2I 1I 5D 5D 3I 6A<br />
Hard Spots 4D 2D 2D 3D 1D 1D 5H<br />
<strong>Injection</strong> Too Slow 1I 2I 3I 3I 4K<br />
Mold Staining 4I 5D 5D 6D 3I 3I 7D 1U & 2Y<br />
Mottled Surface Appearance 3D 2D 2D 1I<br />
Nonfills or Short Shots 4D 3I 3I 2I 2I 1I 5U & 6G<br />
Nozzle Freezes Up 1D 2D 2D 3H<br />
Orange Peel 3I 1I 1I 4D 2I 2I<br />
Rubbery Parts or Runner 1I 2I 2I 3AA<br />
Screw Does Not Go "Home" 2I 2I 5D 5D 3D 1J, 4W & 6K<br />
Screw Pickup is Erratic 1I 2D 1I 3M & 4G<br />
Screw Pickup is Too Slow 2D 1I 2D 3T<br />
Part Shrinkage - Excessive 2I 1I 1I 3I 3I 5I 4U<br />
Part Shrinkage - Insufficient 1D 2D 4D 3U<br />
Sink Marks 2I 3I 3I 4D 1I 5U<br />
Skin Blisters 3D 1D 2D 4U<br />
Sprue Sticking 3D 2D 1N, 4H & 5X<br />
Sticking in Mold 3I 2D 4D 6I 1P & 5E<br />
Subgates Sticking in Mold<br />
1BB, 2CC & 3DD<br />
Trapped Gas 6D 5D 5D 4D 3D 3D 7D 1EE 2U & 8Z<br />
Warpage When Ejected<br />
1P, 2E, 3R & 4V<br />
Warpage After Cooling 1I 3D 2I 2I 5I 4U, 6S & 7A<br />
Wood Screwing<br />
2D 3D 1I<br />
Screw Speed<br />
Screw Back Pressure<br />
Clamp Pressure<br />
Shot Size<br />
Hold Time<br />
Cure Time<br />
Refer to Comment Sheet<br />
.<br />
Legend: Number = Priority I = Increase D = Decrease Other Letters = Comment ID
P L A S T I C S E N G I N E E R I N G C O M P A N Y<br />
S H E B O Y G A N , W I S C O N S I N 5 3 0 8 2 - 0 7 5 8 U . S . A<br />
3518 LAKESHORE ROAD<br />
POST OFFICE BOX 758<br />
PHONE 920 - 458 - 2121<br />
F A X 920 - 458 - 1923<br />
Comment Sheet for INJECTION MOLDING Phenolic & Granular Polyester<br />
A. Increase the size of the gate and if possible relocate it.<br />
B. Heat inserts to mold temperature before using.<br />
C. Use a shorter insert.<br />
E. Check the condition of the mold plating and re-plate if necessary. If the mold is unplated, polishing or polishing<br />
and plating may be necessary.<br />
F. Check the parting line for wear or damage and repair as needed.<br />
G. Check the screw and barrel for wear and if necessary recondition or replace them.<br />
H. Check the sprue tip for a "soft bulb" on the end. If it is not soft, one of the following methods can be used to<br />
reduce the heat transfer from the mold to the nozzle: put an air blow on the nozzle; use a 1/2" spherical radius<br />
nozzle in conjunction with a sprue bushing having a 3/4" spherical radius or insulate the nozzle from the mold<br />
with a piece of corrugated cardboard.<br />
J. Increase injection time.<br />
K. If a mold is either too hot or too cold, it will be difficult to inject all of the material into the mold or the cavities will<br />
fill slowly. To determine if the mold temperature is causing the problem, vary it by 10°F in both directions and<br />
evaluate the results to determine the proper adjustment.<br />
M. Check to see if there is a problem with the material feeding out of the hopper and into the throat of the press.<br />
N. Make sure that the orifice of the sprue bushing is larger than the orifice of the nozzle. Also, check the sprue<br />
bushing and nozzle for damage or wear and repair of replace as needed.<br />
P. Check the mold for wear or staining. Polish out any mold stains and remove any undercuts that may have been<br />
worn into the mold.<br />
R. Add undercuts to hold the part in the moving half of the mold until it is ready to be ejected.<br />
S. Use shrink fixtures to hold the parts flat as they cool.<br />
T. Increase the barrel temperature of only the feed zone.<br />
U. Check the vents and correct as needed. (See Section #6 "Thermoset <strong>Injection</strong> Mold Design Tips")<br />
V. Watch the dropping of the parts from the mold or observe the part picker to see if the parts are being deformed.<br />
W. Decrease the amount of cushion.<br />
X. Check the sprue puller design and revise as needed. (See Section #6 "Thermoset <strong>Injection</strong> Mold Design Tips")<br />
Y. Polish those areas of the mold that tend to trap gas and stain.<br />
Z. Increase the gate and runner size.<br />
AA. Request from material supplier a version of the material that has a lower hot rigidity or deflection<br />
specification.
P L A S T I C S E N G I N E E R I N G C O M P A N Y<br />
S H E B O Y G A N , W I S C O N S I N 5 3 0 8 2 - 0 7 5 8 U . S . A<br />
3518 LAKESHORE ROAD<br />
POST OFFICE BOX 758<br />
PHONE 920 - 458 - 2121<br />
F A X 920 - 458 - 1923<br />
BB. If a new mold, check subgate design and correct as needed.<br />
CC. If an existing mold, check subgates for damage or wear and repair or replace as needed.<br />
DD. Request from material supplier a version of the material that has a higher hot rigidity or deflection<br />
specification.<br />
EE. If mold is vacuum vented, check if system is pulling a minimum of 21" Hg in the mold. If not, resolve problem<br />
with vacuum system.