Optimist Tuning Guide - North Sails - One Design
Optimist Tuning Guide - North Sails - One Design
Optimist Tuning Guide - North Sails - One Design

Create successful ePaper yourself
Turn your PDF publications into a flip-book with our unique Google optimized e-Paper software.
For any question you may have on tuning your <strong>Optimist</strong> for<br />
speed, contact one of our <strong>Optimist</strong> experts listed below:<br />
ONE DESIGN EAST<br />
Brian Hayes . Ched Proctor<br />
203 877 7627<br />
F 203 877 6942<br />
brian@od.northsails.com<br />
ched@od.northsails.com<br />
ONE DESIGN RHODE ISLAND<br />
Chuck Allen<br />
401 683 7997<br />
F 401 683 9121<br />
chuck@od.northsails.com<br />
ONE DESIGN ZENDA<br />
Andy Burdick<br />
262 275 9728<br />
F 262 275 8012<br />
andy@melges.com<br />
ONE DESIGN CAPE COD<br />
Matt Wake<br />
508 778 6550<br />
F 508 778 9332<br />
mike@service.northsails.com<br />
<strong>Optimist</strong><br />
<strong>Tuning</strong> <strong>Guide</strong>
NORTH SAILS<br />
<strong>Optimist</strong> <strong>Tuning</strong> <strong>Guide</strong><br />
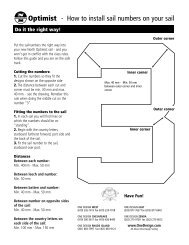
Peak or Head<br />
Throat<br />
Tack<br />
Clew<br />
Thank you for choosing <strong>North</strong> <strong>Sails</strong> for your <strong>Optimist</strong>. Whether you are just starting out in an Opti you are an<br />
experienced racer, read this guide carefully to make sure you get your new <strong>North</strong> Sail set up for maximum speed. While we<br />
have tried to make this guide as self-explanatory as possible if you have any questions please do not hesitate to contact<br />
our Opti experts. We are here to help you get the most from your new sail and your boat! See our contact information at<br />
the end of this guide or visit our web site at www.<strong>One</strong><strong>Design</strong>.com.<br />
This tuning guide is designed to provide you with the information for the key controls that influence the shape of your<br />
sail. Having the correct sail shape can be the biggest determining factor in the speed of your boat and your success on the<br />
race course. We divided this guide into two sections, leech and luff, and we have also provided details for the centerboard<br />
height, hiking straps, etc. With this information you will know how to set up your sail and boat for all conditions.<br />
Visit our web site at www.<strong>One</strong><strong>Design</strong>.com for the latest <strong>Optimist</strong> news and tuning tips.<br />
© <strong>North</strong> <strong>Sails</strong> <strong>One</strong> <strong>Design</strong>. All rights reserved.<br />
2
NORTH SAILS<br />
<strong>Optimist</strong> <strong>Tuning</strong> <strong>Guide</strong><br />
GETTING STARTED, RIGGING THE SAIL<br />
If you are an advanced Opti racer you can skip this section.<br />
Begin with tieing the line at the three corners, clew, tack and throat starting from<br />
the clew. To do this, you will want to use the larger diameter lines provided with<br />
your sail (3mm Diameter). Refer to the pictures for how to tie the throat and tack.<br />
Once you have the three corners tied, rig up the sprit. Note that the sprit has a<br />
point on each one of the ends, and the peak of the sail has a looped line, put the<br />
upper sprit end through this looped line. Loop the short wire that controls the<br />
sprit tension over the opposite end. Note that the sprit has a little plastic cover, to<br />
protect it from chafing on the mast, make sure that you rig the sprit with this end<br />
down. Another suggestion is to rig the sprit on starboard side. Usually you start the<br />
race on starboard tack and this will give you the best speed off the start line.<br />
How to tie the sail to the tack<br />
Once you have everything rigged (outhaul, sprit, vang, top and vang preventer,<br />
and corners), put a little bit of tension on them, and then tie the sail ties to all the<br />
remaining grommets using the 3mm diameter line providedusing a square knot. We<br />
suggest you tie these with two wraps around the boom. Keep in mind that the lines<br />
on the boom are tied loose (not more than 10 mm away but as close to that as<br />
possible), and the lines on the mast go tight (but not tighter than 1 mm). See the<br />
pictures as a guide. Don't forget to tighten your knots very tight, if not, the knots<br />
will come undone when the sail luffs.<br />
How to tie the sail to the throat<br />
1mm of separation between the<br />
mast and the sail.<br />
No more than 1 cm of separation<br />
between the sail and the boom<br />
The <strong>North</strong> Opti<br />
experts are<br />
always available<br />
to help you! Call<br />
them if you have<br />
questions!<br />
Visit our web site at www.<strong>One</strong><strong>Design</strong>.com for the latest <strong>Optimist</strong> news and tuning tips.<br />
© <strong>North</strong> <strong>Sails</strong> <strong>One</strong> <strong>Design</strong>. All rights reserved.<br />
3
NORTH SAILS<br />
<strong>Optimist</strong> <strong>Tuning</strong> <strong>Guide</strong><br />
Section 1: The Leech<br />
MAINSHEET<br />
Upwind<br />
Properly trimming the mainsheet is key. Consider it the accelerator on your<br />
boat and do not be afraid to play it. The best sailors are constantly adjusting<br />
their mainsheet as their boat sails through the water, adjusting it for each<br />
change in the water and wind.<br />
In general, the sail should be trimmed so that the boom is always above the<br />
leeward corner of the transom (See picture). This will keep the leech at the<br />
right angle to the wind. To point higher, trim the sail tighter and to sail lower<br />
and faster ease the sail slightly. You might even want to put a small mark with<br />
tape on your mainsheet to help you gauge how tight or loose the sheet is.<br />
You will notice that your new sail has a telltale sewn to the back end of the<br />
top batten. This telltale should always be streaming about 50% of the time. If<br />
it is always stalled behind the sail, your mainsheet, sprit or vang may be too<br />
tight. See more about the sprit and vang below.<br />
Boom should align with the corner of the boat<br />
It's always a good idea to give the sheet a little ease before hitting a big wave, because it will open your leech and give<br />
your boat a boost to power through the wave without slowing down. Make<br />
sure you head down as you ease and chose a mainsheet that will not absorb<br />
water, we suggest 6mm.<br />
Downwind<br />
Downwind, we suggest that you have a long sheet so that you can let the sail<br />
out all the way. You want the angle between the boom and the middle of<br />
the boat to be 90 degrees, but still have some slack in the sheet to be able to<br />
pump and regulate your heel. Tie a knot once it is at 90 degrees (See picture).<br />
Mainsheet all the way out.<br />
Visit our web site at www.<strong>One</strong><strong>Design</strong>.com for the latest <strong>Optimist</strong> news and tuning tips.<br />
© <strong>North</strong> <strong>Sails</strong> <strong>One</strong> <strong>Design</strong>. All rights reserved.<br />
4
NORTH SAILS<br />
<strong>Optimist</strong> <strong>Tuning</strong> <strong>Guide</strong><br />
SPRIT<br />
Upwind<br />
The sprit controls the leech tension. It has big influence on the leech and when you tighten it, you will tighten the leech.<br />
The way you want to have the sprit in all conditions, with the exception of heavy air, is so there are no diagonal wrinkles<br />
at all. (see picture of too much sprit tension) A little wrinkle perpendicular to the sprit is not a problem and is preferred<br />
(see picture). In light air you actually want to have this small wrinkle, so that you are sure the leech is not too closed or<br />
tight. The basic rule is always have the sail fly smooth or with a slight wrinkle coming off the throat.<br />
Bad wrinkle. Too much sprit tension.<br />
Right sprit tension. A little wrinkle<br />
perpendicular to the sprit is ok.<br />
Heavy Air<br />
As long as you can sail the boat flat with the main all the way in (not further in than the corner of the transom), then<br />
you would set the sprit tension as described above. If you start having trouble and you are hiking all the way out but still<br />
can't sail flat, then you should ease the sprit a little bit, allowing it to wrinkle from the throat to the clew, this will twist<br />
open the leech and depower. Also pulling the centerboard up 3 inches up will help a lot. Note that like many other boats,<br />
the Opti likes to be sailed flat upwind. Sailing the boat flat upwind will keep it from slipping sideways upwind.<br />
DOWNWIND<br />
Light Air<br />
When you head down and ease the sheet, you will see a big wrinkle that goes from<br />
the tack to the head, showing the sprit is too tight. You want a little bit of sag in the<br />
leech sailing downwind, so once you head down slide to the bow and ease the sprit a<br />
little bit so that you don't have any vertical wrinkles at all. To be able to do this easily<br />
you should have a handle tied on the sprit line, as close to the cleat as you can, but<br />
still allowing you to release it (see picture). Try not to have the handle tied far from the<br />
cleat because it will be real hard for you to trim the sprit back on before rounding the<br />
leeward mark.<br />
Handle tied to the sprit line will help<br />
you to adjust the sprit when sailing.<br />
Visit our web site at www.<strong>One</strong><strong>Design</strong>.com for the latest <strong>Optimist</strong> news and tuning tips.<br />
© <strong>North</strong> <strong>Sails</strong> <strong>One</strong> <strong>Design</strong>. All rights reserved.<br />
5
NORTH SAILS<br />
<strong>Optimist</strong> <strong>Tuning</strong> <strong>Guide</strong><br />
Heavy Air<br />
Only if it is windy (more than 13-14 knots), do not ease the sprit at all for the run. In heavy air you want to keep your<br />
weight back in the boat and moving forward to ease the sprit will make the boat unstable and hard to control.<br />
VANG AND PREVENTER<br />
The vang has a similar set up for upwind or downwind sailing. You want to have the vang tight so that the leech<br />
doesn't twist open too much. In very light conditions do not tension the vang too much, you just want to be able to sail<br />
downwind with the leech straight and not allow the boom to move upwards at the clew.<br />
In heavy air you want the vang very tight, if not, it will be very hard to stabilize the boat on the downwind run. If the<br />
leech is open, you will most likely flip over. <strong>One</strong> way to not capsize is by pulling the sail in, but as we suggested before,<br />
you'll get the best out of your sail if you let it out to the 90 degrees. The best way of trimming your vang is to pull the<br />
sail in all the way up to the middle of the boat. Most likely you will be pointing straight into the wind, sheet in hard and<br />
slide forward to cleat the vang tight.<br />
The basic rule of thumb is that the top batten on the main should<br />
always be parallel to the boom if the batten is angled in or out from this<br />
position, the vang could be too tight or too loose respectively.<br />
The vang and preventer work together. Even if you tighten your vang<br />
really hard if the preventer is not on, the boom will still move upwards at<br />
the Clew because it will be able to slide down where it meets the mast<br />
(gooseneck).<br />
Did you know we have<br />
video clips on our web<br />
site that show some<br />
important tricks on<br />
boat handling<br />
Check it out at www.<br />
<strong>One</strong><strong>Design</strong>.com<br />
The preventer is the controller that controls the tension on the luff of the sail, this is very important because the luff<br />
tension moves the draft of the sail forward or backwards. If the luff is tight this moves the draft forward, if it is loose the<br />
draft moves back. Also, the preventer keeps the boom from sliding down when tensioning the vang, which in turn is key<br />
to keeping the leech tight.<br />
Try tightening the vang without the preventer. Push the boom upwards and see what happens. You'll find that it only<br />
tensions the luff, and not the leech, just the opposite of what you want.<br />
OUTHAUL<br />
The outhaul also modifies the shape of leech. The tighter the outhaul the straighter the lower back end of the sail will be.<br />
The looser the outhaul the rounder the lower leech of the sail will be.<br />
Visit our web site at www.<strong>One</strong><strong>Design</strong>.com for the latest <strong>Optimist</strong> news and tuning tips.<br />
© <strong>North</strong> <strong>Sails</strong> <strong>One</strong> <strong>Design</strong>. All rights reserved.<br />
6
NORTH SAILS<br />
<strong>Optimist</strong> <strong>Tuning</strong> <strong>Guide</strong><br />
In light air, you will want to see wrinkles perpendicular<br />
to the boom, if you see the wrinkles and the foot of the<br />
sail is too bumpy then the outhaul too loose. Make sure<br />
the wrinkles don't go higher into the sail then the first<br />
seam (see picture).<br />
In heavy air, where you are overpowered and cannot<br />
control the boat and you have a lot of helm, tighten<br />
the outhaul hard, and put a big wrinkle parallel to the<br />
boom. The angle of the lower batten is a big influence<br />
for the helm, so the rounder it is the more helm you<br />
get because the angle of the lower leech is pointing to<br />
weather.<br />
Setting the outhaul<br />
The outhaul is another power source for the boat, the looser and rounder the foot, the more power you have to go<br />
through waves and accelerate fast. But also, the looser and rounder the less you can point, so find your balance by speed<br />
testing.<br />
Section 2: The Luff<br />
PREVENTER<br />
In light air you want the preventer tight (with two twists), so that the luff is loose.<br />
You do not want the luff so loose that there are wrinkles parallel to the boom coming<br />
from the grommets along the luff, but loose enough to allow the sail to switch easily<br />
from one side to the other without any trouble when you tack.<br />
In general, you never want any wrinkles at all along the luff. Wrinkles caused by<br />
the preventer being too tight would be parallel to the boom and the too loose (or<br />
untwisted) wrinkles would be parallel to the mast. Have your preventer set up so<br />
that you never twist the line more than twice in light air. Do not twist the lines at all<br />
in heavy air. When you do not have any twists in the line, make sure you do not have<br />
a big wrinkle parallel to the mast indicating that the luff of the sail is too tight. We<br />
suggest using a square knot on the low side of the boom, having the two ends of the<br />
line tied together, instead of two stop knots next to the holes. You need to play with<br />
it, twisting and regulating its length by the square knot (See picture 1493). The line<br />
should be 3 or 4 mm thick and be very low stretch.<br />
Visit our web site at www.<strong>One</strong><strong>Design</strong>.com for the latest <strong>Optimist</strong> news and tuning tips.<br />
© <strong>North</strong> <strong>Sails</strong> <strong>One</strong> <strong>Design</strong>. All rights reserved.<br />
The preventer<br />
Tightening the preventer for light air<br />
- two twists<br />
7
NORTH SAILS<br />
<strong>Optimist</strong> <strong>Tuning</strong> <strong>Guide</strong><br />
SAIL TIES<br />
Note that the rules allow you to have the edge of the luff or foot of the sail no further than 1 cm from the mast or boom.<br />
On the boom, you want to have the sail ties as long as you can within the<br />
rules so that when you tack the sail switches sides easily. The sail ties should<br />
all be as loose as you can, no matter what the condition may be. On the mast<br />
or luff, you want the ties tight, but again, allowing the sail to switch sides. The<br />
perfect range would be 1 mm away from the mast, but make sure that the<br />
knot is tight so that it doesn't become any looser than that. The same goes for<br />
the corners, 1mm, no matter what the conditions may be.<br />
A square knot to help adjusting the preventer.<br />
Make sure that the ties in the mast or luff are all tied at exactly the same<br />
distance. If any of the ties are tighter or looser, it will wrinkle the sail parallel to the boom. That does not mean that the<br />
luff itself is too loose, it means that the luff is not tied evenly.<br />
TOP PREVENTER - Very important luff control!<br />
The most important sail tie is the one at the top corner that pulls the sail down. It is a<br />
luff tension regulator called the Top Preventer. It also controls the sail height, keeping<br />
it inside the marks of the mast if tied properly.<br />
What would happen if the preventer is so tight that the sail is smooth in the luff, but<br />
the Top Preventer is loose Well, the sprit pushes the sail higher and if nothing is<br />
stopping the sail it would probably come out of the mast. At least if you don't get to<br />
that point, the luff will be really tight because the vang pulls the sail down, the sprit<br />
up, and nothing is stopping it.<br />
In heavy air you want the sail to be as low as possible, especially if you are light.<br />
Tension the top preventer in a way so that the sail in the moves down to the lower<br />
part of the marks in the mast. In light air you want the sail higher, look at the marks<br />
and tie the top preventer in a way that the mark of the sail is on the highest part of<br />
the marks in the mast.<br />
The standard length for the ties is:<br />
Tying the preventer.<br />
Not any looser than that<br />
Corners (tack, clew and throat): five 3 mm wide, 60 cm/ 24" long.<br />
Grommets: twelve1.5 mm wide, 50 cm/19" long.<br />
Visit our web site at www.<strong>One</strong><strong>Design</strong>.com for the latest <strong>Optimist</strong> news and tuning tips.<br />
© <strong>North</strong> <strong>Sails</strong> <strong>One</strong> <strong>Design</strong>. All rights reserved.<br />
8
NORTH SAILS<br />
<strong>Optimist</strong> <strong>Tuning</strong> <strong>Guide</strong><br />
MAST RAKE<br />
Mast rake should be set according to your weight. It is measured from the top-aft of the mast to the edge of the deck,<br />
coaming, in the transom. Adjust the mast step in the bottom of the boat to get to one of these settings.<br />
Here is the range for each weight.. The length range for the different weights is between 2.78 - 2.86 meters.<br />
Less than 40 kg 2.79 meters<br />
40 to 45 kg 2.80 to 2.83 meters<br />
45 to 50 kg 2.83 to 2.84 meters<br />
More than 50 kg 2.84 to 2.85 meters<br />
In wind conditions over 20 knots we advise that you rake aft 2 cm on all these measurements for all skipper weights.<br />
HIKING STRAPS<br />
Usually hiking straps come in a standard position and length and are screwed to the hull. However, it is very important for<br />
your comfort and effectiveness to have them the exact length for your size. When you hike you should be leaning parallel<br />
to the water with the back of your knees on the sheer of the hull. You'll get the most out of it when your body is flat.<br />
For information on how<br />
to join <strong>North</strong>'s Team BLUE,<br />
visit our web site at<br />
www.<strong>One</strong>design.com/teamblue<br />
Visit our web site at www.<strong>One</strong><strong>Design</strong>.com for the latest <strong>Optimist</strong> news and tuning tips.<br />
© <strong>North</strong> <strong>Sails</strong> <strong>One</strong> <strong>Design</strong>. All rights reserved.<br />
9
NORTH SAILS<br />
<strong>Optimist</strong> <strong>Tuning</strong> <strong>Guide</strong><br />
Summary<br />
Important things to consider for top performance in your <strong>Optimist</strong>:<br />
aAlways have a wind indicator, you can't sail without it, you'll need it for the downwind run to know when you are<br />
sailing by the lee or too high.<br />
aThe boom has to be above the leeward corner of the hull's stern when sailing upwind.<br />
aSail the boat flat when sailing in wavy and puffy conditions. In light air it's better to heel a bit to leeward but sit<br />
down inside, as far forward as you can, right next to the board.<br />
aThe sail should be all the way out when sailing downwind.<br />
aThe center board should be all the way up when sailing downwind. Since the sail is not pushing you sideways<br />
there's no reason to have the board down, it will only slow you down (see picture).<br />
aWhen you hike, make sure you are flat and all the way out.<br />
aRemember the two main controllers of the luff: the Vang and the Preventer.<br />
aThe two main controllers of leech are: The Vang and Sprit.<br />
aRelease the sprit in light to medium air on the downwind leg, but do it once you are sailing down, and trim it back<br />
on before rounding the mark.<br />
aHave the handle of the sprit line close to the cleat.<br />
aIt's a good idea to have two vangs ready to be used in case one gets cut.<br />
aThe line for the vang should be 6mm thick.<br />
aThe standard length for the sail ties is:<br />
- Corners: five 3 mm wide, 60 cm/ 24" long.<br />
- Eyelets: twelve1.5 mm wide, 50 cm/19" long.<br />
Thanks again for your purchase of a <strong>North</strong> Sail for your Opti. We hope you get a lot of enjoyment out of this sail and your<br />
boat. If you have any questions on how to make your boat and sail go faster please do not hesitate to contact us.<br />
Visit our web site at www.<strong>One</strong><strong>Design</strong>.com for the latest <strong>Optimist</strong> news and tuning tips.<br />
© <strong>North</strong> <strong>Sails</strong> <strong>One</strong> <strong>Design</strong>. All rights reserved.<br />
10