You also want an ePaper? Increase the reach of your titles
YUMPU automatically turns print PDFs into web optimized ePapers that Google loves.
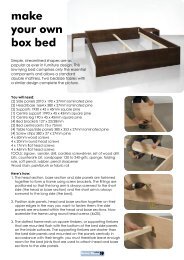
A simplified version<br />
of the traditional<br />
Japanese shoji<br />
<strong>screen</strong> can be easily<br />
made using basic<br />
<strong>to</strong>ols and skills.<br />
These lightweight,<br />
stationary panels,<br />
with their cleanlined<br />
Oriental design,<br />
add sophisticated<br />
elegance <strong>to</strong> a room.<br />
You will need:<br />
- 15mm wide strips 6mm SupaWood<br />
- Rice paper, home made or<br />
sturdy decorative paper<br />
- Double-sided tape (carpet tape is also good)<br />
- 40mm wood screws<br />
- Wood glue, wood filler and sandpaper<br />
- Paint or stain and clear acrylic glaze<br />
- [2] hooks and eyes for mounting the <strong>screen</strong><br />
- Craft knife<br />
- Roll of brown paper<br />
Tools: drill, bits and countersink, mitre box and backsaw<br />
Here’s how:<br />
1. Measure window frame <strong>to</strong> determine outer measurements of<br />
<strong>screen</strong>. Draw an outline of <strong>screen</strong> on a large sheet of paper.<br />
Draw outer frame of <strong>screen</strong> 15mm wide with sides running the<br />
full length of frame; with <strong>to</strong>p and bot<strong>to</strong>m sections abutting sides<br />
at inner edges. Draw stiles and rails 15mm wide, inside outer<br />
frame; stiles run full length between <strong>to</strong>p and bot<strong>to</strong>m sections of<br />
outer frame, with rails abutting stiles at inner edges.<br />
2. Draw inner lattice of <strong>screen</strong> as desired (right); draw all<br />
sections 15mm wide, butting ends of lattice sections <strong>to</strong> inner<br />
edges of stiles, or rails. Sections should abut each other at<br />
right angles. To allow for the insertion of screws, stagger<br />
placement of ends that abut opposite sides of same section.<br />
3. Tape finished pattern <strong>to</strong> window frame <strong>to</strong> check that the<br />
pattern is accurate.<br />
4. Measure pattern for length of each of wood sections,<br />
including stiles, rails, lattice, and outer frame. Keeping<br />
15mm side of frame face up, mark and cut for each section.<br />
Cut on outside of line, using a mitre box and backsaw,<br />
leaving each section slightly longer than desired finished<br />
length. Check lengths by placing sections over the pattern<br />
(left). Sand ends <strong>to</strong> fit exactly.<br />
online<br />
<strong>Home</strong>-<strong>Dzine</strong> 11<br />
shoji <strong>screen</strong>
5. Repeat step 4 for stiles, rails, and<br />
all lattice sections until the entire<br />
framework is laid out on pattern<br />
(right).<br />
6. Remove left stile from pattern and<br />
place face up near the edge of a<br />
flat work surface. Abut bot<strong>to</strong>m rail<br />
<strong>to</strong> stile, with lower edges even;<br />
clamp. Mark placement for screw<br />
on outside of stile, in line with<br />
centre of the rail (left).<br />
7. Predrill and countersink holes;<br />
screw pieces <strong>to</strong>gether. Repeat this<br />
step for <strong>to</strong>p rail.<br />
8. Position stiles and rails over<br />
lattice pieces on pattern. Align<br />
all pieces for a perfect fit. Make<br />
small pencil lines at every<br />
abutting section.<br />
9. Join section of lattice, working<br />
from centre outward and aligning<br />
pencilled markings. Keep lattice<br />
flat on work surface, and predrill<br />
holes in line with centre of section<br />
being joined; screw.<br />
10. Apply wood glue <strong>to</strong> upper side<br />
of <strong>to</strong>p rail and <strong>to</strong>p ends of stiles.<br />
Place frame-work face up on a<br />
flat surface. Place strip of 3mm<br />
thickness next <strong>to</strong> <strong>to</strong>p rail. Rest<br />
<strong>to</strong>p section of outer frame on<br />
straightedge <strong>to</strong> offset slightly; glue<br />
<strong>to</strong> <strong>to</strong>p rail. Clamp in<strong>to</strong> place.<br />
11. Repeat step 10 for bot<strong>to</strong>m section<br />
of outer frame. Then glue side<br />
sections of outer frame <strong>to</strong> stiles,<br />
using straightedge <strong>to</strong> offset them.<br />
Clamp in place until dry.<br />
12. Cover any holes with wood filler,<br />
allow <strong>to</strong> dry and lightly sand<br />
entire <strong>screen</strong>. Paint or stain.<br />
Making the <strong>screen</strong><br />
Cut the paper 25mm longer and wider than the outer frame. Place<br />
the <strong>screen</strong> framework face down on a flat surface; apply doublesided<br />
tape <strong>to</strong> all styles, rails, and lattices (right). Centre paper,<br />
right side down, and affix on<strong>to</strong> framework. Trim off any excess<br />
using a craft knife. Use heavy-duty double-sided tape on back of<br />
framework <strong>to</strong> attach the <strong>screen</strong> <strong>to</strong> inside of window frame.<br />
online<br />
<strong>Home</strong>-<strong>Dzine</strong> 12