Encompass LE User Manual - Encompass LE - Online Control Center
Encompass LE User Manual - Encompass LE - Online Control Center
Encompass LE User Manual - Encompass LE - Online Control Center

Create successful ePaper yourself
Turn your PDF publications into a flip-book with our unique Google optimized e-Paper software.
<strong>Encompass</strong> <strong>LE</strong><br />
<strong>Online</strong> <strong>Control</strong> <strong>Center</strong><br />
<strong>User</strong> <strong>Manual</strong><br />
Chain Profile Login<br />
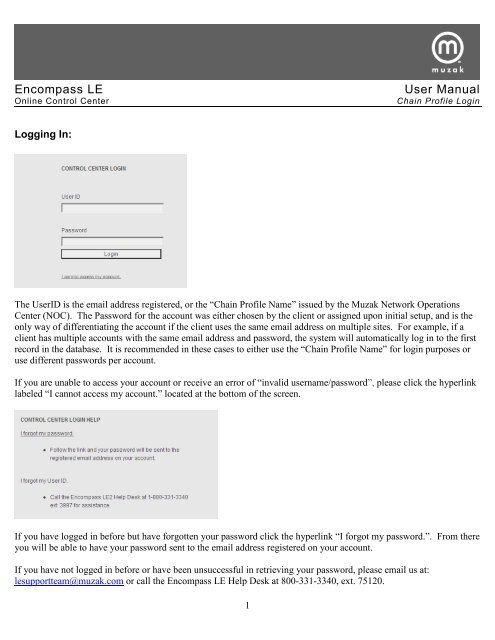
Logging In:<br />
The <strong>User</strong>ID is the email address registered, or the “Chain Profile Name” issued by the Muzak Network Operations<br />
<strong>Center</strong> (NOC). The Password for the account was either chosen by the client or assigned upon initial setup, and is the<br />
only way of differentiating the account if the client uses the same email address on multiple sites. For example, if a<br />
client has multiple accounts with the same email address and password, the system will automatically log in to the first<br />
record in the database. It is recommended in these cases to either use the “Chain Profile Name” for login purposes or<br />
use different passwords per account.<br />
If you are unable to access your account or receive an error of “invalid username/password”, please click the hyperlink<br />
labeled “I cannot access my account.” located at the bottom of the screen.<br />
If you have logged in before but have forgotten your password click the hyperlink “I forgot my password.”. From there<br />
you will be able to have your password sent to the email address registered on your account.<br />
If you have not logged in before or have been unsuccessful in retrieving your password, please email us at:<br />
lesupportteam@muzak.com or call the <strong>Encompass</strong> <strong>LE</strong> Help Desk at 800-331-3340, ext. 75120.<br />
1
Chain Profile Main Menu:<br />
From the main menu, you have full control over every site within your chain. To access a site location separately, type<br />
in the serial number (also referred to as your receiver number) that is located at the site into the search field in the left<br />
column and click the “Search for Serial Number” button.<br />
If you do not know the receiver number for the site in question you can search for the site by clicking “Search / View /<br />
Edit Existing Site”.<br />
Search / View / Edit Existing Site:<br />
2
Please note: Navigation links can be found throughout the system. These are helpful for jumping back to the previous<br />
page or menus within the system. The Help link is located in the top right corner; this gives you access to a dynamic<br />
help document that will assist you throughout the system.<br />
The “Affiliate” field represents the regional office that services your account. This is not required but may help narrow<br />
search results on large chains by limiting the results to a smaller geographic location.<br />
If a chain only has only one site, selecting the “list all” link will jump immediately to the site.<br />
List All Sites In Chain:<br />
On this screen you will be presented with your sites. Depending on the size of the chain it may be on multiple pages<br />
that can be navigated using the number links (not shown) the same way messages are displayed. Simply click the<br />
select button beside the site you wish to view or edit and click “Modify Selected Site”.<br />
The “Search for Location” link jumps to the “Search / View / Edit Existing Site” section mentioned earlier in this<br />
document.<br />
3
Please note: If the chain only has only one site, selecting this will jump immediately to the site instead of displaying the<br />
site listing as shown above. These accounts have been setup to allow single sites to use the messaging capability.<br />
View / Edit Chain Profile:<br />
This screen allows you to update your chain contact information. This would be a mailing address or street address at a<br />
“Home Office” or “Corporate Headquarters” location. This information is helpful when communicating with NOC<br />
personnel.<br />
Upon first signing into a new account you may notice x’s or incorrect information. This is used as a placeholder upon<br />
initial setup, and we encourage you to update your site information so we can better address any issues you have in the<br />
future.<br />
Clicking the “Continue to Chain Profile” button will proceed to setting up zones and default settings within each zone.<br />
Modify Zones & Receivers:<br />
On this page you will see all of the zones used for your chain. A zone refers to an individual area that receives music,<br />
not the physical location at which the receiver is located. For every separate area of music within a site, a different<br />
zone is needed. Two zones are a possibility on one classic <strong>LE</strong> receiver if both the A side and B side are utilized. Or<br />
you may have just one zone on an <strong>LE</strong>2 receiver, which has a silver chassis. In order to have a “B” side on a classic <strong>LE</strong><br />
receiver, which has a black chassis, the receiver must be equipped with an Audio Storage Card—the optional accessory<br />
that gives you messaging capability and LOS “Loss of Signal” music on the classic <strong>LE</strong>.<br />
4
Zones:<br />
Zone names are limited to 16 characters and should describe the area the music is affecting (i.e.: Dining, Lobby, On-<br />
Hold, etc.) as well as time zone or geographic information. This is helpful when using messaging; if a sequence needs<br />
to start at a certain time, you will need to adjust accordingly. All times used in the <strong>Online</strong> <strong>Control</strong> center are in Eastern<br />
Standard Time. Zone names can be helpful when determining the type of music to use at a location. For example, you<br />
may assign programs differently to zones in the Midwest than to the East Coast.<br />
Modifying an entire chain, including all zones and all selected features, can be done by simply clicking the “Submit”<br />
button located at the bottom of the page. If you need to change one particular zone, click “Edit” beside the zone you<br />
wish to modify. Changing a single option within a zone can be accomplished by clicking “Edit” beside the check box<br />
under the appropriate column. For example, for simple program changes, click “Edit” beside the check box located in<br />
the Program Selection column.<br />
Please Note: A check mark signifies that a zone is restricted. This is used to force sites to specific programming<br />
chosen by the client. If custom programming is used it is recommended that the daypart section be restricted as well.<br />
This can be accomplished by checking this function and proceeding thru to the confirmation page. It is not necessary<br />
to supply programming in this section to restrict this setting. If setting zone without restrictions, no selections are to be<br />
made and no check marks should populate on this page.<br />
When editing individual sites please refer to the Chain Site <strong>User</strong> <strong>Manual</strong> for setup instructions.<br />
5
Program Selection:<br />
Programs selection refers to the music programs available by using the channel selection buttons on the front of the<br />
receiver. This selection can be made either by clicking the check boxes beside the individual programs or by using the<br />
“Select All Programs” button. The “Select All Programs” button can also be used as a shortcut if you wish to set all<br />
programs with the exception of just a few.<br />
The “Authorized for All” check box is used to set the zone to receive all programs currently available plus any that<br />
are added to our offering in the future. Even though the site will automatically be authorized for the additional<br />
programs, a refresh would still need to be sent to the receiver for the added programs to be available.<br />
Hovering the mouse over the programs will reveal a popup box displaying the program description, energy level, target<br />
audience/lifestyle and examples of where this program is most popular and best fits.<br />
6
The “Holiday” section contains two channels or programs. When these are not in use they display the channel number<br />
and “OFFAIR” (see image below). If selected within the control system, they will be available on the receiver.<br />
However, when not in use no music is transmitted and the receiver is silent. Selecting these and keeping them active<br />
on the zone saves time and prevents you from having to re-enter the control system during every holiday. It is<br />
recommended, if you wish to have holiday music during the year, to have these checked. Holiday programs include:<br />
Mardi Gras, Valentine’s Day, St. Patrick’s Day, Cinco De Mayo, Summer Fun, Independence Day, Oktoberfest,<br />
Halloween, Veterans Day, Thanksgiving, Traditional Christmas, Secular Holiday and New Year’s.<br />
Custom Programs:<br />
Custom programs will be listed at the bottom as shown below (if included in Muzak service).<br />
7
Daypart Schedule<br />
Daypart Scheduling or “Dayparting” allows you to program your receiver to change music (or mute and unmute your<br />
music) at specific times of the day or have different music on different days of the week. It can also be used to start or<br />
end a program on a specific date (such as pre-programming your music for a Holiday program). As a reminder ALL<br />
receivers should remain powered on at all times, since Muzak’s receivers must be on to receive daypart commands.<br />
Please note: All times in the control system are in Eastern Standard Time (EST) – please account for any<br />
difference in your time zones when working with dayparting and sequence scheduling.<br />
If you need your music to turn off and back on at specific times of the day, you can use the Daypart Schedule to<br />
program a zone to Mute and Unmute. In the following example this receiver would mute audio each day of the week<br />
at 9pm EDT. At 7am the following morning, the receiver will again play music.<br />
Mute mode note: If the receiver is muted for any reason, the front display will read “MUTED BY NOC” and the<br />
output will be silenced.<br />
8
WARNING: If MUTE is used, don’t forget to set an UNMUTE for the time you wish the music to return.<br />
If you would like to allow your site to be able to select between all the programs during some periods of the day use of<br />
the “Authorize all ON/OFF” function will allow access to all programs by using the up/down buttons located on the<br />
front of the <strong>Encompass</strong> <strong>LE</strong> receiver. Authorize all ON/OFF allows all available programs to be enabled on the receiver<br />
during the specified ON period. This is useful if you have your site setup for one program during your business hours<br />
but wish to have all programs available to you after hours. NOTE: Please remember to write a daypart to change the<br />
music selection to your normal business hours program.<br />
In the example below, the site determined that they would give their night crew access to all programs starting at<br />
9:30pm. Then at 6am the programs would once again be restricted to the sites standard programming (City Lights)..<br />
Special Holiday Dayparting:<br />
Special attention needs to be paid to dayparting Holiday music for an extended period of time. The first daypart is set<br />
to change to the Holiday program of your choice. Make sure that you check the day of the week to match the Start and<br />
End Date that you desire your holiday program to start. Since the command only needs to be sent once to take your<br />
receiver to the Holiday program, you only need to send these commands one time. Once on the holiday program, the<br />
receiver will remain on this program until you send another daypart at the end of the holiday season to return to your<br />
existing program. To accomplish this, create a dayparting command to return to the program at the end of the holiday<br />
season, again only sending the command one day using the same start and end dates.<br />
The following is an example of a simplified non-secular holiday setup. The dayparting to start the Holiday<br />
programming is set to begin at 5:30am EST on 12/1/08. The start date for resuming the City Lights program is set to<br />
begin 1/1/08 at 5:45am EST. The start & end date are the same because this only needs to send the dayparting<br />
command once.<br />
9
To have your daypart play until the start of the holiday season and return to your existing program you will need to add<br />
an end date on the last day you want your existing dayparts to be scheduled. Create a daypart to start your holiday<br />
program on the day and date you want to start with your holiday music. Then recreate the existing daypart with a Start<br />
date to coincide with the day and date that you want to resume your existing daypart after the Holiday season.<br />
When programming a receiver that has multiple programs selected on the Program Select screen it is often desirable to<br />
have the Holiday daypart every day of the Holiday season as seen in the example below. Since the site can change the<br />
program on the receiver this allows the site to start the day on the selected holiday program while still giving the site<br />
the ability to select other programs if they choose.<br />
A complete listing of the holiday programs and dates each program is available on our website at: www.muzak.com.<br />
Please note these dates are sometimes changed prior to air but are a good representation of when special music<br />
programs become available.<br />
Messaging<br />
Upload Message:<br />
Begin by giving the message you intend to upload a description. This field is limited to 40 characters and the standard<br />
format is: Message Number (if attained from Muzak), brief description including the run dates. I.e.: A456815 – Brand<br />
Water 01/15/08-03/20/08. If there is no intended stop date, a common abbreviation is “tfn” or till further notice; this is<br />
also assumed if no dates are included in the description.<br />
10
After setting your message description click “Submit” to proceed to the next page.<br />
The following screen will allow for upload of a message. Click the “Browse…” button and select the message file you<br />
wish to use, and then click “Upload File”. Uploading times depend on the size of the file and your network connection;<br />
please allow adequate time for uploading to finish. Failure to do this may result in an incomplete or corrupted file.<br />
Please note: All message files must follow the rules listed on the page. Do not use files that are not the correct format;<br />
this may have adverse affects to your service.<br />
After uploading is complete, you will see several options including “Add New Sequence”, “Modify Existing Sequence”<br />
or, using the top navigation links, click “Upload Message” if you have more to upload.<br />
11
If, during this process, you encountered an error and wish to check the status of this message, simply return to the Main<br />
menu and use “Modify Message”.<br />
Modify Message:<br />
This screen will allow you to view existing messages and see their status. Your active messages will be represented by<br />
your company name as a label.<br />
If you use the “list all Messages” link, these are sorted in alphabetical order and messages are presented on multiple<br />
pages.<br />
12
To edit an existing message, click the select button to the left and click “Edit Selected Message”. This will allow you<br />
to not only edit the description but re-upload the file as well. Please note: If you only edit the description, the status<br />
will change to “In Progress”, signifying the file is uploading. However, the file still exists and will function. To<br />
prevent any confusion, some users may wish to re-upload as well. This will change the Version Number (Ver.),<br />
signifying an additional file replaced.<br />
Delete Message:<br />
This feature is handled similarly to Modify Message. Simply select the message you wish to delete, click “Submit”,<br />
then verify on the proceeding pages.<br />
Add New Sequence:<br />
A sequence is a group of messages set to play at a specified interval. Use the same rules in creating the description for<br />
messages and select the messages uploaded to your account previously.<br />
The interval is the amount of time in between messages. The receiver will fade out from the music, the display will<br />
read “# AD PLAY”, your message will play and fade back to music.<br />
13
Click “Submit” at the bottom of the page.<br />
Modify & Delete Sequence:<br />
This is handled the same way as messaging. Simply select and submit.<br />
Sequence Scheduling:<br />
Sequence Scheduling will allow you to set specific start times and days when message sequences play.<br />
The “All” button will select all days of the week. The time selected will be when the sequence will start playing – how<br />
often each message within the sequence plays is determined by the interval selected when the sequence was created.<br />
Boost can be set for OFF, LOW OR HIGH. When OFF is selected the messages are played the same volume level as<br />
the music. LOW will increase the volume of messages above the music by 3db, while HIGH will increase the volume<br />
of the messages above the music by 6db. These are very slight differences but sometimes allow messages to stand out<br />
or “pop” and can impact customer attention.<br />
14
The Start and End Dates are handled in the same manner as Dayparting. Simply set the date you wish the messages to<br />
start playing. The End Date determines when they will cease.<br />
To stop a sequence, use the “Stop Sequence” command found in the Sequence pull down column. See the Example<br />
below.<br />
The Start and End Date are not required fields. As with Dayparting, the Start Date is saved as today and the End Date<br />
is left open. This will continue to play messages until you go back in and change it. The same principle applies to the<br />
Stop Sequence command.<br />
When using a closed command as seen in the example above, be sure to set the Stop Sequence dates to be the same as<br />
the sequence. Otherwise, it will continue to transmit and can have a negative impact on service. Please note: The Stop<br />
Sequence command will stop all active sequences.<br />
Are You Sure:<br />
This page will present you with the information on each zone. Double-check that everything is correct, paying close<br />
attention to the zone name. If multiple zones exist and the “Submit” button was used to edit, you will need to confirm<br />
all zones.<br />
15
Selecting the “Submit Changes” button will send the info to the receiver, sometimes referred to as a “refresh”. If the<br />
changes are incorrect select the “Return to Main” button, keeping in mind that any changes will be lost.<br />
When using “Submit Changes” the next page will present you with two options.<br />
Clicking “Yes, Modify profile and all existing sites” will push out any changes and change all receivers under the<br />
modified zone.<br />
The “No, Modify profile only” will not transmit the changes and affect sites. This is useful when pre-planning and<br />
setting up a complex daypart for a special event. It allows you to review all and transmit at a later date.<br />
Please note: If the “No…” selection is used; any sites set up or installed after that will use the settings that have been<br />
saved.<br />
Zone Management:<br />
This section allows you a brief overview of zone usage for your chain. Keep in mind the totals included in this list are<br />
zones only and not necessarily an accurate count of sites under that zone.<br />
Here you will see the “Zones” within a given chain, and the member count. Keep in mind, these are the ZONES only,<br />
not the sites. Sites can have multiple zones and receivers at any given location. Select the zone you wish to modify<br />
and click the “Continue to Membership Page”.<br />
This page will list the number of Members in this zone. To move sites to this zone select “Show All Sites”.<br />
16
The following page will indicate the sites that are available. Check the box beside the sites you wish to add to the zone<br />
membership selected. By adding a site or zone to a different membership, the site or zone will no longer be in the<br />
original zone and will now be in the zone selected. Current members of the zone will be checked and shaded<br />
(disabled). To remove these sites from the zone selected you must add them to another zone; doing so will<br />
automatically removed them the previous zone membership.<br />
This will not be applied until you click “Update Zone Group Membership” located at the bottom of the screen.<br />
17
The following screen confirms the changes made have been saved. However, these changes have not affected the sites<br />
yet. You can select “Continue to modify Zone Membership” to make more changes to this zone or you can select<br />
“Broadcast Zone Profile”. We recommend using the “Broadcast Zone Profile” every time a change is made. This will<br />
prevent the possibility of having the affected sites not updated correctly. The “Broadcast Zone Profile” link will take<br />
the information you have changed and make the appropriate changes to the individual sites; this will also proceed to the<br />
Confirmation screen so you can transmit the appropriate profile data contained in the zone modified.<br />
This will advance to the familiar “Are You Sure” confirmation screen. Confirm all changes and select Broadcast<br />
Zone Profile at the bottom.<br />
This is a simple way to change multiple sites at once. You can not only setup zones for different music and dayparting,<br />
but also new messaging. This ensures the site always has fresh content.<br />
What’s Playing Now:<br />
Clicking on this link will direct you to the What’s Playing Now page. From here you can select music programs and<br />
see the name and artist of what is currently playing along with the last 10 songs that played previously. NOTE: This is<br />
currently not available for all programs (Environmental and all custom programs are excluded). Holiday programs,<br />
when not in use, revert to OFFAIR (947 – OFFAIR and 949 – OFFAIR).<br />
Please note, for more in-depth assistance, the <strong>Encompass</strong> <strong>LE</strong> Help Desk is available at 1-800-331-3340 Ext 75120.<br />
18