Owners Manual - Roland
Owners Manual - Roland
Owners Manual - Roland

Create successful ePaper yourself
Turn your PDF publications into a flip-book with our unique Google optimized e-Paper software.
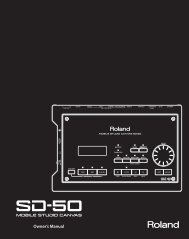
Panel Descriptions<br />
Front Panel<br />
11 12 13<br />
14 15<br />
16<br />
19 17 1 2<br />
3<br />
4 5 6<br />
7<br />
8<br />
9 10 18<br />
1. OCTAVE [+] / [–] Buttons<br />
These buttons raise or lower the keyboard range in steps<br />
of one octave (p. 11).<br />
2. [TRANSPOSE] Button<br />
By holding down this button and pressing the OCTAVE [+],<br />
[–] buttons you can raise or lower the keyboard range in<br />
steps of one semitone (p. 11).<br />
3. Display<br />
This shows the selected tone or mode, or the value of the<br />
parameter you’re editing.<br />
4. [SHIFT] Button<br />
Use this button in conjunction with other buttons to<br />
execute various functions.<br />
5. [SPECIAL TONE] Button<br />
Press this to select special tones.<br />
6. TONE [1]–[6] Buttons<br />
Use these buttons to select the tone group for regular<br />
tones, or to select special tones.<br />
7. [INC/+] / [DEC/–] Buttons<br />
Use these buttons to select variations of the regular tones.<br />
8. FAVORITE [A] / [B] Buttons<br />
Use these buttons to select the FAVORITE memory bank<br />
(p. 10) in which you want to register a favorite tone.<br />
9. [WRITE] Button<br />
This button stores the Lucina AX-09 settings you’ve edited,<br />
or the tone you registered in FAVORITE (p. 10, p. 18).<br />
10. [LOCK] Button<br />
If this button is turned on, you won’t be able to switch<br />
tones. Use this to prevent the tone from being accidentally<br />
switched during a performance (p. 14).<br />
11. USB MEMORY Slot<br />
You can insert USB memory (sold separately) here (p. 15).<br />
12. [VOLUME] Knob<br />
This knob adjusts the volume.<br />
13. D Beam<br />
[PITCH] / [FILTER] / [ASSIGNABLE] Buttons<br />
These buttons turn the D Beam on/off.<br />
By placing your hand above the D Beam you can apply<br />
various effects to the sound (p. 12).<br />
14. [V-LINK] Button<br />
This button turns V-LINK on/off (p. 21).<br />
15. [AUDIO PLAYER] Button<br />
If you turn this on, you’ll be able to play back audio files<br />
from USB memory (p. 14).<br />
16. [ / PREVIEW] Button<br />
When the [AUDIO PLAYER] button is lit, this button starts/<br />
stops playback of audio files in USB memory.<br />
When the [AUDIO PLAYER] button is unlit, this button<br />
starts/stops a preview demo of the currently selected tone.<br />
You can also get a count in to begin sounding by pressing<br />
the modulation bar while you press the [PREVIEW] button.<br />
4