

IM280 User Guide - Priority Systems
IM280 User Guide - Priority Systems
IM280 User Guide - Priority Systems

You also want an ePaper? Increase the reach of your titles
YUMPU automatically turns print PDFs into web optimized ePapers that Google loves.
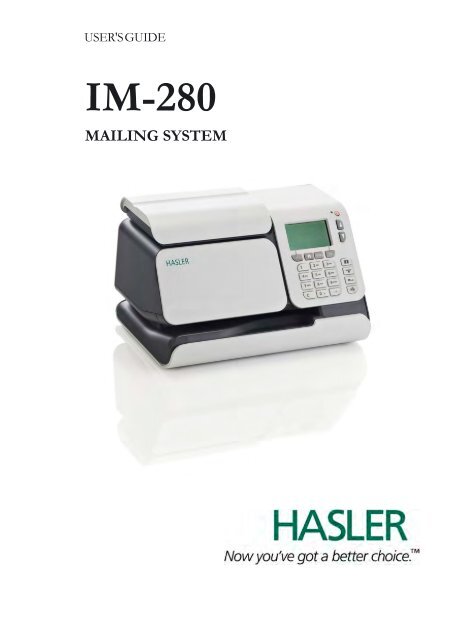
USER'S GUIDE<br />
IM-280<br />
MAILING SYSTEM
CONTACTING HASLER<br />
Hasler<br />
478 Wheelers Farms Road<br />
Milford, CT 06461<br />
www.haslerinc.com<br />
If You Need Assistance<br />
Product Name: IM-240/280 Mailing System<br />
Hasler Customer CARE<br />
1-800-259-2678<br />
TMS ® Postage Account Information<br />
1-800-248-8013<br />
www.haslerinc.com/myaccount<br />
Service and Supplies<br />
Please contact your local authorized Hasler dealer<br />
CONTROL PANEL DESCRIPTION INSIDE
Rate and services<br />
Date<br />
Postage<br />
Weight<br />
Sleep/Softoff<br />
Text<br />
Slogan<br />
Navigation<br />
arrows<br />
Weighing mode<br />
Mailbox<br />
Return<br />
Home screen<br />
Clear / Reset<br />
rate and<br />
weighing mode<br />
Job memory<br />
OK<br />
Menu<br />
Rate<br />
selection<br />
Weighing<br />
mode<br />
Imprint<br />
memory<br />
Credit<br />
Shortcut keys<br />
CONTROL PANEL
4148026K/A - 04/05/2011
Table of Contents<br />
1 Read this First 1<br />
1.1 What you will Find in this Manual..............................................3<br />
1.2 Safety Requirements.................................................................6<br />
2 Meet Your Mailing System 11<br />
2.1 System Layout.........................................................................13<br />
2.2 Control Panel Features ...........................................................15<br />
2.3 Connections ............................................................................18<br />
2.4 Power Management ................................................................20<br />
3 Processing Mail 23<br />
3.1 The different Types of Imprint .................................................25<br />
3.2 Preparing and Starting your Work Session.............................27<br />
3.3 Processing [Standard] Mail .....................................................33<br />
3.4 Printing [Received] for Incoming Mail......................................43<br />
3.5 Settings Details .......................................................................45<br />
3.6 Complementary Operations ....................................................59<br />
4 Money Operations 61<br />
4.1 Overview .................................................................................63<br />
4.2 Managing Funds......................................................................64<br />
4.3 Unlocking the Meter (Postal Inspection) ...............................67<br />
5 Managing Accounts and Access Rights 69<br />
5.1 Accounting and Access Rights Overview ..............................71<br />
5.2 Setting up 'Machine PIN Code ' ..............................................72<br />
5.3 Selecting an 'Account Mode '..................................................73<br />
5.4 <strong>Guide</strong>lines to Setup Account Modes.......................................74<br />
5.5 Selecting an 'Account Mode'...................................................78<br />
5.6 Managing the Accounts...........................................................79<br />
6 Reports 83<br />
6.1 Report Overview......................................................................85<br />
6.2 Generating Reports.................................................................86<br />
6.3 Postage Data...........................................................................88<br />
6.4 Funds Data..............................................................................89<br />
6.5 Account Data...........................................................................91<br />
6.6 System Data............................................................................94
7 Online Services 95<br />
7.1 Online Services Overview....................................................... 97<br />
7.2 Connecting to Online Services ............................................... 98<br />
7.3 Uploading Statistics (Optional) ............................................. 102<br />
7.4 System Online Services........................................................ 103<br />
7.5 eConfirmation Services (Optional)....................................... 105<br />
8 PC Meter Link Application 111<br />
8.1 PC Meter Link Application Overview .................................... 113<br />
8.2 Funds Management.............................................................. 115<br />
8.3 Online services ..................................................................... 116<br />
8.4 Maintenance ......................................................................... 117<br />
8.5 Support ................................................................................. 118<br />
8.6 Settings ................................................................................. 119<br />
9 Configuring your Mailing System 121<br />
9.1 Settings Overview................................................................. 123<br />
9.2 Logging in / out as the Supervisor ....................................... 124<br />
9.3 Changing the Display Language .......................................... 125<br />
9.4 Adjusting the Display Contrast ............................................. 126<br />
9.5 System Time-outs ............................................................... 127<br />
9.6 Funds Warnings.................................................................... 130<br />
9.7 Funding PIN Code ................................................................ 132<br />
9.8 Weighing Settings................................................................. 133<br />
9.9 Imprint Default Settings ........................................................ 137<br />
9.10 Imprint Memories .................................................................. 141<br />
9.11 Connection Settings.............................................................. 144<br />
9.12 Time and Date Management ................................................ 148<br />
10 Options and Updates 149<br />
10.1 Options and Updates Process.............................................. 151<br />
10.2 Using the Mailbox ................................................................. 152<br />
10.3 Managing Options................................................................. 154<br />
10.4 Managing Custom Text Messages ....................................... 156<br />
10.5 Managing Slogan s ............................................................... 158<br />
10.6 Managing Postal Rates......................................................... 160<br />
10.7 Updating System Software ................................................... 162<br />
11 Maintaining your Mailing System 165<br />
11.1 Maintaining the Ink Cartridge ............................................... 167<br />
11.2 Maintenance Processes ...................................................... 174<br />
12 Troubleshooting 177<br />
12.1 Weighing Problems............................................................... 179<br />
12.2 Diagnostics and System Data .............................................. 180<br />
13 Specifications 183<br />
13.1 Mail Specifications ................................................................ 185<br />
13.2 General Specifications ......................................................... 186<br />
13.3 Weighing platform................................................................. 187
Index 189<br />
Index 189<br />
3
Index 189<br />
4
Read this First<br />
1 Read this First<br />
This section contains important information about safety precautions and environmental<br />
recommendations to operate your equipment in the best possible conditions.<br />
1.1 What you will Find in this Manual..........................................3<br />
1.2 Safety Requirements ..............................................................6<br />
How to Disconnect your Mailing System........................................................................... 8
1<br />
Read this First<br />
2
What you will Find in this Manual<br />
1.1 What you will Find in this Manual<br />
Section 1: Read this First<br />
Make sure your have read and fully understood the safety requirements in<br />
this section. This section also includes a list of acronyms and symbols used<br />
in the manual.<br />
Section 2: Meet Your Mailing System<br />
System features, reference descriptions of elements and controls, mail format<br />
and how to power your mailing system on or off.<br />
Section 3: Processing Mail<br />
Processing mail using the mailing system: selecting a rate, weighing, printing,<br />
and processing received mail.<br />
Section 4: Money Operations<br />
Loading postage funds.<br />
Section 5: Managing Accounts and Access Rights<br />
How you can change accounts as user, or set up accounts and control<br />
access to the system as supervisor (varies with model).<br />
Section 6: Reports<br />
How you can generate and print out reports for the mailing system usage,<br />
funds usage, account usage, etc.<br />
Section 7: Online Services<br />
Using your mailing system for online postal services and connect your system<br />
for upgrades.<br />
Section 8: PC Meter Link Application<br />
Performing all the Mailing System calls to servers by using the internet connection<br />
of your PC.<br />
Section 9: Configuring your Mailing System<br />
All the parameters of your mailing system you can set up as user (temporary<br />
settings) or supervisor (default settings).<br />
1<br />
Read this First<br />
3
Section 10: Options and Updates<br />
1<br />
Read this First<br />
How to update/upgrade your system and modify the imprint (custom text, ad<br />
slogan, rates...).<br />
Section 11: Maintaining your Mailing System<br />
Changing the ink cartridge and maintaining other system components.<br />
Section 12: Troubleshooting<br />
What to do when a problem occurs: poor printing etc.<br />
Section 13: Specifications<br />
Detailed capabilities of your mailing system.<br />
4
Symbols<br />
This manual uses the symbols listed below.<br />
This symbol...<br />
Indicates...<br />
1<br />
WARNING : indicates a human safety hazard.<br />
ATTENTION : brings to your attention a risk for equipment or<br />
mail that could result from an action you may perform.<br />
NOTE : remark that explains different cases or specificities.<br />
TIP : advice to help save you time when processing your mail.<br />
Read this First<br />
SUPERVISOR : indicates that you have to log in as supervisor<br />
(using the supervisor PIN) to perform the procedure. Postage<br />
functions of the mailing system are not accessible in this mode.<br />
Glossary<br />
This manual uses the acronyms listed below.<br />
Acronym<br />
Description<br />
Ascending<br />
Funds<br />
ID<br />
LAN<br />
PC<br />
PIN<br />
PSD<br />
USPS<br />
Total Postage Used<br />
Postage Available<br />
IDentification<br />
Local Area Network: link between computers<br />
Personal Computer<br />
Personal Identification Number<br />
Postal Security Device (Meter)<br />
United States Postal Services<br />
5
1<br />
Safety Requirements<br />
1.2 Safety Requirements<br />
Power Connection<br />
Read this First<br />
Before connection, check whether the mailing system is suitable for external power<br />
supply; refer to the type plates at the back of the pieces of equipment.<br />
• To reduce the risk of fire, use only the power cord supplied with<br />
the mailing system.<br />
• Do not use this product on a wet floor or near water.<br />
• Your system should be connected with a 19vdc - 2.6A limited<br />
power source.<br />
• In case of liquid spillage, disconnect the external power supply<br />
from the wall plug and proceed to cleaning.<br />
• Use a wall plug located near the equipment and easily accessible. Do not route<br />
the power cord between pieces of furniture or over sharp edges.<br />
• Make sure there is no strain on the power supply cord.<br />
• Avoid using outlets controlled by wall switches or shared by other equipment.<br />
Compliance<br />
Energy Star compliance<br />
Your mailing system is Energy Star compliant: it helps you to save energy and money<br />
while protecting the environment.<br />
6
Environmental compliance<br />
1<br />
A program is implemented for the recycling of worn mailing systems and systems at<br />
the end of their lifetime. Contribute in a responsible way to the environmental protection<br />
by consulting your retailer internet site, or by contacting him. He will inform you<br />
of the collection and treatment processes of these systems.<br />
General Safety<br />
Read this First<br />
• Before using your mailing system, thoroughly read the operating instructions.<br />
• To reduce the risk of fire, electric shock and injury to persons, follow normal and<br />
basic safety precautions for office equipment when using your mailing system.<br />
• To avoid equipment damage, only use approved supplies (inks, tapes,<br />
cleaners...).<br />
The mailing system contains moving parts. Keep fingers, long<br />
hair, neck ties, loose clothing away from the mail path at all times.<br />
Follow the additional safety precautions below:<br />
• Do not place lighted candles, cigarettes, cigars, etc. on the mailing system.<br />
• When lifting covers, wait for all parts to stop moving before placing hands near the<br />
printhead.<br />
• When changing internal elements (ink, PSD...), avoid using too much force to<br />
prevent personal injury or damaging equipment.<br />
• To prevent overheating, do not block the equipment ventilation openings or try to<br />
stop internal fans.<br />
• Do not remove bolted covers as they enclose potentially hazardous parts that<br />
should only be accessed by a Service Representative.<br />
Environmental conditions<br />
Your mailing system should only be operated in the following conditions:<br />
• Temperature range: 50°F - 104°F (10°C - 40°C)<br />
• Relative humidity: 80% max. without condensation.<br />
7
Weighing accuracy<br />
1<br />
Read this First<br />
To obtain the best weighing results, use a solid and steady<br />
table:<br />
• Far from any door<br />
• Far from any fan.<br />
Disconnecting your Mailing System<br />
Unplug the power supply cord only when the mailing system is in<br />
Sleep or Soft Off mode . This avoids keeping the ink cartridge in a<br />
unprotected position where the ink may dry out and become<br />
unusable.<br />
How to Disconnect your Mailing System<br />
How to Disconnect<br />
your<br />
Mailing System<br />
The power supply cord is the equipment disconnecting device.<br />
1 First switch the mailing system to Sleep mode (see How to<br />
Switch to 'Sleep' or 'Wake' Mode p.20 ) if there is no<br />
emergency.<br />
2 Unplug the power supply from the wall plug.<br />
8
Telephone and LAN Connections<br />
To prevent damage to equipment, do not confuse telephone jacks<br />
that connect to the modem and LAN connectors that are bigger:<br />
1<br />
Read this First<br />
Analog phone (4 wires)<br />
Network/PC LAN or Scale (8 wires)<br />
Follow the additional precautions below:<br />
• Avoid using equipment during an electrical storm; there may be a risk of electrical<br />
shock from lightning.<br />
• Do not install telephone jacks or LAN connectors in a wet location.<br />
• Disconnect the telephone or LAN cable from the wall before removing equipment.<br />
To reduce the risk of fire, only connect the modem to the telephone<br />
line using supplied cable (see Specifications p.183 ).<br />
9
1<br />
Read this First<br />
10
Meet Your Mailing System<br />
2 Meet Your Mailing<br />
System<br />
Get to know your mailing system in this section.<br />
2.1 System Layout ...................................................................... 13<br />
2.2 Control Panel Features......................................................... 15<br />
2.3 Connections.......................................................................... 18<br />
2.4 Power Management ............................................................20<br />
How to Switch to 'Sleep' or 'Wake' Mode ....................................................................... 20
2<br />
Meet Your Mailing System<br />
12
System Layout<br />
2.1 System Layout<br />
Main Components<br />
2<br />
Mail Path<br />
Inserting location of envelopes for printing.<br />
Meet Your Mailing System<br />
Scale<br />
Control Panel<br />
Cover<br />
Measures weight of mail pieces.<br />
Controls the mailing system.<br />
Allows you to access the ink cartridge.<br />
13
Inside Machine<br />
2<br />
Meet Your Mailing System<br />
Cover<br />
Ink cartridge<br />
Postal security device<br />
(PSD)<br />
Pull the upper left side corner to open the cover.<br />
Prints the postal imprint on envelopes.<br />
See also Changing the Ink Cartridge p.172 .<br />
Postage meter.<br />
14
Control Panel Features<br />
2.2 Control Panel Features<br />
Control panel<br />
2<br />
Meet Your Mailing System<br />
Display Areas<br />
Account<br />
Ad slogan<br />
Date<br />
Imprint memory<br />
Mailbox<br />
Postage<br />
Rate and services<br />
Text<br />
Weighing mode<br />
Weight<br />
Displays account currently selected.<br />
Indicates that an ad slogan will be printed.<br />
Displays the date that will be printed.<br />
Displays selected imprint memory when applicable.<br />
Indicates unread messages in message box.<br />
Indicates the amount to be printed on the imprint.<br />
Indicates the current rate and services selected.<br />
Indicates that a text will be printed on the imprint.<br />
Current weighing method.<br />
Current weight used to calculate postage.<br />
15
Keys and Shortcuts<br />
2<br />
Retur<br />
Home screen<br />
Menu<br />
NAVIGATION KEYS<br />
Goes back to the previous screen.<br />
Displays the current task home screen.<br />
Accesses the menu settings.<br />
Meet Your Mailing System<br />
OK<br />
Navigation<br />
arrows<br />
Rate selection<br />
Weighing mode<br />
/ Reset Scale<br />
Imprint<br />
memories<br />
Validates a selection.<br />
Navigate up or down in lists or menus.<br />
SHORTCUT KEYS<br />
Displays the rate selection screen.<br />
Opens the weighing mode selection menu (Standard<br />
weighing, Manual weight entry...)<br />
Press and hold this button for 2 seconds to rezero the<br />
Scale (if present).<br />
Accesses preset imprint and account memories. These<br />
presets are managed by the supervisor.<br />
Funds<br />
Alphanumeric<br />
keys<br />
Clear / Reset<br />
rate<br />
Sleep/On/Soft<br />
off mode<br />
Accesses funds management (including adding funds).<br />
KEYPAD<br />
Allows the entry of alpha or numeric values : postage<br />
amounts or weights, accounts or other set up information.<br />
Press a key several times to display all possible characters<br />
(see p.17 ).<br />
Clears keypad entries or, from the home screen, resets<br />
rate to default.<br />
START / STOP KEYS<br />
Wakes the mailing system up or turns it to 'Sleep-mode'<br />
or 'Soft off mode'. The light indicates the system state<br />
(green = awake, amber (continuous) = sleep-mode,<br />
amber (blinking) = Soft off mode) (see Power Management<br />
p.20 ).<br />
16
Keypad Use<br />
The table below displays the output of each key for different fields. For example, key<br />
#2 will only display 2, A, B or C when pressed in Modem Settings.<br />
Key Alpha-numeric Custom text Modem settings<br />
1 1 1 1<br />
2 2ABCabc ABC2 2ABC<br />
3 3DEFdef DEF3 3D<br />
4 4GHIghi GHI4 4<br />
5 5JKLjkl JKL5 5<br />
6 6MNOmno MNO6 6<br />
7 7PQRpqr PQR7 7<br />
8 8TUVtuv TUV8 8<br />
9 9WXYZwxyz WXYZ9 9W<br />
0 0 0 0<br />
. . , # / : @ * & ! - + \ . , # / : @ * & ! - + \ , # * +<br />
C 'Clear' function 'Clear' function 'Clear' function<br />
2<br />
Meet Your Mailing System<br />
17
Connections<br />
2.3 Connections<br />
2<br />
Rear Connectors<br />
Your mailing system has Universal Serial Bus (USB) ports that allow you to connect<br />
a PC Meter Link, various LAN adaptors / modems, a printer or memory devices.<br />
Meet Your Mailing System<br />
Power connector<br />
USB ports<br />
To AC mains adaptor.<br />
Flat port to:<br />
• USB PC Meter Link adaptor<br />
• USB LAN adaptor<br />
• modem<br />
• memory device<br />
• printer<br />
Scale Port<br />
Square port<br />
• to USB PC Meter Link Adaptor<br />
See detail below.<br />
To Scale.<br />
18
Right Side USB Connectors<br />
2<br />
1 Flat<br />
2 Used to connect to a PC<br />
The Mailing System will detect the connection method on startup.<br />
Therefore, please connect the LAN cable, PC Meter Link or the<br />
analog modem before applying power to the system.<br />
Meet Your Mailing System<br />
19
Power Management<br />
2.4 Power Management<br />
2<br />
Energy Star® Compliance<br />
Meet Your Mailing System<br />
Your mailing system is an Energy Star® qualified mailing system that automatically<br />
goes into a low-power 'Sleep mode ' after a period of inactivity.<br />
The mailing system automatically switches to 'Sleep mode' after 30 minutes of nonactivity.<br />
You can change this default setting in supervisor mode. You can also switch<br />
to a low-power mode by pressing the Sleep/Wake button.<br />
A very-low-power sleep mode called 'Soft off mode ' is also available. This mode<br />
should only be used for long periods of non-use of the system. In this mode, the<br />
system takes longer to wake up and the automatic postal updates cannot take place.<br />
See also<br />
• To change the low-power modes time-outs, see: How to Change the 'Sleep timeout'<br />
(<strong>User</strong>) p.127 .<br />
How to Switch to 'Sleep' or 'Wake' Mode<br />
How to Switch to<br />
'Sleep' or 'Wake'<br />
Mode<br />
1 Press to switch between 'Sleep' and 'Wake' modes.<br />
- A short press on the Sleep/On/Soft off mode button sets the<br />
system to 'Sleep' mode.<br />
- A long press on the Sleep/On/Soft off mode button sets the<br />
system to 'Soft off '.<br />
- The light located next to the key indicates:<br />
- Green : the mailing system is in Awake mode and ready for<br />
use.<br />
- Amber (continuous) : the mailing system is in Sleep mode<br />
(low-power mode).<br />
- Amber (blinking) : the mailing system is in Soft off mode<br />
(very-low-power mode).<br />
To avoid weighing errors, make sure the Scale is clear when<br />
waking up the system. If the system does not seem to display a<br />
correct weight, see Weighing Problems p.179 .<br />
20
2 When switching to 'Soft off' mode, the system may display<br />
the following screen:<br />
2<br />
Press [OK] to confirm (the call will be cancelled) and switch<br />
the system to Soft off mode.<br />
Turning the system to Sleep or Soft off mode ends your working<br />
session: the system will then restart with default parameters<br />
(these parameters can be set in supervisor mode).<br />
Meet Your Mailing System<br />
21
2<br />
Meet Your Mailing System<br />
22
Processing Mail<br />
3 Processing Mail<br />
This section describes how you can run mail: choosing a type of imprint, selecting a<br />
rate and so on, depending on the type of metering you need to apply to your mail.<br />
3.1 The different Types of Imprint ..............................................25<br />
3.2 Preparing and Starting your Work Session..........................27<br />
How to Sort Mail .............................................................................................................. 28<br />
How to Log in and Start a Work Session ........................................................................ 29<br />
How to Change the Current 'Type of Imprint'.................................................................. 31<br />
3.3 Processing [Standard] Mail ..................................................33<br />
How to Apply Standard Postage (Settings)..................................................................... 33<br />
How to Apply Postage (Running Mail) ............................................................................ 36<br />
How to Re-Date Mail (Settings)....................................................................................... 38<br />
How to Re-Date Mail (Running Mail)............................................................................... 39<br />
How to Correct Postage Amount (Settings) ................................................................... 40<br />
How to Correct Postage Amount (Running Mail)............................................................ 42<br />
3.4 Printing [Received] for Incoming Mail ..................................43<br />
How to Process Incoming Mail (Settings) ....................................................................... 43<br />
How to Process Received Mail (Running Mail)............................................................... 44<br />
3.5 Settings Details.....................................................................45<br />
How to Change Accounts................................................................................................ 45<br />
How to Select a Rate....................................................................................................... 46<br />
How to Enter Postage Amount Manually ........................................................................ 48<br />
How to Enter a Default Postage Amount ............................................................. 49<br />
How to Change the Weighing Type ................................................................................ 51<br />
How to Enter Weight Manually........................................................................................ 52<br />
How to Change the Date on the Imprint.......................................................................... 53<br />
How to Add (or Cancel) a Text on the Imprint................................................................. 56<br />
How to Add (or Cancel) a Slogan on the Imprint ............................................................ 57<br />
How to Use an Imprint Memory....................................................................................... 58<br />
3.6 Complementary Operations.................................................59<br />
How to Count Mail pieces by Weighing .......................................................................... 59
3<br />
Processing Mail<br />
24
The different Types of Imprint<br />
3.1 The different Types of Imprint<br />
Customizing Your Imprint<br />
Your Mailing system can use the following types of imprint:<br />
• [Standard]: to print standard postage, including Text and Ad slogans<br />
• [Amount correction]: to apply amount corrections on previously processed mail<br />
• [Received]: to print the date on incoming mail.<br />
3<br />
By default, the [Standard] type of imprint is selected at powering on.<br />
Home Screen and Configuration Menu<br />
Each Type of imprint is associated to:<br />
• A specific Home screen that displays current parameters (weight, postage...)<br />
• A specific Configuration menu that allows you to set the other imprint parameters<br />
(advertisements ...).<br />
Processing Mail<br />
Your system has shortcut keys for direct access to save you time.<br />
You can eliminate key strokes for rate selection, imprint memories,<br />
add or check funds, weighing mode selection.<br />
25
Parameters of the Type of Imprint<br />
3<br />
The table below indicates the type of imprint to choose, depending on the type of<br />
process you want to apply to each set of mail.<br />
The column on the right indicates, for each type of imprint, the parameters you can<br />
set before printing mail.<br />
The mailing system uses default values defined as supervisor.<br />
Type of process Type of imprint Parameters<br />
Processing Mail<br />
Apply postage to outgoing<br />
mail<br />
[Standard ] • Rate<br />
• Weight<br />
• Date format<br />
• Slogan (optional)<br />
• Text (optional)<br />
Re-date a mail piece [Correction date ] • No weight, postage amount<br />
= 0<br />
• Date format<br />
Correct the amount on a<br />
mail piece (print on back of<br />
envelope)<br />
Print 'Received' and/or the<br />
date on incoming mail<br />
[Amount correction<br />
]<br />
• Manual amount of postage<br />
• Date format<br />
[Received ] • Printing date and/or 'Slogan<br />
Received ' .<br />
By default, the system selects the [Standard ] type of imprint at<br />
start-up.<br />
See also<br />
• To set default values as supervisor: see Configuring your Mailing System p.121 .<br />
26
Preparing and Starting your Work Session<br />
3.2 Preparing and Starting your Work<br />
Session<br />
In this section<br />
This section recommends a list of preparation steps to help you run your mail efficiently.<br />
Mail preparation involves:<br />
• Sorting mail by type and task , to make processing faster (p.28 )<br />
• Logging into the system to start a work session (p.29 )<br />
• Selecting the Type of imprint that corresponds to each set of mail (p.31 )<br />
• Frequently asked questions concerning your system check list: ink level, funds...<br />
(p.32 ).<br />
3<br />
Processing Mail<br />
27
Sorting Mail by Type and by Task<br />
3<br />
Processing Mail<br />
To save time, sort your mail in groups that have similar characteristics.<br />
This will prevent you having to change the imprint parameters too often and allow you<br />
to fully benefit from the automatic features of your mailing system.<br />
Follow the procedure below to split your mail into different stacks.<br />
How to Sort Mail<br />
How to Sort Mail<br />
Put the mail in different stacks according to the characteristics<br />
and in the order that follows:<br />
1 Type of process to apply<br />
- See table p.26 .<br />
2 Account to use<br />
(only if you have to select an account at log in)<br />
3 Rate and/or services to apply<br />
4 Physical characteristics<br />
Separate mail pieces that exceed the weight, size or<br />
thickness allowed in the system mail path.<br />
See Mail Specifications p.185 .<br />
5 Sort each stack by size .<br />
28
Turning Machine On and Starting a Work Session<br />
Turning the system on starts a work session on the mailing system.<br />
At start-up, depending on specific supervisor settings:<br />
• The access to the system may be free<br />
• You may have to select an account<br />
• You may have to enter a PIN code.<br />
Your work session ends when the system returns to 'Sleep mode'.<br />
3<br />
How to Log in and Start a Work Session<br />
How to Log in<br />
and Start a Work<br />
Session<br />
To log in as a user:<br />
1 Press to wake the system up.<br />
The system may display one of the following screens:<br />
1 Home screen [Standard] , if there is no account.<br />
Processing Mail<br />
2 Account screen, if there are accounts.<br />
3 Login screen, if there are a machine PIN code or accounts<br />
with PIN code.<br />
‣ On the Account screen, select your account as follows.<br />
Use up and down arrows (use double arrows to scroll list) and<br />
press [OK] to validate, or:.<br />
Find your account quicker: instead of using up and down arrows,<br />
type the account number.<br />
29
‣ On the Login screen, enter your account or machine PIN<br />
code.<br />
2 The Home screen [Standard] screen is displayed. Your<br />
work session begins.<br />
3<br />
To type letters instead of numbers, using the keypad, press the<br />
corresponding key several times in a row like a mobile phone.<br />
(Example : To have “N” press twice the key “6").<br />
Processing Mail<br />
See also<br />
• To choose the policy for accounting and access control as supervisor, see<br />
Managing Accounts and Access Rights p.69 .<br />
30
Selecting the Type of Imprint<br />
For each stack of mail you have sorted (see p.28 ), select the type of imprint you need<br />
to process your mail as follows.<br />
About the types of imprint, see Parameters of the Type of Imprint p.26<br />
How to Change the Current 'Type of Imprint'<br />
How to Change<br />
the Current 'Type<br />
of Imprint'<br />
Once you are logged in as user:<br />
1 As user:<br />
Press and type 1<br />
> Customize stamp<br />
The Customize stamp screen is displayed.<br />
2 Select > Type and press [OK] .<br />
The Type of stamp screen is displayed.<br />
3<br />
Processing Mail<br />
3 Select the type of imprint in the list and press [OK] .<br />
The Customize stamp screen is updated and displays the<br />
menu items that allow you to modify the imprint parameters.<br />
4 Press or to return to the home screen.<br />
31
Frequently Asked Questions<br />
Machine check list:<br />
Question...<br />
How to answer<br />
3<br />
Processing Mail<br />
Do I have enough funds<br />
Is the Scale properly zeroed<br />
Is there enough ink in the cartridge<br />
<br />
Press and type 1 to check funds balance.<br />
To add funds, see How to Add Funds to the Meter<br />
p.65 .<br />
Before laying envelope(s) on the Scale, your home<br />
screen should display 00 lb 01.0 oz . If __lb _._oz<br />
is displayed, perform a 'rezero' of the Scale.<br />
See How to Re-Zero the Weighing Platform p.133 .<br />
To display the level of ink in the printing ink cartridge,<br />
see How to Display Ink Level and Cartridge<br />
Data p.168 .<br />
You can be warned when the available funds gets below a preset<br />
value (see How to Set the Low-Funds Threshold p.131 ).<br />
32
Processing [Standard] Mail<br />
3.3 Processing [Standard] Mail<br />
In this Section<br />
This section describes how to process mail when in the [Standard ] type of imprint<br />
mode:<br />
• Applying postage using different rates<br />
• Re-dating mail<br />
• Correcting postage amount.<br />
3<br />
About the 'Types of imprint', see also The different Types of Imprint p.25 .<br />
Applying Standard Postage<br />
Sequence of Settings<br />
The procedure below outlines steps to process mail.<br />
As mail requirements differ from day to day, some of the settings may not be necessary,<br />
or their order may vary.<br />
Processing Mail<br />
At this point, make sure you have completed the preparation<br />
steps mentioned in Preparing and Starting your Work Session<br />
p.27 .<br />
How to Apply Standard Postage (Settings)<br />
How to Apply<br />
Standard<br />
Postage<br />
(Settings)<br />
Required settings:<br />
1 Make sure you are on the home screen of the Standard type<br />
of imprint . The home screen indicates weight, postage and<br />
currently selected rate as illustrated below.<br />
33
2 To change the type of imprint (if you are not in Standard<br />
mode) .<br />
Press<br />
screen:<br />
and type 1 to access the Customize stamp<br />
3<br />
Processing Mail<br />
The type of imprint is indicated on line 2 of the screen.<br />
To change the type of stamp , select the Type line, press<br />
[OK] and then select Standard in the Type of stamp screen,<br />
and press [OK] .<br />
To select an option in the screen:<br />
Highlight the option using the arrow keys<br />
Then always press<br />
and<br />
to validate your selection.<br />
Additionally, you can configure imprint elements from the<br />
Customize imprint screen as follows:<br />
Imprint with Text<br />
Imprint with Ad Slogan<br />
34
‣ To check or change the Slogan selection :<br />
Select Ad Slogan and then select a Ad Slogan (or None ) in<br />
the Ad Slogan list screen. For more details, see How to Add<br />
(or Cancel) a Slogan on the Imprint p.57 .<br />
‣ To check or change the Text selection :<br />
Select Text and then select a text (or None ) in the Text list<br />
screen.<br />
For more details, see How to Add (or Cancel) a Text on the<br />
Imprint p.56 .<br />
‣ To check or change the date or date format :<br />
Select Date and then select a date option in the Date<br />
advance screen. Select Today's date for printing today's<br />
date.<br />
For more details, see How to Change the Date on the Imprint<br />
p.53 .<br />
Press or to return to the home screen.<br />
3 Select a rate and services .<br />
Press<br />
to open the Rate selection screen.<br />
3<br />
Processing Mail<br />
Type a rate number to select a rate or display new rate<br />
options<br />
Press 8 to select the Rate wizard and choose rate options<br />
in lists (includes rates not shown on rate selection screen).<br />
For more details, see Selecting a Rate p.46 .<br />
You may also enter the postage amount manually : on the home<br />
screen, type directly the amount using the keypad. For more<br />
details, see How to Enter Postage Amount Manually p.48 .<br />
You are now ready to weigh and print the mail piece.<br />
To set the imprint quickly, consider using imprint memories . The<br />
memories store imprint characteristics together with rates and, if<br />
activated, accounts. See Using Imprint Memories p.58 .<br />
35
Printing Mail<br />
Standard weighing is automatically selected when you put a mail piece on the Scale.<br />
3<br />
You can still enter the weight manually by pressing<br />
select > 1 or > Manual entry mode .<br />
and<br />
Processing Mail<br />
How to Apply Postage (Running Mail)<br />
How to Apply<br />
Postage<br />
(Running Mail)<br />
If you need to change the current account before applying postage<br />
(on account-enabled configurations), see How to Change<br />
Accounts p.45 .<br />
In Manual weight entry mode<br />
1 Press , select > Manual Weight Entry and press [OK] .<br />
The following screen is displayed.<br />
2 Enter the weight and<br />
press [OK] .<br />
The weight of the mail<br />
piece is displayed in the<br />
Weight area of the<br />
home screen and the<br />
postage amount is<br />
updated.<br />
3 Insert the mail piece (or<br />
a label tape) into the<br />
system, with the side to<br />
be printed facing<br />
upwards.<br />
36
If a mail piece is bigger than mail path maximum thickness (see<br />
Mail Specifications p.185 ), you can print on a label instead.<br />
These are supplied by your local reseller.<br />
The mailing system applies the imprint on the mail piece.<br />
In Standard weighing mode , you can print postage directly<br />
on mail pieces from the [Standard ] home screen:<br />
1 Put the mail piece on the<br />
Scale.<br />
The weight of the mail<br />
piece is displayed in the<br />
Weight area of the<br />
home screen and the<br />
postage amount is<br />
updated.<br />
2 Withdraw the envelope<br />
from the Scale and insert<br />
it into the system, with<br />
the side to be printed<br />
facing upwards.<br />
3<br />
Processing Mail<br />
If a mail piece is bigger than mail path maximum thickness (see<br />
Mail Specifications p.185 ), you may print on a label instead.<br />
The mailing system applies the imprint on the mail piece.<br />
When you put a mail piece on the Weighing Platform, the weight<br />
value is saved when you remove it. You can then print a batch of<br />
similar mail pieces (same weight) without weighing them each. To<br />
print a batch of mixed mail pieces (different weight), you need to<br />
weigh each mail piece before printing.<br />
37
Re-dating Mail<br />
3<br />
Sequence of Settings<br />
The procedure below outlines steps to re-date mail that has already been processed.<br />
The sequence is similar to sequence Applying Standard Postage (p.33 ), except for<br />
the following settings:<br />
• Postage must be set to zero and have the date of mailing correct<br />
• You do not have to weigh the mail piece.<br />
• Print the new date on the back or bottom of the front of the envelope.<br />
Processing Mail<br />
How to Re-Date Mail (Settings)<br />
How to Re-Date<br />
Mail (Settings)<br />
Make sure you have already completed the preparation steps<br />
mentioned in Preparing and Starting your Work Session p.27 .<br />
Required settings:<br />
1 Make sure you are on the home screen of the [Standard ]<br />
type of imprint . The home screen indicates weight, postage<br />
and currently selected rate as illustrated below.<br />
2 ²Check or change the type of imprint .<br />
Press<br />
screen:<br />
and type 1 to access the Customize stamp<br />
The type of imprint is indicated on line 2 of the screen.<br />
To select an option in the screen:<br />
Highlight the option using the arrow keys and<br />
Then press to validate your selection.<br />
38<br />
To change the type of imprint , select the Type line, press<br />
[OK] and then select [Normal ] in the Type of imprint screen<br />
and press [OK] .
To change the date or date format from the Customize<br />
stamp screen as follows:<br />
Select Date and then select a date option in the Date<br />
screen. Select Today's date for printing today's date. For<br />
more details, see How to Change the Date on the Imprint<br />
p.53 .<br />
Press or to return to the home screen.<br />
3 Set postage to 0 manually , to be sure that it will remain on<br />
zero.<br />
Type 0 on the home screen to open the Manual amount<br />
screen and then just press [OK] . For more details, see How<br />
to Enter Postage Amount Manually p.48 .<br />
You are now ready to print.<br />
Running Mail<br />
To run mail, follow the procedure below after you have completed the steps in Sequence<br />
of Settings p.38 .<br />
How to Re-Date Mail (Running Mail)<br />
How to Re-Date<br />
Mail (Running<br />
Mail)<br />
The postage amount 0 is displayed on the home screen. To<br />
print postage directly on mail pieces:<br />
1 Insert the mail piece (or<br />
a label tape) with the<br />
side to be printed facing<br />
upwards.<br />
3<br />
Processing Mail<br />
The side that you want to print on should be facing upwards.<br />
If a mail piece is bigger than mail path maximum thickness (see<br />
Mail Specifications p.185 ), you may print on a label instead.<br />
The mailing system applies postage.<br />
39
Correcting a Postage Amount<br />
3<br />
Sequence of Settings<br />
The procedure below outlines steps to correct the amount on mail that has already<br />
been processed.<br />
The sequence is identical to Re-dating Mail (p.33 ), except for the following:<br />
• Postage must be set to the desired additional amount, instead of 0 .<br />
• Print the new postage on the back or bottom of the front of the envelope.<br />
Processing Mail<br />
How to Correct Postage Amount (Settings)<br />
How to Correct<br />
Postage Amount<br />
(Settings)<br />
Make sure you have already completed the preparation steps<br />
mentioned in Preparing and Starting your Work Session p.27 .<br />
Required settings:<br />
1 Make sure you are on the home screen of the [Standard ]<br />
type of imprint . The home screen indicates weight, postage<br />
and currently selected rate as illustrated below.<br />
2 Check or change the type of imprint .<br />
Press<br />
screen:<br />
and type 1 to access the Customize stamp<br />
The type of imprint is indicated on line 2 of the screen.<br />
To select an option in the screen:<br />
Highlight the option using the arrow keys and<br />
Then press to validate your selection.<br />
40<br />
To change the type of stamp , select the Type line, press<br />
[OK] and then select [Standard ] in the Type of stamp screen<br />
and press [OK] .
You can change the date or date format from the Customize<br />
stamp screen as following:<br />
Select Date and then select a date option in the Date<br />
screen. Select Today's date for printing the current date. For<br />
more details, see How to Change the Date on the Imprint<br />
p.53 .<br />
Press or to return to the home screen.<br />
3 Set postage to the desired amount :<br />
- Type the postage amount on the home screen: this opens<br />
the Manual amount screen<br />
- Complete the amount and then press [OK] to validate. For<br />
more details, see How to Enter Postage Amount Manually<br />
p.48 .<br />
You are now ready to print.<br />
3<br />
Processing Mail<br />
41
Running Mail<br />
To run mail, follow the procedure below after you have completed the sequence in<br />
Sequence of Settings p.40 .<br />
3<br />
Processing Mail<br />
How to Correct Postage Amount (Running Mail)<br />
How to Correct<br />
Postage Amount<br />
(Running Mail)<br />
The postage amount is displayed on the home screen. To print<br />
postage directly on mail pieces:<br />
1 Insert the mail piece (or<br />
a label tape) into the mail<br />
path against the rearguide<br />
wall, with the side<br />
to be printed facing<br />
upwards.<br />
The side that you want to print on should be facing upwards.<br />
If a mail piece is bigger than mail path maximum thickness (see<br />
Mail Specifications p.185 ), you may print on a label instead.<br />
42
Printing [Received] for Incoming Mail<br />
3.4 Printing [Received] for Incoming<br />
Mail<br />
In this Section<br />
This section describes how to use the [Received ] type of stamp, to:<br />
• Print the date on incoming mail, and/or<br />
• Print 'Received' on incoming mail.<br />
3<br />
See also<br />
• To choose the type of imprint to use for each type of mail process, see The different<br />
Types of Imprint p.25 ).<br />
How to Process Incoming Mail (Settings)<br />
How to Process<br />
Incoming Mail<br />
(Settings)<br />
Make sure you have completed the preparation steps mentioned<br />
in Preparing and Starting your Work Session p.27<br />
Required settings:<br />
1 Make sure you are on the home screen of the [Received ]<br />
type of stamp .<br />
The type of imprint is indicated at the top of the home screen<br />
as illustrated.<br />
Processing Mail<br />
2 To check or change the type of imprint .<br />
Press<br />
and type > 1 to access the Imprint screen:<br />
The type of imprint is indicated on line 2 of the screen.<br />
Select the Type line, press [OK] and then select [Received<br />
] from the Type of imprint screen and press [OK] .<br />
43
To select an option on the screen:<br />
Highlight the option using the arrow keys and<br />
Then press to validate your selection.<br />
3<br />
Additionally, you can :<br />
- Activate or deactivate printing the date<br />
- Activate or deactivate printing 'Received '.<br />
- Select the option to change and press [OK] . The screen indicates<br />
the current status of the options.<br />
Processing Mail<br />
How to Process Received Mail (Running Mail)<br />
How to Process<br />
Received Mail<br />
(Running Mail)<br />
Press or to return to the home screen.<br />
You are now ready to print.<br />
On the [Received ] home screen:<br />
1 Insert the mail piece into<br />
the system, with the side<br />
to be printed facing<br />
upwards.<br />
2 The mailing system<br />
applies the selected<br />
imprint on the mail piece.<br />
44
Settings Details<br />
3.5 Settings Details<br />
Changing Accounts<br />
To process mail pieces using another account, change the account as follows (if purchased)<br />
How to Change Accounts<br />
How to Change<br />
Accounts<br />
To change accounts:<br />
1 As a user:<br />
Press<br />
> Account<br />
and type 5 or select the path:<br />
The list of accounts you can change is displayed.<br />
2 Select the account you want with Up and Down arrows then<br />
press [OK] .<br />
3<br />
Processing Mail<br />
3 Press to return to the home screen. The current<br />
account number is displayed.<br />
The accounts are listed on the screen in the order they were set<br />
up (see Managing the Accounts p.79 ).<br />
45
Selecting a Rate<br />
3<br />
Selecting a rate allows the mailing system to calculate the postage amount when the<br />
mail piece weight is available, either from a weighing device or, for a big parcel,<br />
entered manually (see How to Enter Weight Manually p.52 ).<br />
The system provides you several ways to select a rate:<br />
• Using a shortcut list in the form of a Scale dashboard in the rate selection screen<br />
• Using a wizard that asks you to choose class, destination, format and services in<br />
complete lists of options.<br />
Processing Mail<br />
How to Select a Rate<br />
How to Select a<br />
Rate<br />
On the home screen, press<br />
refresh weight.<br />
To select a rate:<br />
1 Either:<br />
Press<br />
or<br />
to select the default rate and<br />
Press and type 4 or select the<br />
path:<br />
> Rate selection<br />
The Rate selection screen is displayed.<br />
2 On that screen, you can:<br />
- Type a rate number 1 to 7 to select a rate or display rate<br />
options<br />
- Press 8 to select the Rate wizard .<br />
3 Follow the instructions on screen and, once you have chosen<br />
the rate and services, press [OK] to validate your selection.<br />
Postage displayed on the screen is zero as long as the weight is<br />
not known (= zero).<br />
46
Using the Rate Wizard<br />
After selecting the rate Wizard, it will guide you through the selection process to select<br />
a rate and all associated postal services for that class of mail<br />
To select an option on the screen:<br />
• Highlight the option using the arrow keys and .<br />
• use the arrow keys and to scroll from screen to screen<br />
3<br />
• Then always press to validate your selection.<br />
• Select Mail Class<br />
All the Rate mail classes loaded in the system are displayed in a list.<br />
• Select Destination<br />
For domestic mail classes, you may be prompted to enter the destination zip<br />
code. Use the [C] key to delete any existing zip code and enter the new destination<br />
zip.<br />
Processing Mail<br />
For international mail classes, use the and key to highlight Code or<br />
Country. You can select from the alphabetically sorted Country list by entering<br />
the country letters or you can use the Code list to enter the numeric code for<br />
the country if you know it.<br />
• Select Format<br />
Formats describe the mail piece types for the selected mail class.<br />
• Select Services<br />
All the services available for the mail class, destination and format you selected<br />
are displayed in a list (including “No services”).<br />
After you select a service, any additional services available will be displayed.<br />
• Wizard Summary Screen<br />
Summary screen displays all the selections you have made.<br />
If you place a weight on the platform, the postage for your selections is displayed.<br />
Press [Finish] on the Wizard summary screen to set the postage value and<br />
rate settings on the Home Screen.<br />
Before pressing Finish, you can press the Back key to<br />
modify any of the wizard screens to change your final selection.<br />
47
Entering Postage Amount Manually<br />
To enter the postage amount manually, follow the procedure below.<br />
3<br />
How to Enter Postage Amount Manually<br />
How to Enter<br />
Postage Amount<br />
Manually<br />
On the home screen:<br />
1 Type directly the first figure of the amount using the keypad.<br />
The Manual amount screen appears.<br />
2 Complete the amount.<br />
Processing Mail<br />
3 Press [OK] .<br />
The amount is displayed in the Postage area of the home<br />
screen.<br />
You can set a default postage amount to display the same postage<br />
amount on the homepage screen at each system start-up,<br />
see How to Enter a Default Postage Amount p.49<br />
To set the fractional postage for presort mail, see How to Activate<br />
/ Deactivate Fractional Postage values p.140 .<br />
48
How to Enter a Default Postage Amount<br />
How to Enter a<br />
Default Postage<br />
Amount<br />
To enter a default postage amount:<br />
1 As supervisor (see How to Log in as Supervisor p.124 ),<br />
select a default rate (see How to Change the Default Rate<br />
p.137 ).<br />
2 Select a default weight:<br />
Press and type 3.2.3.2 or select the path:<br />
> Default user settings > System settings > Default weighing<br />
types > Manual weight entry<br />
3<br />
3 Enter a default weight value.<br />
4 Press [OK] .<br />
The default postage amount (including the default weight<br />
value entered as supervisor and a default rate) is displayed<br />
on the home screen when you log in as user.<br />
Processing Mail<br />
49
Choosing a Weighing Type<br />
Depending on the options that are installed in your mailing system, several weighing<br />
methods are available.<br />
You can also enter the weight manually if you know it: see How to Enter Weight<br />
Manually p.52 .<br />
3<br />
Choosing a Weighing Type<br />
The Weighing type icon on the screen indicates the selected method and thus the<br />
source that provides the weight of the mail piece to the system.<br />
Processing Mail<br />
Details on the Weighing Types<br />
• Manual Weight Entry ( )<br />
In this mode, you enter the weight manually (see p.52 ).<br />
• Standard Weighing ( )<br />
In this mode, you manually and successively put each mail piece on the Weighing<br />
Platform.<br />
The standard weighing type is automatically selected when you<br />
put a mail piece on the Weighing Platform. You can still enter the<br />
weight manually by pressing .<br />
Check with your Customer Service to see how you can add<br />
weighing features to your mailing system using Online Services.<br />
50
Changing the Weighing Type<br />
At start-up, the default weighing type is active.<br />
To change the weighing type (see Choosing a Weighing Type p.50 ), follow the procedure<br />
below.<br />
How to Change the Weighing Type<br />
How to Change<br />
the Weighing<br />
Type<br />
To change the weighing type from the home screen:<br />
1 Either:<br />
Press<br />
or<br />
Press and type 2.1 or select the<br />
path:<br />
> Job settings > Weighing modes<br />
The Weighing mode screen is displayed.<br />
3<br />
Processing Mail<br />
The options currently displayed in the screen depend on the<br />
weighing devices that are connected to your mailing system.<br />
2 Select the weighing type and press [OK] .<br />
51
Entering Weight Manually<br />
3<br />
Processing Mail<br />
You may have to enter the weight manually if a mail piece exceeds the weighing capacity<br />
of your weighing platform.<br />
In this latter case, you will typically choose to print the postage on a label to stick onto<br />
the mail piece.<br />
How to Enter Weight Manually<br />
How to Enter<br />
Weight Manually<br />
To enter the weight manually from the home screen:<br />
1 Either:<br />
Press<br />
or<br />
Press and type 2.1 or select the<br />
path:<br />
> Job settings > Weighing mode<br />
The Weighing mode screen is displayed.<br />
2 Select Manual weight entry (or type 1 ).<br />
The Manual weight entry screen is displayed.<br />
3 Enter the weight (first lb then oz ) and press [OK] to validate.<br />
The home screen displays the Manual weight icon ( )<br />
and the weight entered.<br />
52
Configuring the Imprint<br />
Depending on the current type of imprint, you can modify the elements printed on mail<br />
pieces as follows:<br />
• Changing printed date<br />
• Adding a pre-loaded Ad slogan to the left of the imprint<br />
• Adding a custom text to the left of the imprint (you must first create it in supervisor<br />
mode).<br />
Navigating in the Imprint Settings<br />
When you have selected the type of imprint:<br />
3<br />
• Press and type 1 to access the configuration menu of the type of imprint.<br />
• To return to the type of imprint home screen, press .<br />
Advancing or Omitting the Date<br />
The Date Advance function allows you to change the date printed on the mail pieces<br />
for future sending or to print no date.<br />
You can set Date Advance to change the date at a fixed time<br />
(from supervisor mode). This is useful if you process mail after the<br />
last mail pickup for the day. This ensures that the proper date of<br />
mailing is printed for the next days mail pickup. See How to Set<br />
the Automatic Date Advance Function p.139 .<br />
Processing Mail<br />
How to Change the Date on the Imprint<br />
How to Change<br />
the Date on the<br />
Imprint<br />
To change the date that will be printed:<br />
1 As user:<br />
Press and type 1 or select the path:<br />
> Customize stamp<br />
The Customize stamp screen is displayed.<br />
53
2 Select > Date and press [OK] (or type 3 ).<br />
The Date advance screen is displayed.<br />
3<br />
Processing Mail<br />
3 On the Date advance screen, you can configure the printed<br />
date as follows:<br />
To cancel the date, select > No date .<br />
To cancel the day in the date, select > No day .<br />
- To choose another day, select the corresponding item in the<br />
list.<br />
- The icon indicates the current selection.<br />
The date can be advanced up to 30 days from today's date.<br />
4 Press [OK] to apply changes and return to the configuration<br />
menu.<br />
54
Adding Text or Ad Slogan to the Imprint<br />
You can add a Text or an Ad Slogan to the imprint, as illustrated below.<br />
Imprint with Text<br />
3<br />
Imprint with Ad Slogan<br />
Processing Mail<br />
55
3<br />
How to Add (or Cancel) a Text on the Imprint<br />
How to Add (or<br />
Cancel) a Text on<br />
the Imprint<br />
To add a text to the imprint, or to cancel the text:<br />
1 Either:<br />
Press and type 1 or select the path:<br />
> Customize stamp<br />
2 Select > Text and press [OK] (or type 2 ).<br />
The Select text screen is displayed.<br />
Processing Mail<br />
3 Select the desired text in the list or select None for printing<br />
no text.<br />
The icon indicates the current selection.<br />
4 Press [OK] to validate your selection.<br />
The Customize stamp screen is displayed with updated parameters.<br />
See also<br />
The supervisor manages the lists of the available :<br />
• custom texts<br />
(see Managing Custom Text Messages p.156 )<br />
• custom ad slogans.<br />
(see Managing Slogan s p.158 )<br />
56
How to Add (or Cancel) a Slogan on the Imprint<br />
How to Add (or<br />
Cancel) a Slogan<br />
on the Imprint<br />
To add a slogan to the imprint or cancel the slogan:<br />
1 Either:<br />
Press and type 1 or select the path:<br />
> Customize stamp<br />
2 Select > Ad slogan and press [OK] (or type 1 ).<br />
The Select ad slogan screen is displayed.<br />
3<br />
3 Select the ad slogan in the list or select None for printing no<br />
ad slogan.<br />
The icon indicates the current selection.<br />
4 Press [OK] to validate your selection.<br />
The Customize stamp screen is displayed with updated parameters.<br />
Processing Mail<br />
57
Using Imprint Memories<br />
3<br />
If your mail requires different settings such as:<br />
• specific postal rate<br />
• custom text<br />
• ad slogan<br />
• departement to charge<br />
Processing Mail<br />
then the imprint memories are the solution.<br />
All your settings are stored in a single memory. Just press Imprint<br />
memory key instead of multiple keystrokes to select all the<br />
required elements. Highly recommended for repetitive tasks.<br />
The Imprint Memories allow you to create a memory preset with:<br />
• Rate<br />
• Custom text<br />
• Ad slogan<br />
Ad die<br />
• Date mode ,<br />
for the type of imprint you would like to print<br />
In account-activated configurations (depends on model), imprint memories can<br />
include accounts , allowing you to associate default rates to accounts .<br />
See also<br />
• To prepare imprint memories as supervisor, see Imprint Memories p.141 .<br />
How to Use an Imprint Memory<br />
How to Use an<br />
Imprint Memory<br />
To use an imprint memory:<br />
1 Either:<br />
Press<br />
or<br />
Press and type 3 or select the<br />
path:<br />
> Imprint Memories<br />
The imprint memories list is displayed.<br />
2 Select an imprint memory in the list.<br />
3 Press [OK] to validate and apply memory parameters.<br />
The imprint memory area (Mem ) of the home screen<br />
displays the current imprint memory name.<br />
58
Complementary Operations<br />
3.6 Complementary Operations<br />
Piece Counting<br />
This function uses the weighing platform to count a stack of identical mail pieces.<br />
How to Count Mail pieces by Weighing<br />
How to Count<br />
Mail pieces by<br />
Weighing<br />
To count mail pieces by weighing:<br />
1 As a user:<br />
Press and type 10 or select the path:<br />
> Piece Counting<br />
2 Read the explanations then press<br />
3 Place 10 items, of your total stack, on the Scale and press<br />
[OK] .<br />
3<br />
Processing Mail<br />
4 Put the complete stack of items on the Scale and press [OK] .<br />
5 The total number of items is displayed.<br />
You must first weigh 10 (ten) items in order to get the count of the<br />
total number of items.<br />
59
3<br />
Processing Mail<br />
60
Money Operations<br />
4 Money Operations<br />
This section describes how you can load and manage money in your mailing system<br />
to allow postage operations.<br />
4.1 Overview ..............................................................................63<br />
4.2 Managing Funds ..................................................................64<br />
How to Check the Meter Funds....................................................................................... 64<br />
How to Add Funds to the Meter ...................................................................................... 65<br />
4.3 Unlocking the Meter (Postal Inspection) ............................67<br />
How to Unlock the Meter................................................................................................. 67
4<br />
Money Operations<br />
62
Overview<br />
4.1 Overview<br />
The Postage Meter<br />
The Meter, located under the system, handles the funds (or money) in your mailing<br />
system.<br />
The Meter performs all necessary operations to comply with the postal standards. To<br />
do so, regular connections to the Postal Services are necessary.<br />
Check that your mailing system is connected to a network or a<br />
telephone line (see Connections p.18 ) and that the connection is<br />
properly configured (see Connection Settings p.144 ).<br />
4<br />
Managing Funds<br />
As a user, you can carry out the following operations dealing with funds in your<br />
mailing system:<br />
• Check the available funds in the Meter<br />
• Add funds to the Meter.<br />
• Display the date of next call.<br />
The funding operations trigger a connection of the mailing system to Postal Services<br />
through an Internet connection or the telephone line.<br />
Money Operations<br />
Tracking Funds<br />
To trigger manual calls when the Mailing System connection type<br />
is set to PC Meter Link , see PC Meter Link Application p.111<br />
You can generate reports on the use of the funds as all mailing operations involving<br />
postage are recorded in the mailing system.<br />
To generate reports, see Reports p.83 .<br />
When the connection type is set to PC Meter Link , the functions<br />
mentioned above are no longer available from your Mailing System<br />
screen.<br />
63
Managing Funds<br />
4.2 Managing Funds<br />
Checking Funds<br />
4<br />
Money Operations<br />
You can check the total postage used and the remaining funds in the Meter at any<br />
time, and particularly before mailing sessions, to check that the funds are sufficient to<br />
complete your current task.<br />
Use the following procedure to display remaining funds.<br />
How to Check the Meter Funds<br />
How to Check<br />
the Meter Funds<br />
To check the funds in the system:<br />
1 Either:<br />
Press<br />
or<br />
Press<br />
> My Funds<br />
The Funds menu is displayed.<br />
and type 7 or select the path:<br />
2 Select the menu path:<br />
> Funds used / Funds available (or type 1 ).<br />
The screen displays the current amounts.<br />
(Ascending = funds used. Descending = funds available.)<br />
64
Adding Funds<br />
You can add funds to the mailing system by indicating an amount to add. The mailing<br />
system then connects to the Postal Server and validates the operation.<br />
How to Add Funds to the Meter<br />
How to Add<br />
Funds to the<br />
Meter<br />
To add funds to the Meter:<br />
1 Either:<br />
Press<br />
or<br />
Press<br />
> My Funds<br />
and type 7 or select the path:<br />
4<br />
2 Select > Add funds (or type 2 ).<br />
3 If the system asks for a PIN code, enter the code using the<br />
keypad and press [OK] .<br />
The Add funds screen is displayed.<br />
Money Operations<br />
By default, the system proposes the value of the previous<br />
funding operation.<br />
4 Enter the amount to add using the keypad (use C to clear a<br />
digit, twice to clear the field).<br />
5 Press [OK] to start the connection to the Postal Server.<br />
If the funding process is successful, the system displays a<br />
successful message.<br />
If funding process fails, the system displays a failure<br />
message and the value that you may actually add, depending<br />
on your postal account balance.<br />
In the case of a communication error, the amount previously<br />
entered cannot be changed.<br />
65
6 You can open the Funds used / Funds available screen to<br />
check the new values.<br />
See also<br />
• As supervisor, you can set the mailing system to ask for a PIN code for funding:<br />
see How to Set/Cancel a Funding PIN Code p.132 .<br />
4<br />
Money Operations<br />
66
Unlocking the Meter (Postal Inspection)<br />
4.3 Unlocking the Meter (Postal<br />
Inspection)<br />
Manual Call<br />
The postal service requires your postage Meter to periodically connect for postal security<br />
regulation. If you have not connected your system after a period your system<br />
will automatically be deactivated.<br />
You have to do a connection within 109 days.<br />
If your system is deactivated, you have to perform a connection to the Postal Services<br />
to unlock the Meter.<br />
4<br />
How to Unlock the Meter<br />
How to Unlock<br />
the Meter<br />
To unlock the Meter and manually connect to the Postal<br />
Services:<br />
1 Either:<br />
Press<br />
or<br />
Press<br />
path:<br />
> My Funds<br />
2 Select > Postal inspection (or type 3 ).<br />
The system asks for confirmation.<br />
and type 7 or select the<br />
Money Operations<br />
3 Press [OK] to connect to the Postal Services.<br />
If the Postal Services connection is successful, the system<br />
displays a successful message.<br />
If the Postal Services connection fails, the system displays a<br />
failure message explaining the cause of the error. Try to<br />
correct the cause and retry.<br />
You can also use the Postal inspection function to set the mailing<br />
system time after Daylight Savings Time transitions , as connecting<br />
to the Postal Services sets the mailing system time and date.<br />
If you use PC Meter Link connection, see instructions from the<br />
software.<br />
67
4<br />
Money Operations<br />
68
Managing Accounts and Access Rights<br />
5 Managing Accounts and<br />
Access Rights<br />
This section describes how you can manage accounts as supervisor to track the<br />
postage funds usage and/or set access rights to the mailing system.<br />
5.1 Accounting and Access Rights Overview .............................71<br />
5.2 Setting up 'Machine PIN Code ' ...........................................72<br />
How to activate 'Access control' and set the 'Machine PIN code' ........................ 72<br />
5.3 Selecting an 'Account Mode ' ..............................................73<br />
5.4 <strong>Guide</strong>lines to Setup Account Modes....................................74<br />
How to Change the Shared PIN Code .................................................................. 75<br />
5.5 Selecting an 'Account Mode' ...............................................78<br />
How to Display and Change the 'Account Mode' .................................................. 78<br />
5.6 Managing the Accounts.......................................................79<br />
How to Create an Account .................................................................................... 80<br />
How to View / Edit Account Parameters ............................................................... 81<br />
How to Activate / Deactivate an Account .............................................................. 82<br />
How to Delete an Account ..................................................................................... 82
5<br />
Managing Accounts and Access Rights<br />
70
Accounting and Access Rights Overview<br />
5.1 Accounting and Access Rights<br />
Overview<br />
Postage Tracking and Access Control<br />
Your mailing system allows you to track postage by account/department and provides<br />
security features to prevent unauthorized use.<br />
• Track postage expenditures: the Accounts function<br />
• Control user access to the system with PIN codes: the Access Control function.<br />
The Accounts Function<br />
Activating the Accounts function in the mailing system is a convenient way to monitor,<br />
track and control postage expenses by, for example, associating accounts to departments<br />
in your organization (Marketing, Sales, etc.) or to different companies, if<br />
the mailing system is shared.<br />
When the Accounts function is activated, the currently selected account is charged<br />
each time the user applies postage to mail.<br />
Then you can issue reports on each account usage (for information about reports,<br />
see Reports p.83 ).<br />
Accounts from the <strong>User</strong>'s Perspective<br />
If the Accounts function is activated, users of the mailing system must select an<br />
account when starting their work session.<br />
Afterwards, users can change accounts to allocate postal expenditures.<br />
The supervisor can associate PIN codes to accounts to restrict the usage of the accounts.<br />
The Access Control Function<br />
As supervisor, you can set the mailing system to ask for a PIN code when a user<br />
wakes the system up to start a session.<br />
This allows you to protect the system and restrict the usage of its funds.<br />
The different access control policies you can implement as supervisor are:<br />
• No PIN code : free access<br />
• Unique system or Machine PIN code : the user enter the PIN code to access the<br />
system.<br />
• Account PIN code : the user enter a PIN code to access the account associated<br />
with this PIN code.<br />
5<br />
Managing Accounts and Access Rights<br />
71
Setting up 'Machine PIN Code '<br />
5.2 Setting up 'Machine PIN Code '<br />
This functionnality is only applicable to systems where Accounting<br />
is not allowed (Account Number = 0).<br />
To check your number of accounts or upgrade your system, see<br />
Account Level (Optional) p.104<br />
5<br />
Managing Accounts and Access Rights<br />
You can set a 'Machine PIN code' to open a session on your mailing system by activating<br />
the 'Access control ' mode.<br />
How to activate 'Access control' and set the 'Machine PIN code'<br />
How to activate<br />
'Access control'<br />
and set the<br />
'Machine PIN<br />
code'<br />
1 As supervisor (see How to Log in as Supervisor p.124 ):<br />
Press and type 3.2.2 or select the path:<br />
> Default user settings > System settings > Access control<br />
The Access control screen is displayed.<br />
2 Select ON with up and down arrows<br />
A screen to set the 'Machine PIN code' appears<br />
3 Enter the PIN code and press [OK] .<br />
72
Selecting an 'Account Mode '<br />
5.3 Selecting an 'Account Mode '<br />
Introducing the 'Account Modes'<br />
In your mailing system, a single 'Account mode' allows you to set up both the Accounts<br />
and the Access control functions (see Accounting and Access Rights<br />
Overview p.71 ).<br />
The table below lists the account functional access control for each account mode.<br />
If your system does not allow accounting, see Setting up<br />
'Machine PIN Code ' p.72<br />
5<br />
Access Control Function<br />
Accounting Function<br />
No<br />
Yes<br />
No 'No account' 'No account with access<br />
control'<br />
Yes 'Account' 'Account with PIN code'<br />
Managing Accounts and Access Rights<br />
73
<strong>Guide</strong>lines to Setup Account Modes<br />
5.4 <strong>Guide</strong>lines to Setup Account<br />
Modes<br />
See also<br />
• Selecting an 'Account Mode ' p.73 .<br />
Setting up 'No account '<br />
5<br />
The 'No account' mode provides users with free access to the system (self-service<br />
type).<br />
This is the default mode in the system.<br />
Managing Accounts and Access Rights<br />
Implementing “No account”<br />
• Follow the procedure How to Display and Change the 'Account Mode' p.78 and<br />
select the 'No account' mode.<br />
'No Account' Management Menu<br />
In No account mode:<br />
No other setting is necessary for the 'No account' mode.<br />
74
Setting up 'No account with access control '<br />
If you want to prevent unauthorized use of the mailing system and do not track accounts,<br />
use the “No account with access control” mode. This provides a single PIN<br />
code for all authorized users.<br />
Implementing “No account with access control”<br />
1 Follow the procedure How to Display and Change the 'Account Mode' p.78 and<br />
select the 'No account with access control' mode.<br />
2 In the procedure, enter the 4 digit shared PIN code the users will have to enter at<br />
log in.<br />
'No account with access control' Management Menu<br />
In No Account with access control mode, the menu allows you to change the shared<br />
PIN code.<br />
5<br />
How to Change the Shared PIN Code<br />
How to Change<br />
the Shared PIN<br />
Code<br />
1 As supervisor (see How to Log in as Supervisor p.124 ):<br />
Press and type 5.2 or select the path:<br />
> Account Management > Change PIN code<br />
The Change machine PIN code screen is displayed.<br />
Managing Accounts and Access Rights<br />
2 Enter the new PIN code and press [OK] .<br />
75
Setting up 'Account '<br />
In the 'Account' mode, users must select an account to process mail. The user can<br />
change accounts at any time during mail processing.<br />
If only one account is available, the mailing system automatically<br />
selects it at start up.<br />
5<br />
Implementing 'Account'<br />
1 Follow the procedure How to Display and Change the 'Account Mode' p.78 and<br />
select the 'Account' mode.<br />
2 Create accounts as indicated in How to Create an Account p.80 .<br />
Managing Accounts and Access Rights<br />
'Account' Mode Management Menu<br />
When you activate the 'Account' mode, the system creates an<br />
account by default.<br />
In Account mode, the menu allows you to manage the accounts.<br />
See also<br />
• To add, modify or delete accounts, see Managing the Accounts p.79 .<br />
76
Setting up 'Account with PIN Code '<br />
In the 'Account with PIN code' mode, users must select an account and enter the associated<br />
PIN code to process mail. The user can change accounts at any time during<br />
mail processing.<br />
If only one account is available, the mailing system automatically<br />
selects it at start up.<br />
Implementing 'Account with PIN Code'<br />
1 Follow the procedure How to Display and Change the 'Account Mode' p.78 and<br />
select the 'Account with PIN Code' mode.<br />
2 Create accounts with PIN codes as indicated in How to Create an Account p.80 .<br />
5<br />
When you activate the 'Account with PIN code' mode, the system<br />
creates an account with PIN code '0000' by default.<br />
'Account with PIN Code' Mode Management Menu<br />
In Account with PIN code mode, the menu allows you to manage the accounts.<br />
You can manage the PIN code of an account in the account management screens.<br />
See also<br />
• To add, edit/modify or delete accounts, see Managing the Accounts p.79 .<br />
Managing Accounts and Access Rights<br />
77
Selecting an 'Account Mode'<br />
5.5 Selecting an 'Account Mode'<br />
See also<br />
• <strong>Guide</strong>lines to Setup Account Modes p.74 .<br />
5<br />
How to Display and Change the 'Account Mode'<br />
How to Display<br />
and Change the<br />
'Account Mode'<br />
To display and change the 'Account mode':<br />
1 As supervisor (see How to Log in as Supervisor p.124 ):<br />
Press and type 5.1 or select the path:<br />
> Account Management > Account Mode Selection<br />
The Account Mode Selection screen is displayed.<br />
Managing Accounts and Access Rights<br />
In the screen, the current 'Account mode' is selected.<br />
2 Select another 'Account mode'.<br />
The system asks for a confirmation.<br />
3 Press [OK] to confirm.<br />
4 In selection 4 enter a unique PIN and press [OK] .<br />
The mailing system confirms that the 'Account mode' has<br />
been changed.<br />
78
Managing the Accounts<br />
5.6 Managing the Accounts<br />
Selecting an Account Mode<br />
You can only manage accounts in the mode Account or Account with PIN code .<br />
Before creating accounts , see Setting up 'Account ' p.76 .<br />
The maximum number of accounts you can create depends on the model.<br />
Account names must be unique within the system.<br />
5<br />
Account Parameters<br />
An account has the following parameters, displayed on the Add account screens:<br />
Param. Format Description<br />
Number<br />
Name<br />
PIN code<br />
11 alphanumeric<br />
characters<br />
32 alphanumeric<br />
characters<br />
4 numeric characters<br />
Number of the account. Two accounts cannot have<br />
the same number.<br />
An account number cannot be modified after the<br />
account is created. However, the account can be<br />
deleted.<br />
Name of the account. Two accounts cannot have<br />
the same name.<br />
<strong>User</strong>s have to enter the PIN code to access the<br />
account.<br />
Only available in mode 'Account with PIN code'.<br />
Status Active / Inactive Only active accounts are visible to users.<br />
Managing Accounts and Access Rights<br />
See also<br />
• Printing the current account list: Account List Report p.91 .<br />
• Changing the maximum number of accounts: Account Level (Optional) p.104 .<br />
79
Account Management<br />
Follow the steps below to create, modify, activate/deactivate or delete accounts.<br />
See also<br />
• Account Parameters p.79 .<br />
• Creating an account requires the 'Accounts' or 'Accounts with PIN code' mode to<br />
be active. See How to Display and Change the 'Account Mode' p.78 .<br />
5<br />
How to Create an Account<br />
How to Create<br />
an Account<br />
To create an account:<br />
1 As supervisor (see How to Log in as Supervisor p.124 ):<br />
Press and type 5.2.1 or select the path:<br />
> Account management > Manage accounts > Account<br />
list<br />
Managing Accounts and Access Rights<br />
The Account list screen is displayed.<br />
2 Select > Add Account .<br />
3 Using the keypad:<br />
- Enter account Number and press [OK]<br />
- Enter Name and press [OK]<br />
- Select the account status (active or inactive) and press [OK]<br />
.<br />
- Only in mode 'Account with PIN code' : type the account<br />
PIN code and press [OK] .<br />
- The Account creation summary screen is displayed.<br />
4 Press [OK] to create the account.<br />
80
Editing Accounts<br />
Use the procedures below to modify an account name or status.<br />
The account number cannot be modified.<br />
How to View / Edit Account Parameters<br />
How to View /<br />
Edit Account<br />
Parameters<br />
To view or edit an account:<br />
1 As supervisor (see How to Log in as Supervisor p.124 ):<br />
Press and type 5.2.1 or select the path:<br />
> Account management > Manage accounts > Account<br />
list<br />
The Account list screen is displayed.<br />
5<br />
2 Select the account (or type its number) and press [OK] .<br />
3 Select Edit / Modify (or type 1 ).<br />
The Edit / Modify screen is displayed.<br />
4 Change each parameter using the keypad (use key [C] to<br />
clear characters). Press [OK] to display the next parameter.<br />
The Account modification summary screen is displayed.<br />
5 Press [OK] to validate the changes.<br />
Managing Accounts and Access Rights<br />
81
Activating Accounts<br />
Deactivated accounts are not visible to users.<br />
This function allows you to create accounts in advance and prevent them being used<br />
before your account structure is complete.<br />
5<br />
How to Activate / Deactivate an Account<br />
How to Activate<br />
/ Deactivate an<br />
Account<br />
To activate or deactivate an account:<br />
1 Perform procedure How to View / Edit Account Parameters<br />
p.81 .<br />
2 Change the status parameter (the button displays the current<br />
status: active or inactive) and press [OK] .<br />
3 On the Account modification summary screen, press [OK] to<br />
validate the changes.<br />
Managing Accounts and Access Rights<br />
Deleting Accounts<br />
You may need to delete an account.<br />
How to Delete an Account<br />
How to Delete<br />
an Account<br />
To delete an Account:<br />
1 Perform procedure How to View / Edit Account Parameters<br />
p.81 .<br />
2 On the Account management screen, select > Delete (or<br />
type 2 ) instead of Edit/Modify .<br />
A confirmation of account deletion is displayed.<br />
82
Reports<br />
6 Reports<br />
This section explains how you can get and print out reports for the mailing system<br />
usage, funds usage, account usage, etc.<br />
6.1 Report Overview...................................................................85<br />
6.2 Generating Reports ..............................................................86<br />
How to Generate Reports (<strong>User</strong>) .................................................................................... 86<br />
How to Generate Reports (Supervisor) ................................................................. 87<br />
6.3 Postage Data........................................................................88<br />
6.4 Funds Data ...........................................................................89<br />
6.5 Account Data........................................................................ 91<br />
How to Generate the Account List Report ............................................................. 91<br />
6.6 System Data.........................................................................94
6<br />
Reports<br />
84
Report Overview<br />
6.1 Report Overview<br />
As user or as supervisor, you can get a range of reports to regularly view, print or<br />
store information regarding the mailing system usage, funds usage, account expenditures,<br />
etc.<br />
Your mailing system also uploads basic data that can be viewed online. Enhanced<br />
online postal expense management reporting can be added as an option (please<br />
contact your Customer Service).<br />
Reports generally require a beginning date and an end date. Typically, the reports are<br />
available on screen and can be printed out on an envelope, an external USB printer<br />
or saved on a USB memory device.<br />
Your mailing system allows you to get reports on the activity over the past two years.<br />
The table below lists the available reports.<br />
List of Reports<br />
Output on: L=label (or envelope), S=screen, P=USB printer, F=USB memory device<br />
Report name Short description Output Page<br />
Daily usage<br />
Funds summary<br />
Funds history<br />
Account list<br />
Single account<br />
Multi-accounts<br />
Machine<br />
configuration<br />
POSTAGE DATA<br />
Consumption information (total items and<br />
total postage value) for each day of a<br />
selected period.<br />
CREDIT DATA<br />
Information on the funds usage in the system<br />
(since the installation of the system).<br />
Contents is limited to the history available<br />
in the Meter.<br />
Last refill operations performed on the<br />
system in a selected period (supervisor<br />
only).<br />
ACCOUNT DATA<br />
List of accounts in the system (if installed)<br />
(supervisor only).<br />
Usage on the account for a selected<br />
period of time.<br />
Usage on all accounts for a selected<br />
period of time.<br />
SYSTEM DATA<br />
Supervisor settings (imprint default data,<br />
date advance, postal services, connections,<br />
MMI, ink cartridge, weighing, etc.)<br />
SPF p.88<br />
LSP p.89<br />
SPF p.90<br />
PF p.91<br />
S p.92<br />
PF p.93<br />
PF p.94<br />
6<br />
Reports<br />
85
Generating Reports<br />
6.2 Generating Reports<br />
Generating a report requires to select the desired report and how you want to display<br />
or record the report:<br />
• On screen<br />
• On an envelope (or label tape)<br />
• On an external printer (if installed)<br />
• On a USB memory device.<br />
Follow the procedures below as user or as supervisor.<br />
6<br />
How to Generate Reports (<strong>User</strong>)<br />
How to Generate<br />
Reports (<strong>User</strong>)<br />
To generate a report:<br />
1 As a user:<br />
Press<br />
> Reports<br />
and type 6 or select the path:<br />
Reports<br />
2 A list of available report types is displayed.<br />
3 Select the report type and press [OK] .<br />
4 Depending on the report type, the system may ask for parameters<br />
such as:<br />
- Period of time targeted (begin date, end date)<br />
- Desired account, etc.<br />
- Select or type the required parameters and press [OK] .<br />
- The Output selection screen is displayed.<br />
Output selection varies according to the report selected.<br />
5 Select an available output device and press [OK] .<br />
The system sends the report details to the selected output.<br />
When displaying a report on screen , use the arrow keys<br />
to display the different pages of the report.<br />
and<br />
86
How to Generate Reports (Supervisor)<br />
How to Generate<br />
Reports<br />
(Supervisor)<br />
To generate a report:<br />
1 As supervisor (see How to Log in as Supervisor p.124 ):<br />
Press<br />
> Reports<br />
and type 2 or select the path:<br />
2 Resume with the steps in How to Generate Reports (<strong>User</strong>) .<br />
6<br />
Reports<br />
87
Postage Data<br />
6.3 Postage Data<br />
Daily Usage Report<br />
6<br />
This report displays, for each day of the selected period, usage data (total items and<br />
total postage value).<br />
Requirements<br />
• You have to specify the period for the report (Begin date and End date).<br />
Default period:<br />
Begin = 1st day of the current month<br />
End = current day.<br />
When you specify the Begin date, the End date field is filled with a proposed value:<br />
Begin date + 31 days.<br />
You can specify any other End date.<br />
Reports<br />
Outputs<br />
• Screen<br />
• External printer (if installed)<br />
• USB memory device.<br />
Fields<br />
Die number<br />
For each day in the period:<br />
• Day number<br />
• Number of items processed (zero and non-zero)<br />
• Total postage value for this day<br />
Comments<br />
On printed report only<br />
See also<br />
• Generating Reports p.86 .<br />
88
Funds Data<br />
6.4 Funds Data<br />
Funds Summary Report<br />
This report displays information on funds usage since the system has been installed<br />
(content is limited to the history available in the Meter).<br />
Outputs<br />
• Screen<br />
• Label or envelope<br />
• External printer (if installed).<br />
Fields<br />
Current date and time<br />
Meter status<br />
Die number<br />
Funds used (ascending)<br />
Funds available (descending)<br />
Control total<br />
Non zero items<br />
Zero Items<br />
Total items<br />
Comments<br />
Printed report only.<br />
Printed report only.<br />
Printed report only.<br />
Total postage printed by the system.<br />
Postage available for printing by the system.<br />
Total funds downloaded into the system.<br />
Must be equal to ascending + descending.<br />
Total number of normal items.<br />
Total number of zero items.<br />
Total number of zero + non-zero items.<br />
6<br />
Reports<br />
See also<br />
• Generating Reports p.86 .<br />
89
Funds History Report<br />
This report displays the last postage refill operations performed on the system in a<br />
selected period.<br />
Requirements<br />
• For this report, you have to be logged in as a supervisor.<br />
Outputs<br />
• Screen<br />
• External printer (if installed)<br />
• USB memory device.<br />
6<br />
Reports<br />
Fields<br />
Period<br />
Default period:<br />
• Begin = Current date - 6 months<br />
• End= Current date<br />
Die number<br />
For each postage download performed:<br />
• Download date & time<br />
• Funds amount<br />
• New funds<br />
Comments<br />
On printed report only<br />
Represents the new total amount available<br />
in the system.<br />
See also<br />
• Generating Reports p.86 .<br />
90
Account Data<br />
6.5 Account Data<br />
Account List Report<br />
This report displays the list of accounts in the system.<br />
Requirements<br />
• The current access control mode has to be Account or Account with PIN code<br />
(see Managing Accounts and Access Rights p.69 )<br />
• You have to be logged in as supervisor.<br />
Outputs<br />
• External printer (if installed)<br />
• USB memory device.<br />
6<br />
Data<br />
For each account:<br />
• Account number<br />
• Account name<br />
• Status.<br />
Reports<br />
How to Generate the Account List Report<br />
How to Generate<br />
the Account List<br />
Report<br />
To generate the report:<br />
1 As supervisor (see How to Log in as Supervisor p.124 ):<br />
Press and type 5.2.2 or select the path:<br />
> Account management > Manage accounts > Account<br />
list report<br />
2 Select an Output and then press [OK] .<br />
91
Single Account Report<br />
This report displays the postal expenditures of one account over a selected period of<br />
time. You can select any account from the list.<br />
The default period of time is:<br />
• Begin = 1st day of the current month<br />
• End = Current date.<br />
Requirements<br />
• The current account mode has to be 'Accounts' or 'Accounts with PIN code' (see<br />
Managing Accounts and Access Rights p.69 ).<br />
6<br />
Outputs<br />
• Screen.<br />
(For other outputs, see Multi Account Report p.93 .)<br />
Fields<br />
Comments<br />
Reports<br />
Period<br />
Die number<br />
Account number<br />
Account name<br />
Number of items processed (zero + non-zero items)<br />
Total postage value<br />
Printed reports only.<br />
See also<br />
• Generating Reports p.86 .<br />
92
Multi Account Report<br />
This report displays postal expenditures for all the accounts over a selected time<br />
period, sorted by ascending account number.<br />
The report displays all the accounts in 'active' status, and accounts 'inactive' or<br />
'deleted' with a postage value.<br />
Requirements<br />
• The current account mode has to be 'Accounts' or 'Accounts with PIN code' (see<br />
Managing Accounts and Access Rights p.69 ).<br />
• You have to specify the period for the report (Begin and End dates).<br />
Default period:<br />
Begin = 1st day of current month<br />
End = current date<br />
Outputs<br />
• USB printer<br />
• USB memory device.<br />
6<br />
Fields<br />
Period<br />
Die number<br />
For each account:<br />
• Account Number<br />
• Account name<br />
• Number of items processed (zero +<br />
non-zero items)<br />
•<br />
• Total postage value.<br />
Comments<br />
On printed report only.<br />
If, in the period, some items were printed<br />
using a mode without accounts (default<br />
account), these items appear in the report<br />
under the name: 'Others' and 'No<br />
account'.<br />
Reports<br />
See also<br />
• Generating Reports p.86 .<br />
93
System Data<br />
6.6 System Data<br />
Machine Configuration Report<br />
This report displays all supervisor settings.<br />
Requirements<br />
• To generate this report, you have to be logged in as the supervisor.<br />
6<br />
Outputs:<br />
• External printer<br />
• USB memory device.<br />
Fields<br />
Imprint default settings (Default Text, Default Ad slogan, Default Rate)<br />
Reports<br />
Date advance parameters<br />
Funds settings (High value, Low Funds)<br />
Connections settings (phone numbers)<br />
System settings including, for example:<br />
• MMI settings (language, default home screen, sleep mode time-out, backlight)<br />
• Weighing settings (geodesic code, weight threshold, rounding mode)<br />
• Connection settings.<br />
See also<br />
• Generating Reports p.86 .<br />
94
Online Services<br />
7 Online Services<br />
Online Services for your mailing system allows you to update postal rates, download<br />
optional features and use discounted USPS postal services such as e-Services.<br />
7.1 Online Services Overview.....................................................97<br />
7.2 Connecting to Online Services .............................................98<br />
How to Call Online Services Manually ............................................................................ 99<br />
How to Call Online Services Manually .................................................................. 99<br />
How to Test the Connection to Online Services ........................................................... 100<br />
7.3 Uploading Statistics (Optional)........................................... 102<br />
How to Upload Report Data to the Online Services Server .......................................... 102<br />
7.4 System Online Services ...................................................... 103<br />
How to check your number of accounts .............................................................. 104<br />
7.5 eConfirmation Services (Optional)..................................... 105<br />
The Process in your Mailroom ...................................................................................... 107<br />
How to Process eConfirmation Items using the Scale.................................................. 108<br />
How to Display eConf Record List and Details ............................................................. 109<br />
How to Modify an eConf Record Status........................................................................ 110
7<br />
Online Services<br />
96
Online Services Overview<br />
7.1 Online Services Overview<br />
The Online Services simplify the use and the update of your mailing system.<br />
Online Services features and capabilities include:<br />
• Online reporting (optional) : the usage of your system is available from your<br />
personal, secure web account, simplifying tracking and reporting of your postage<br />
expenses.<br />
• eConfirmation Services (optional) : save money with USPS discounts on Delivery<br />
and Signature Confirmation services, and simplify the process of sending Certified<br />
Mail. Monitor delivery of all of your tracked mail from your web account.<br />
• Rate Updates : maintain current postal rates with automatic, electronic, convenient<br />
downloads into your mailing system (see Options and Updates p.149 )<br />
• Ink alerts (optional) : never run out of ink again! The online server monitors your<br />
mailing system ink supply and e-mails an alert notification when it is time to reorder.<br />
• Slogan download : order a new slogan and get it downloaded via Online Services<br />
server directly to your mailing system.<br />
7<br />
Your mailing system connects to Online Services server via the same network connection<br />
/ telephone you use to add postage to your meter.<br />
All connections are secure, and data is maintained under strict privacy policies.<br />
When the connection type is set to PC Meter Link , some of the<br />
functions mentioned above are no longer available from your<br />
Mailing System Online Services menu.<br />
Online Services<br />
97
Connecting to Online Services<br />
7.2 Connecting to Online Services<br />
Automatic calls<br />
7<br />
Online Services<br />
Automatic calls<br />
To fully benefit from the convenience and power of Online Services, your mailing<br />
system should permanently be connected to a network connection or PC Meter link<br />
or a live analog telephone line so that it can link to the Online Server automatically<br />
whenever required.<br />
For the use of some services, some automatic calls are d to upload corresponding<br />
data.<br />
For the Reports service, the mailing system automatically connects at the end of each<br />
month to upload accounting and postal category statistics.<br />
For the eConfirmation service, your mailing system automatically connects during afterwork<br />
hours if you have processed transactions with an eConfirmation service that<br />
day.<br />
For the Ink Management service, the mailing system automatically connects when it’s<br />
time to re-order ink supplies.<br />
It is strongly recommended that you leave the mailing system<br />
turned on, in 'Sleep mode', and connected to a network or a live<br />
analog telephone line during the night, to allow the connection to<br />
the Online Server to occur automatically.<br />
98
Manual Calls<br />
Manual calls allow you to connect to the Online Server in order to retrieve new information<br />
(update postal rates, ad slogan or messages) or to enable features and<br />
options (Scale capacity, number of accounts...).<br />
You will be instructed to use this function when rates change if<br />
you do not have a rate protection agreement.<br />
You can trigger a call to the Online Services server from the user menu as well as<br />
from the supervisor menu.<br />
To trigger manual calls when the Mailing System connection type<br />
is set to PC Meter Link , see PC Meter Link Application p.111 .<br />
When the connection type is set to PC Meter Link , manual calls<br />
are no longer available in My Funds menu and Online Services<br />
menu of your Mailing System screen.<br />
7<br />
How to Call Online Services Manually<br />
How to Call<br />
Online Services<br />
Manually<br />
To trigger a generic call:<br />
1 As a user:<br />
Press and type 9.3 or select the path:<br />
> Online services > Generic call<br />
The mailing system connects to the server and downloads<br />
the available elements (rates, slogans, etc.).<br />
2 Check your mailbox for messages: see Using the Mailbox<br />
p.152 .<br />
Online Services<br />
How to Call Online Services Manually<br />
How to Call<br />
Online Services<br />
Manually<br />
To trigger a generic call:<br />
1 As supervisor (see How to Log in as Supervisor p.124 ):<br />
Press and type 10.3 or select the path:<br />
> Online services > Generic call<br />
The mailing system connects to the server and downloads<br />
the available elements (rates, slogans, etc.).<br />
2 Check your mailbox for messages: see Using the Mailbox<br />
p.152 .<br />
99
Synchronizing Call<br />
This type of call is only for executing a request from Customer Service.<br />
This call updates the automatic call schedule of the system and the options (see<br />
Options and Updates p.149 ).<br />
Testing the Connection to Online Services<br />
7<br />
You may test the connection to the Online Services server via the commands in the<br />
Online Services menu:<br />
• Ping server<br />
Establishes a connection and checks whether the server answers to a 'ping'<br />
command. This test:<br />
Validates connection parameters (see Connection Settings p.144 )<br />
Indicates that the LAN is functional<br />
Indicates that the modem is functional<br />
Indicates that the server can be contacted<br />
Online Services<br />
• Test server<br />
Establishes a connection and tests the communication dialog with the server. This<br />
test indicates that transactions can be held normally.<br />
Test server is a bandwidth test and should only be undertaken<br />
after a request from Customer Service.<br />
When the connection type is set to PC Meter Link , Ping server<br />
menu and Test server menu no longer appear on your Mailing<br />
System screen.<br />
How to Test the Connection to Online Services<br />
How to Test the<br />
Connection to<br />
Online Services<br />
To ping the server<br />
1 As a user:<br />
Press and type 9.1 or select the path:<br />
> Online Services > Ping server<br />
2 Or, as supervisor (see How to Log in as Supervisor p.124 ):<br />
Press and type 10.1 or select the path:<br />
> Online Services > Ping server<br />
100
To test the server<br />
1 As a user:<br />
Press and type 9.2 or select the path:<br />
> Online Services > Test server<br />
2 Or, as supervisor (see How to Log in as Supervisor p.124 ):<br />
Press and type 10.2 or select the path:<br />
> Online Services > Test server<br />
The call process starts and displays its sequence of operations<br />
on the screen.<br />
7<br />
Online Services<br />
101
Uploading Statistics (Optional)<br />
7.3 Uploading Statistics (Optional)<br />
Automatic calls upload report data to the Online Services server at the end of each<br />
month.<br />
You can also trigger a manual call to display reports that integrate the latest figures<br />
on your Online Services web page.<br />
Your system uploads basic statistic data for basic postal expense<br />
management reporting.<br />
7<br />
Online Services<br />
How to Upload Report Data to the Online Services Server<br />
How to Upload<br />
Report Data to<br />
the Online<br />
Services Server<br />
When the connection type is set to PC Meter Link , Upload Statistics<br />
menu does no longer appear on your Mailing System screen.<br />
To upload report data:<br />
1 As a user<br />
Press and type 9.5 or select the path:<br />
> Online Services > Upload Statistics<br />
2 As supervisor (see How to Log in as Supervisor p.124 ):<br />
Press and type 10.7 or select the path:<br />
> Online Services > Upload Statistics<br />
The call to the server is triggered.<br />
102
System Online Services<br />
7.4 System Online Services<br />
Ink Management Service<br />
The Ink Management service sends an electronic message to the Online Services<br />
server when the mailing system’s ink supply is running low.<br />
An e-mail message then informs you of that condition so that the ink cartridge can be<br />
replaced in time.<br />
To sign up for low ink e-mail alerts, visit your myNeopost account<br />
online.<br />
Rate Protection<br />
Rate Protection ensures that the latest postal rates are installed on your mailing<br />
system.<br />
When the Postal Service announce changes in their rate and fee schedule, the Online<br />
Services server downloads the new rates into your mailing system.<br />
Your mailing system automatically switches to the approved rates on the effective<br />
date of rate change.<br />
For more information, please contact Customer Service.<br />
7<br />
Online Services<br />
103
Account Level (Optional)<br />
According to the mailing system you ordered, accounts may be not available. It is<br />
possible to get accounts or increase their number by upgrading your system.<br />
To upgrade your system, please contact your Customer Service.<br />
See also<br />
• Managing Accounts and Access Rights p.69<br />
7<br />
How to check your number of accounts<br />
How to check<br />
your number of<br />
accounts<br />
1 As supervisor (see How to Log in as Supervisor p.124 ):<br />
Press and type 8.1 or select the path:<br />
> Options and updates > Options list<br />
The Options list screen is displayed.<br />
Online Services<br />
Here, number is 0, then you have access to 'Access Control'.<br />
In case your system have been upgraded and Account Number<br />
have not changed, choose Check for updates then<br />
press<br />
to refresh.<br />
104
eConfirmation Services (Optional)<br />
7.5 eConfirmation Services (Optional)<br />
Service Overview<br />
With e-Services, your mailing system can capture and process USPS Delivery Confirmation<br />
, Signature Confirmation , and Certified Mail tracking label numbers.<br />
After upload to the Online Server, simply log on your Online Services Web account<br />
to monitor all of your USPS Confirmation Service delivery tracking records at a<br />
glance, or in detail, in one convenient location.<br />
In addition to online tracking, you can activate and receive e-mail status updates for<br />
your tracked parcels.<br />
You will realize postage savings on your tracked parcels because the Postal Service<br />
provides a discount on its retail Delivery and Signature Confirmation fees when parcel<br />
tracking data is uploaded electronically to the Postal Server. The special rate is identified<br />
as eConfirmation on your mailing system and in these instructions.<br />
eDelivery Confirmation<br />
To be eligible for Postal Service discounts on Delivery Confirmation<br />
and Signature Confirmation services, you must use e-identified<br />
tracking labels that are only available from Customer Service.<br />
Any other label will cause an input error message. Your mailing<br />
system cannot process confirmation service tracking labels<br />
obtained from a Post Office retail counter.<br />
The 'e' in the upper left corner of the label expedites processing<br />
and indicates the discount to the letter carrier.<br />
You receive an email with the date and time of the delivery. The dates and times of<br />
any unsuccessful deliveries are also noted. eDelivery Confirmation is for Parcels only<br />
and available with First Class, <strong>Priority</strong> or Package Services (including Parcel Post,<br />
Media Mail, etc.).<br />
7<br />
Online Services<br />
eSignature Confirmation<br />
You receive an email with the date and time of the delivery and the name of the<br />
person who signed for the parcel. You can obtain a copy of the proof-of-delivery signature<br />
via FAX or email from the USPS. The dates and times of any unsuccessful deliveries<br />
are also noted. eSignature Confirmation is for Parcels only and available with<br />
First Class, <strong>Priority</strong> or Package Services (including Parcel Post, Media Mail, etc.).<br />
eCertified Mail<br />
You receive an email with the date and time of the delivery. The recipient’s signature<br />
is obtained upon delivery and a record is maintained by the USPS. This service is typically<br />
used for letters rather than parcels.<br />
In order to use the eConfirmation services, you must have a Scale connected to your<br />
mailing system.<br />
105
e-Services Customer Profile<br />
If you have purchased the E-Services Edition with USPS tracking, on the Online<br />
Services web page, you can activate and define your e-mail notifications, as well as<br />
enter and maintain e-mail addresses for the notifications.<br />
The possible notifications are:<br />
• Email Daily Report to the email address of the person who is to receive a daily<br />
summary status for the eConfirmation tracking records uploaded the previous day<br />
• Email Notifications to the email address of the person who is to receive email notifications<br />
about the following events:<br />
When sent<br />
When delivered<br />
When not received (within N days).<br />
7<br />
The notification settings are initially set to OFF. They will need to be set up in order<br />
to activate the e-mail notification services.<br />
Online Services<br />
106
How e-Confirmation Service Works<br />
You can track mail delivery through the Online Services server because the server is<br />
in constant communication with the USPS. The diagram below shows how tracking<br />
information flows from your mailroom, through the Online Services server and on to<br />
the USPS, and then back to you.<br />
The Process in your Mailroom<br />
The Process in<br />
your Mailroom<br />
1 Apply a tracking label (supplied by your Customer Service)<br />
to your mail.<br />
For information about ordering new labels, please contact<br />
your Customer Service.<br />
2 Select the appropriate rate and e-Confirmation service on<br />
your system display.<br />
3 Apply the metered postage to your mail.<br />
4 Deposit your mail with the USPS (e-Confirmation does not<br />
require additional special paper work, as do retail mail confirmations).<br />
7<br />
5 Upload your daily mailing information to the Online Services<br />
Server.<br />
This function is performed everyday via an automatic call<br />
after hours. We recommand to make a connection at the end<br />
of day.<br />
6 Receive USPS updates about your mail’s delivery status via<br />
emails from the Online Services server. You can also check<br />
the status of your mail on the web by logging on to the Online<br />
Services Web page.<br />
Online Services<br />
Getting e-Confirmation Status Data . Mailing status information is available in two<br />
ways:<br />
• Via your Online Services web page<br />
• Via emails sent by the Online Services server.<br />
You can log on to your Online Services web page with a password 24 hours a day, 7<br />
days a week.<br />
Email notifications arrive when a change in your mail status occurs at USPS.<br />
107
Processing e-Confirmation Items Using your Scale<br />
If you plan to use the eConfirmation service frequently, the use of a handheld scanner<br />
to scan the tracking labels is recommended. The handheld scanner option is compatible<br />
with the use of a Scale.<br />
For information about the optional scanner, please contact your Customer Service<br />
representative.<br />
7<br />
Online Services<br />
How to Process eConfirmation Items using the Scale<br />
How to Process<br />
eConfirmation<br />
Items using the<br />
Scale<br />
The Scale must be connected to your mailing system. Using<br />
your Scale to send a package and request eConfirmation<br />
service is simple:<br />
1 Place the eConfirmation label on the package.<br />
2 Place your package on the Scale.<br />
(If needed, first remove all items from the Scale and re-zero<br />
your Scale: see How to Zero the Weighing Platform p.133 ).<br />
3 Select the rate corresponding to the package to send (see<br />
How to Select a Rate p.46 ).<br />
If the rate requires a zip code to be entered, a specific screen<br />
is displayed to capture the Zip code.<br />
4 Add an eConfirmation service.<br />
In the eConfirmation screen, check the PIC number (tracking<br />
number) or scan it. The system automatically suggests the<br />
next PIC number.<br />
If the displayed PIC number does not match your label, use<br />
the [C] key to clear numbers (right to left), then enter the<br />
correct PIC number.<br />
Use the labels in order to avoid typing the full PIC number each<br />
time. If you have a scanner, scan the PIC number - this is fast,<br />
easy, and reliable.<br />
5 Enter or modify the Sender ID information on the SenderID<br />
screen. This sender ID will enable you to easily identify the<br />
package record in an email notification or on the tracking web<br />
site. The Sender ID can be up to 31 characters. This is an optional<br />
step.<br />
6 Validate the rate and return to the home screen.<br />
7 Insert item or tape in the system.<br />
When printing is done, an eConfirmation record is created<br />
(see How to Display eConf Record List and Details p.109 )<br />
below.<br />
108
If printing is cancelled at this stage, the current PIC number cannot<br />
be re-used for another mail piece.<br />
8 Press [OK] to start.<br />
You can also upload records manually (see How to Upload Report<br />
Data to the Online Services Server p.102 ).<br />
Checking e-Confirmation Records<br />
List of E-Confirmation records is accessible in the system.<br />
The eConf Record List screen displays the eConfirmation records that have not yet<br />
been uploaded to the Online Services server. When eConfirmation records are uploaded,<br />
the eConfirmation record list is empty.<br />
You can display and check information regarding an eConfirmation record:<br />
• Record status (PIC Valid or PIC Deleted)<br />
• Type of eConfirmation Service<br />
• Tracking number (PIC)<br />
• Destination ZIP code<br />
• Sender ID information (optional)<br />
• Date and time of the record.<br />
How to Display eConf Record List and Details<br />
How to Display<br />
eConf Record List<br />
and Details<br />
To display the list and check a record:<br />
1 As a user:<br />
Press and type 9.7 or select the path:<br />
> Online Services > eConf Record List<br />
7<br />
Online Services<br />
The record list is displayed.<br />
2 Select a record in the list and press Details for more details<br />
about that item.<br />
The record details are displayed.<br />
109
Modifying an e-Confirmation Record<br />
You can modify an e-Confirmation in case you decide not to send an item processed<br />
with an eConfirmation Service. In this case you have to edit the corresponding record<br />
and change its status.<br />
Record status:<br />
• PIC Valid : corresponds to a valid mail with eConfirmation Service to track through<br />
USPS.<br />
• PIC Deleted : corresponds to a mail you don’t want to track anymore.<br />
You will not receive any tracking information on records with status PIC Deleted.<br />
7<br />
How to Modify an eConf Record Status<br />
How to Modify<br />
an eConf Record<br />
Status<br />
To modify the status of an eConf record:<br />
1 As a user:<br />
Press and type 9.7 or select the path:<br />
> Online Services > eConfirmation record list<br />
The record list is displayed.<br />
Online Services<br />
2 Select a record in the list and press Details for more details<br />
about that item.<br />
3 Change record status.<br />
110
PC Meter Link Application<br />
8 PC Meter Link<br />
Application<br />
This section describes the PC Meter Link application functionalitites.<br />
8.1 PC Meter Link Application Overview................................... 113<br />
8.2 Funds Management............................................................ 115<br />
8.3 Online services .................................................................... 116<br />
8.4 Maintenance ....................................................................... 117<br />
8.5 Support................................................................................ 118<br />
8.6 Settings................................................................................ 119
8<br />
PC Meter Link Application<br />
112
PC Meter Link Application Overview<br />
8.1 PC Meter Link Application<br />
Overview<br />
The PC Meter Link application performs all the Mailing System calls to servers by<br />
using the internet connection of your PC.<br />
This application allows you to trigger manual calls to servers from your PC for:<br />
• Funds management<br />
• Online services<br />
• Maintenance<br />
• Support<br />
• Settings<br />
To use the PC Meter Link application , the Mailing System connection<br />
type must be set to PC Meter Link , see Connection Settings<br />
p.144 .<br />
When the connection type is set to PC Meter Link , manual calls<br />
are no longer available in My Funds menu and Online Services<br />
menu from your Mailing System screen. With the PC Meter Link<br />
connection type, manual calls are only available from the PC<br />
Meter Link application.<br />
Connectivity<br />
The PC Meter Link connectivity is set as follows:<br />
• The PC Meter Link application is running on your PC.<br />
• Your Mailing System is connected to your PC through an USB cable.<br />
• Your PC is connected to the Internet to have access to servers.<br />
8<br />
PC Meter Link Application<br />
When the connection to the Mailing System is available, all the PC Meter Link application<br />
menu on your screen are accessible.<br />
If the connection to the Mailing System is not available, only the<br />
Support menu is accessible.<br />
Click on the [Check connectivity] button for diagnostic.<br />
113
PC Meter Link application status of connection<br />
The PC Meter Link application status of connection appears in the System Tray with<br />
the following pictograms:<br />
• to notify an alert, a warning, an error.<br />
• to notify that all connections are available.<br />
8<br />
• to notify that at least one connection is not available.<br />
• to notify that a call is in progress.<br />
PC Meter Link Application<br />
114
Funds Management<br />
8.2 Funds Management<br />
This section describes functions related to calls for adding and managing funds in the<br />
Mailing System.<br />
The Funds Management screen allows you to:<br />
• Display remaining funds in your Mailing System<br />
• Add funds to your Mailing System<br />
• Display account balance<br />
• Get account balance<br />
• Perform an Audit to unlock you Mailing system<br />
8<br />
PC Meter Link Application<br />
115
Online services<br />
8.3 Online services<br />
This section describes functions related to calls for Online Services.<br />
8<br />
The Online Sevices screen allows you to:<br />
• Generic call<br />
• Upload statistics<br />
• Upload eConfirmation records<br />
PC Meter Link Application<br />
116
Maintenance<br />
8.4 Maintenance<br />
This section describes functions related to calls for the Mailing System maintenance<br />
(diagnostics, software download, etc).<br />
The Maintenance screen allows you to:<br />
• Resynchronize your Mailing System<br />
• Backup settings to save your Mailing System settings<br />
• Download Mailing System software<br />
• Perform Diagnostics (Ping OLS, Test OLS, Upload diagnostics)<br />
8<br />
PC Meter Link Application<br />
117
Support<br />
8.5 Support<br />
This section describes functions related to PC Meter Link application software and<br />
support. It also gives access to the Mailing System user guide.<br />
8<br />
The Support screen allows you to:<br />
• Access the customer knowledge base<br />
• Display the current PC Meter Link software version<br />
• Check for PC Meter Link software updates manually<br />
PC Meter Link Application<br />
118
Settings<br />
8.6 Settings<br />
This section describes the settings of the PC Meter Link application that you can<br />
manually modify<br />
The Settings screen allows you to:<br />
• Modify Call Reminder Alerts before a scheduled call<br />
• Modify Call Reminder Alerts after a missed call<br />
8<br />
PC Meter Link Application<br />
119
8<br />
PC Meter Link Application<br />
120
Configuring your Mailing System<br />
9 Configuring your Mailing<br />
System<br />
This section describes the general settings you can apply to your mailing system.<br />
Some of them can be managed directly by all users whereas most of them require<br />
access as supervisor .<br />
9.1 Settings Overview............................................................... 123<br />
9.2 Logging in / out as the Supervisor .................................... 124<br />
How to Log in as Supervisor ............................................................................... 124<br />
How to Exit the Supervisor Mode ........................................................................ 124<br />
9.3 Changing the Display Language ....................................... 125<br />
How to Change the Display Language ......................................................................... 125<br />
How to Change the Display Language by Default .............................................. 125<br />
9.4 Adjusting the Display Contrast .......................................... 126<br />
How to Adjust the Display Contrast............................................................................... 126<br />
How to Change the Display Contrast by Default ................................................ 126<br />
9.5 System Time-outs ............................................................. 127<br />
How to Change the 'Sleep time-out' (<strong>User</strong>) .................................................................. 127<br />
How to Change the 'Soft off time-out' (<strong>User</strong>) ................................................................ 128<br />
How to Change the 'Sleep time-out' (Supervisor) ............................................... 128<br />
How to Change the 'Soft off time-out' (Supervisor) ............................................. 129<br />
9.6 Funds Warnings ................................................................. 130<br />
How to Set the High-Value Warning Amount................................................................ 130<br />
How to Set the Low-Funds Threshold........................................................................... 131<br />
9.7 Funding PIN Code .............................................................. 132<br />
How to Set/Cancel a Funding PIN Code....................................................................... 132<br />
9.8 Weighing Settings .............................................................. 133<br />
How to Zero the Weighing Platform .............................................................................. 133<br />
How to Zero the Weighing Platform .............................................................................. 133<br />
How to Re-Zero the Weighing Platform ........................................................................ 133<br />
How to Change the GEO Code ........................................................................... 134<br />
9.9 Imprint Default Settings ..................................................... 137<br />
How to Change the Default Rate .................................................................................. 137<br />
How to Change the Default Text................................................................................... 138<br />
How to Change the Default Slogan ..................................................................... 138<br />
How to Set the Automatic Date Advance Function ............................................. 139<br />
How to Activate / Deactivate Fractional Postage values .............................................. 140
9.10 Imprint Memories ................................................................141<br />
How to Create an Imprint Memory.................................................................................142<br />
How to Edit / Modify an Imprint Memory........................................................................142<br />
How to Delete an Imprint Memory .................................................................................143<br />
9.11 Connection Settings............................................................144<br />
How to Select a Postal/Online Services Connection.....................................................145<br />
How to Set LAN (High-speed Internet) Parameters ......................................................146<br />
How to Set PC Meter Link Parameters..........................................................................146<br />
How to Set the Analog Modem Parameters ..................................................................147<br />
9.12 Time and Date Management.............................................148<br />
How to Check/Adjust the Machine Time and Date........................................................148<br />
9<br />
Configuring your Mailing System<br />
122
Settings Overview<br />
9.1 Settings Overview<br />
This section describes two types of settings:<br />
• <strong>User</strong> settings , that only last as long as the user who applies them is logged in<br />
• Supervisor settings , sets the default or permanent characteristics of your mailing<br />
system.<br />
<strong>User</strong> Settings<br />
Other user settings are described in the corresponding sections:<br />
Processing Mail p.23 , Maintaining your Mailing System p.165 ,<br />
etc.<br />
The user settings described in the sections below are:<br />
• Setting the display language<br />
• Adjusting the screen contrast.<br />
Supervisor Settings<br />
The mailing system has one supervisor PIN code that allows you to configure the<br />
mailing functions and perform other functions such as managing accounts and<br />
access rights, generating certain reports, etc.<br />
9<br />
The Supervisor PIN code of the system has been provided to your<br />
organization in a separate distribution.<br />
The supervisor settings allow you to:<br />
• Change the default user settings<br />
• Modify system sleep modes time-outs<br />
• Set fund warnings (high amount, low funds) and activate a funding PIN code<br />
• Reset the weighing platform<br />
• Design a default imprint (rate, text, slogan) and activate the Automatic Date<br />
Advance function<br />
• Enter connection parameters.<br />
Configuring your Mailing System<br />
123
Logging in / out as the Supervisor<br />
9.2 Logging in / out as the Supervisor<br />
You need to be logged in as supervisor to configure the mailing system and perform<br />
functions such as managing accounts and access rights, generating certain reports,<br />
etc.<br />
When you are logged in as supervisor, only the supervisor menu is available. Printing<br />
postage is not possible while logged-in as supervisor.<br />
How to Log in as Supervisor<br />
How to Log in as<br />
Supervisor<br />
To log in as Supervisor when you are already logged in as a<br />
user:<br />
1 As a user:<br />
Press<br />
> Supervisor<br />
and type 13 or select the path:<br />
The Login screen is displayed.<br />
9<br />
2 Type the supervisor PIN code and press [OK] .<br />
The supervisor Main menu is displayed.<br />
Configuring your Mailing System<br />
Exiting the Supervisor Mode<br />
Follow the procedure below to exit the supervisor mode. This is necessary to return<br />
to the user mode.<br />
How to Exit the Supervisor Mode<br />
How to Exit the<br />
Supervisor Mode<br />
You can log in as supervisor by directly typing the supervisor PIN<br />
code, in place of a regular user PIN code, on mailing systems that<br />
ask for a PIN code at start-up.<br />
To exit the supervisor mode:<br />
1 As supervisor:<br />
Press the sleep key<br />
twice.<br />
The system goes to 'Sleep mode' and supervisor is logged<br />
out.<br />
124
Changing the Display Language<br />
9.3 Changing the Display Language<br />
You can choose a language among those available in the mailing system for your<br />
mailing session (3 languages maximum).<br />
How to Change the Display Language<br />
How to Change<br />
the Display<br />
Language<br />
To change the current display language:<br />
1 As a user:<br />
Press and type 11.1 or select the path:<br />
> Preferences > Language<br />
2 Select the language you want to use.<br />
3 Press [OK] to validate.<br />
Setting Default Display Language<br />
To set a display language which will be applied to all user sessions, you can set the<br />
default display language.<br />
How to Change the Display Language by Default<br />
How to Change<br />
the Display<br />
Language by<br />
Default<br />
This is a user setting that only lasts as long as you are logged in.<br />
the standby mode will delete this setting.<br />
To change the user language by default:<br />
1 As supervisor (see How to Log in as Supervisor p.124 ):<br />
Press and type 3.1.1 or select the path:<br />
> Default <strong>User</strong> Settings > Default <strong>User</strong> Preferences > Language<br />
2 Select the default language.<br />
3 Press [OK] to validate.<br />
9<br />
Configuring your Mailing System<br />
125
Adjusting the Display Contrast<br />
9.4 Adjusting the Display Contrast<br />
You can adjust the contrast of the display for bright or dark working environments.<br />
How to Adjust the Display Contrast<br />
How to Adjust<br />
the Display<br />
Contrast<br />
To adjust the display contrast:<br />
1 As a user:<br />
Press and type 11.2 or select the path:<br />
> Preferences > Contrast<br />
2 Use the or to increase or decrease the contrast. The<br />
screen updates immediately.<br />
3 Press to exit.<br />
9<br />
Configuring your Mailing System<br />
Setting the Default Display Contrast<br />
To set a display contrast which will be applied to all user sessions, you can set the<br />
default display contrast.<br />
How to Change the Display Contrast by Default<br />
How to Change<br />
the Display<br />
Contrast by<br />
Default<br />
This is a user setting that only lasts as long as you are logged in.<br />
To change the display contrast by default:<br />
1 As supervisor (see How to Log in as Supervisor p.124 ):<br />
Press and type 3.1.2 or select the path:<br />
> Default user settings > Default user preferences > Contrast<br />
2 Use the or button to increase or decrease the contrast.<br />
The screen updates to the new setting.<br />
3 Press to exit.<br />
126
System Time-outs<br />
9.5 System Time-outs<br />
As user or as supervisor, you can change the following system time-outs:<br />
• 'Sleep time-out': period of inactivity after which the system automatically turns to<br />
'Sleep mode'.<br />
• 'Soft off time-out': period of inactivity after which the system automatically turns to<br />
'Soft off mode'.<br />
These modes are described in section Power Management p.20 .<br />
How to Change the 'Sleep time-out' (<strong>User</strong>)<br />
How to Change<br />
the 'Sleep timeout'<br />
(<strong>User</strong>)<br />
To change the 'sleep time-out':<br />
1 As a user:<br />
Press and type 2.3.1 or select the path:<br />
> Job settings > Time-out settings > Sleep time-out<br />
The Sleep time-out screen is displayed.<br />
9<br />
2 Enter the new value of the 'sleep time-out'.<br />
Use the key [C ] to clear the old setting and then enter a new<br />
value.<br />
3 Press [OK] to validate.<br />
The Timeout settings screen is displayed.<br />
Configuring your Mailing System<br />
127
How to Change the 'Soft off time-out' (<strong>User</strong>)<br />
How to Change<br />
the 'Soft off timeout'<br />
(<strong>User</strong>)<br />
To change the 'Soft off time-out':<br />
1 As a user:<br />
Press and type 2.3.2 or select the path:<br />
> Job settings > Time-out settings > Soft off time-out<br />
The Soft off time-out screen is displayed.<br />
2 Enter the new value of the 'Soft off time-out'.<br />
Use the key [C ] to clear the old setting and then enter a new<br />
value.<br />
9<br />
3 Press [OK] to validate.<br />
The Timeout settings screen is displayed.<br />
Configuring your Mailing System<br />
How to Change the 'Sleep time-out' (Supervisor)<br />
How to Change<br />
the 'Sleep timeout'<br />
(Supervisor)<br />
To change the 'Sleep time-out':<br />
1 As supervisor (see How to Log in as Supervisor p.124 )<br />
Press and type 3.5.1 or select the path:<br />
> Default user settings > Time-out settings > Sleep timeout<br />
The Sleep time-out screen is displayed.<br />
2 Enter the new value of the 'sleep time-out'.<br />
Use the key [C ] to clear the old setting and then enter a new<br />
value.<br />
128
3 Press [OK] to validate.<br />
The Timeout settings screen is displayed.<br />
How to Change the 'Soft off time-out' (Supervisor)<br />
How to Change<br />
the 'Soft off timeout'<br />
(Supervisor)<br />
To change the Soft off time-outs:<br />
1 As supervisor (see How to Log in as Supervisor p.124 )<br />
Press and type 3.5.2 or select the path:<br />
> Default user settings > Time-out settings > Soft off timeout<br />
The Soft off time-out screen is displayed.<br />
2 Enter the new value of the 'soft off time-out'.<br />
Use the key [C ] to clear the old setting and then enter a new<br />
value.<br />
9<br />
3 Press [OK] to validate.<br />
The Timeout settings screen is displayed.<br />
Configuring your Mailing System<br />
129
Funds Warnings<br />
9.6 Funds Warnings<br />
Possible type of funds warning:<br />
• High value<br />
The mailing system warns you that the postage amount that you have typed is<br />
higher than a preset value. This high-amount warning prevents you from accidentally<br />
printing high postage amounts.<br />
• Low funds threshold<br />
The mailing system warns you that funds remaining in the Meter are getting low<br />
(low-funds threshold).<br />
High value<br />
9<br />
How to Set the High-Value Warning Amount<br />
How to Set the<br />
High-Value<br />
Warning Amount<br />
To set a high-value warning amount:<br />
1 As supervisor (see How to Log in as Supervisor p.124 ):<br />
Press and type 3.2.1 or select the path:<br />
> Default user settings > Funds settings > High value<br />
amount entry<br />
Configuring your Mailing System<br />
2 — Enter the high-value warning amount<br />
— Or if you want to disable the warning function, press [C]<br />
and enter 0 as amount<br />
3 Press [OK] to validate.<br />
130
Low funds threshold<br />
How to Set the Low-Funds Threshold<br />
How to Set the<br />
Low-Funds<br />
Threshold<br />
To set a low-funds threshold:<br />
1 As supervisor (see How to Log in as Supervisor p.124 ):<br />
Press and type 3.4.1 or select the path:<br />
> Default user settings > Funds settings > Low funds<br />
threshold<br />
2 — Enter the low-funds warning amount<br />
— Or if you want to disable the warning function, press [C]<br />
and enter 0 as amount<br />
3 Press [OK] to validate.<br />
9<br />
Configuring your Mailing System<br />
131
Funding PIN Code<br />
9.7 Funding PIN Code<br />
You can create a funding PIN code to control access to only those who are authorized<br />
to add postage. (see Money Operations p.61 ).<br />
How to Set/Cancel a Funding PIN Code<br />
How to Set/<br />
Cancel a<br />
Funding PIN<br />
Code<br />
To set a funding PIN code:<br />
1 As supervisor (see How to Log in as Supervisor p.124 ):<br />
Press and type 3.4.2 or select the path:<br />
> Default user settings > Funds settings > Funding PIN<br />
code<br />
2 Enable or disable the PIN code.<br />
3 Enter the funding PIN code if enabled.<br />
4 Press [OK] to validate.<br />
9<br />
Configuring your Mailing System<br />
132
Weighing Settings<br />
9.8 Weighing Settings<br />
The weighing settings include:<br />
• Zeroing the weighing platform<br />
• Setting the GEO code that corresponds to the geographical location of the mailing<br />
system.<br />
Zeroing the Weighing Platform<br />
You can reset the weighing platform in the following ways:<br />
• Set to zero : resets the weight to zero<br />
• Rezero : physically adjusts the weighing platform to zero.<br />
How to Zero the Weighing Platform<br />
How to Zero the<br />
Weighing<br />
Platform<br />
To zero the Scale as user from the standard home screen:<br />
1 Press and hold for 2 seconds.<br />
2 Remove all items from the weighing platform.<br />
3 Press [OK] to set to zero the weighing platform.<br />
9<br />
How to Zero the Weighing Platform<br />
How to Zero the<br />
Weighing<br />
Platform<br />
How to Re-Zero the Weighing Platform<br />
How to Re-Zero<br />
the Weighing<br />
Platform<br />
To zero the weighing platform as user:<br />
1 As a user:<br />
Press and type 2.2 or select the path:<br />
> Job settings > Zero Weigh Platform<br />
2 Remove all items from the weighing platform.<br />
3 Press [OK] to set to zero the weighing platform.<br />
To re-zero the weighing platform:<br />
1 As supervisor (see How to Log in as Supervisor p.124 ):<br />
Press and type 6.1 or select the path:<br />
> System settings > Zero Weigh Platform<br />
Configuring your Mailing System<br />
2 Remove all items from the weighing platform.<br />
3 Press [OK] to rezero the platform.<br />
133
GEO Code<br />
The Weighing Platform (option) provide mail piece weights that have to be corrected<br />
according to the geographical location of the mailing system, as weights can change<br />
with altitude and latitude. The correcting geodesic code may be entered:<br />
• Automatically with Online Services<br />
• Manually<br />
To change the GEO code manually, follow the steps below.<br />
Changing the GEO code modifies the weight values the mailing<br />
system delivers. Make sure you enter the correct parameter.<br />
How to Change the GEO Code<br />
How to Change<br />
the GEO Code<br />
To change the GEO code:<br />
1 As supervisor (see How to Log in as Supervisor p.124 ):<br />
9<br />
Press and type 6.2 or select the path:<br />
> System settings > GEO code<br />
2 See the map and table on the next pages to get the 5 digit<br />
GEO code from your location altitude and latitude, and enter<br />
the 5 digit using the keypad.<br />
Configuring your Mailing System<br />
3 Press [OK] to validate.<br />
134
9<br />
Figure 1 : Latitudes<br />
Configuring your Mailing System<br />
135
9<br />
Configuring your Mailing System<br />
Figure 2 : GEO codes from latitude and altitude<br />
136
Imprint Default Settings<br />
9.9 Imprint Default Settings<br />
The settings of the imprint 'by default' (applied to all user sessions) include:<br />
• Imprint default settings : default rate, text and ad slogan<br />
• Fractional mode : enables fractional values for manually entered postage<br />
• Automatic Date Advance : enables early date change to allow mail processing with<br />
a new printed date after post office closing hours.<br />
Imprint Default Settings<br />
You can set default parameters for the imprint elements that follow:<br />
• Rate<br />
• Text<br />
• Ad slogan<br />
You can create up to nine custom text messages.<br />
On list screens, a mark indicates the default parameter.<br />
How to Change the Default Rate<br />
How to Change<br />
the Default Rate<br />
To change the default rate:<br />
1 As supervisor (see How to Log in as Supervisor p.124 ):<br />
9<br />
2 The following message is displayed : To default a rate, press<br />
[OK] .<br />
Press [OK] to accept.<br />
3 Select the default rate using the rate wizard.<br />
4 Press [OK] to validate.<br />
See also Managing Postal Rates p.160<br />
Press and type 3.3.3 or select the path:<br />
> Default user settings > Default imprint parameters ><br />
Default rate<br />
Configuring your Mailing System<br />
137
How to Change the Default Text<br />
How to Change<br />
the Default Text<br />
To change the default text:<br />
1 As supervisor (see How to Log in as Supervisor p.124 ):<br />
Press and type 3.3.1 or select the path:<br />
> Default user settings > Default imprint parameters ><br />
Text<br />
2 Select the Default text from the list.<br />
3 Press [OK] to validate.<br />
See also<br />
• Managing Custom Text Messages p.156<br />
9<br />
How to Change the Default Slogan<br />
How to Change<br />
the Default<br />
Slogan<br />
To change the default slogan:<br />
1 As supervisor (see How to Log in as Supervisor p.124 ):<br />
Press and type 3.3.2 or select the path:<br />
> Default <strong>User</strong> Settings > Default Imprint Parameters ><br />
Default slogan selection<br />
Configuring your Mailing System<br />
See also<br />
• Managing Slogan s p.158<br />
2 Select the default slogan from the list, or None for no<br />
slogan.<br />
3 Press [OK] to validate.<br />
You can order a custom Ad slogan. Contact customer service<br />
138
Automatic Date Advance<br />
The Auto Date -Advance function automatically proposes, at a preset time, to change<br />
the date printed on mail pieces to the next 'working day' date.<br />
Example : you can set the system to change dates at 17:00 hours, and set Saturdays<br />
and Sundays to be non-working days. From Friday 17:00 hours to Sunday 23:59, the<br />
system will automatically print Monday's date on the envelopes (after a confirmation<br />
message to the user; if the change is not confirmed and printing maintained, current<br />
date is printed).<br />
How to Set the Automatic Date Advance Function<br />
How to Set the<br />
Automatic Date<br />
Advance<br />
Function<br />
To select auto date-advance time and days:<br />
1 As supervisor (see How to Log in as Supervisor p.124 ):<br />
Press and type 3.3.4 or select the path:<br />
> Default user settings > Default imprint parameters ><br />
Automatic date advance<br />
The Automatic date advance setting screen is displayed.<br />
9<br />
The second line of the screen indicates whether the function<br />
is active or not.<br />
2 To change the function state, press [OK] or type 1 to access<br />
the Activate/Inactivate screen and change the function state.<br />
Select ON and press [OK] to enable the Auto Date-Advance<br />
function.<br />
3 To set the changing time, select Set hours and press [OK]<br />
(or type 2 ).<br />
4 Enter the Automatic Date-Advance time (00:00 hours is not<br />
allowed) and press [OK] .<br />
5 To set working days, select Set working days and press [OK]<br />
(or type 3 ).<br />
6 Select or deselect each day by pressing [OK] and using the<br />
up/down arrows.<br />
Configuring your Mailing System<br />
7 Press to validate and exit.<br />
139
Fractional Setting<br />
The fractional setting enables users to type fractional values when manually entering<br />
postage. Otherwise, the fractional value is always zero.<br />
How to Activate / Deactivate Fractional Postage values<br />
How to Activate<br />
/ Deactivate<br />
Fractional<br />
Postage values<br />
To activate / deactivate fractional postage:<br />
1 As supervisor (see How to Log in as Supervisor p.124 ):<br />
Press and type 3.3.5 or select the path:<br />
> Default user settings > Default imprint parameters ><br />
Fractional Postage Mode<br />
2 Select Enable / Disable fractional and press [OK] to activate<br />
or deactivate the fractional.<br />
9<br />
Configuring your Mailing System<br />
140
Imprint Memories<br />
9.10 Imprint Memories<br />
The Imprint Memories are presets for imprint types that the users of the system can<br />
quickly recall to save time and benefit from a simpler system operation (see Using<br />
Imprint Memories p.58 ).<br />
As supervisor, you can create, edit/modify and delete the Imprint Memories.<br />
Each Imprint Memory is identified by a name and a number.<br />
The system displays the name of the currently used Imprint Memory on the home<br />
screen.<br />
Imprint Memory Content<br />
The table below gives the content of an Imprint memory.<br />
Imprint settings<br />
Account setting<br />
Free text<br />
OR<br />
Slogan.<br />
Date mode.<br />
Your system can store up to 5 Imprint memories.<br />
Rate (and weight if different from zero at rate setup).<br />
Account number (if any).<br />
9<br />
Configuring your Mailing System<br />
141
Managing Imprint Memories<br />
Follow the procedure below to create an Imprint memory.<br />
How to Create an Imprint Memory<br />
How to Create<br />
an Imprint<br />
Memory<br />
To create an Imprint memory:<br />
1 As supervisor (see How to Log in as Supervisor p.124 ):<br />
Press and type 4 or select the path:<br />
> Predefined imprint memory management<br />
The current list of Imprint memories is displayed in the<br />
Imprint Memories screen.<br />
2 Select a line named None in the list.<br />
3 Press [OK] to create a new imprint memory.<br />
4 Enter the name of the new imprint memory, then press [OK] .<br />
9<br />
5 Select parameters and press [OK] to validate and display the<br />
next list of parameters (you can also modify the parameters<br />
later).<br />
6 Repeat the previous step until the system displays the name<br />
of the new imprint memory in the list.<br />
Configuring your Mailing System<br />
How to Edit / Modify an Imprint Memory<br />
How to Edit /<br />
Modify an<br />
Imprint Memory<br />
To edit or modify an Imprint memory:<br />
1 As supervisor (see How to Log in as Supervisor p.124 ):<br />
Press and type 4 or select the path:<br />
> Predefined imprint management<br />
2 Select an imprint memory in the list.<br />
3 Press [OK] to validate.<br />
4 Select the menu path > Edit (or type 1 )<br />
The Imprint Memory screen is displayed.<br />
5 Use the arrows to select the parameters, then press [OK] to<br />
modify the parameters.<br />
6 Press to quit.<br />
142
How to Delete an Imprint Memory<br />
How to Delete<br />
an Imprint<br />
Memory<br />
To delete an Imprint memory:<br />
1 As supervisor (see How to Log in as Supervisor p.124 ):<br />
Press and type 4 or select the path:<br />
> Predefined imprint management<br />
2 Select an Imprint memory in the list of the memorized Imprint<br />
memories.<br />
3 Press [OK] to validate.<br />
4 Select the menu path > Delete (or type 2 ).<br />
5 Press [OK] to confirm to delete the Imprint memory.<br />
9<br />
Configuring your Mailing System<br />
143
Connection Settings<br />
9.11 Connection Settings<br />
Connection to the Postal Services or Online Services<br />
To add funds or access Online Services, the mailing system can use the following<br />
connections:<br />
• A PC Meter Link application with an Internet access<br />
• An Internet access through a high-speed Internet Connection (e.g. DSL, Cable<br />
Broadband).<br />
• An analog / fax telephone line through a Modem<br />
All these connections use a USB adaptor device connected to the flat USB port of the<br />
mailing system.<br />
First use the procedure below to select a connection, then configure the connection.<br />
LAN settings can only be performed if the system was actually<br />
connected to the LAN at power-up.<br />
9<br />
To trigger manual calls when the Mailing System connection type<br />
is set to PC Meter Link , see PC Meter Link Application p.111<br />
Configuring your Mailing System<br />
See also<br />
• To physically connect the USB adaptor to the system, see Connections p.18 .<br />
144
How to Select a Postal/Online Services Connection<br />
How to Select a<br />
Postal/Online<br />
Services<br />
Connection<br />
To select the postal/Online Services connection:<br />
1 As supervisor (see How to Log in as Supervisor p.124 ):<br />
Press and type 9.1 or select the path:<br />
> Communication Settings > Type of connection<br />
The Type of connection screen is displayed.<br />
2 To use the the PC Meter Link, select PC Meter Link and<br />
press [Ok] .<br />
To use the LAN, select LAN and press [Ok] (or type 2 ).<br />
To use an analog telephone line modem, select Modem and<br />
press [Ok] (or type 1 ).<br />
3 For further settings, see:<br />
For PC Meter Link: How to Set PC Meter Link Parameters<br />
p.146<br />
For LAN: How to Set LAN (High-speed Internet) Parameters<br />
p.146<br />
Modem: How to Set the Analog Modem Parameters p.147 .<br />
See also<br />
• To physically connect the PC Meter Link, the LAN, or a USB modem to the system,<br />
see Connections p.18 .<br />
9<br />
Configuring your Mailing System<br />
145
LAN Settings<br />
LAN settings can only be performed if the system is connected to<br />
the LAN at power-up.<br />
How to Set LAN (High-speed Internet) Parameters<br />
How to Set LAN<br />
(High-speed Internet)<br />
Parameters<br />
To set the parameters of the LAN :<br />
1 As supervisor (see How to Log in as Supervisor p.124 ):<br />
Press and type 9.2 or select the path:<br />
> Communication settings > LAN settings<br />
The LAN configuration menu is displayed.<br />
9<br />
PC Meter Link Settings<br />
2 Select:<br />
- DHCP ON<br />
- DNS AUTO ON<br />
- HALF DUPLEX<br />
and press [OK] four times for a standard LAN configuration.<br />
Configuring your Mailing System<br />
How to Set PC Meter Link Parameters<br />
How to Set PC<br />
Meter Link Parameters<br />
Make sure the PC Meter Link application is installed on your PC<br />
before selecting the PC Meter Link connection type, see the<br />
installation guide for further information.<br />
The PC Meter Link does not work on docking stations.<br />
To set the parameters of the PC Meter Link :<br />
1 See PC Meter Link Application p.111<br />
146
Analog Telephone Line and Modem Settings<br />
These settings include the modem parameters, telephone number and prefix that the<br />
mailing system calls to fund the meter or connect to Online Services (see Money Operations<br />
p.61 ).<br />
Make sure the telephone line is selected: see How to Select a<br />
Postal/Online Services Connection p.145 .<br />
How to Set the Analog Modem Parameters<br />
How to Set the<br />
Analog Modem<br />
Parameters<br />
To set the parameters of the modem:<br />
1 As supervisor (see How to Log in as Supervisor p.124 ):<br />
Press and type 9.3 or select the path:<br />
> Communication settings > Modem settings<br />
2 In the screens that are displayed next, enter the parameters<br />
as required and press [OK] to complete screens until you<br />
return to the Communications settings screen.<br />
9<br />
Configuring your Mailing System<br />
147
Time and Date Management<br />
9.12 Time and Date Management<br />
Daylight Savings Time Transitions<br />
The mailing system normally auto-adjusts to Daylight Savings Time . However, if a<br />
manual adjustment is necessary, you can use either of the following procedures to<br />
correct the mailing system time:<br />
• As user: How to Unlock the Meter p.67<br />
• As supervisor: How to Check/Adjust the Machine Time and Date p.148 below.<br />
Time and Date Setting<br />
9<br />
The time and date are required for postage and are provided by the postal authorities.<br />
As a result, you cannot manually adjust the system time and date.<br />
However, you can ask the system to check the current time and date and display<br />
them.<br />
See also<br />
• Re-dating Mail p.38 .<br />
• Automatic Date Advance p.139 .<br />
Configuring your Mailing System<br />
How to Check/Adjust the Machine Time and Date<br />
How to Check/<br />
Adjust the<br />
Machine Time<br />
and Date<br />
To check the time and date, make sure the connection to the<br />
Postal Services is available. See How to Select a Postal/Online<br />
Services Connection p.145 .<br />
To check/adjust the current time and date:<br />
1 As supervisor (see How to Log in as Supervisor p.124 ):<br />
Press and type 6.3 or select the path:<br />
> Machine settings > Date and time<br />
2 Select Audit call to adjust the time.<br />
The system adjusts its time if necessary and displays time<br />
and date values.<br />
If the clock adjusts backwards for 'Daylight savings time', the<br />
mailing system will wait until last postage printing time before<br />
allowing you to process new mail.<br />
148
Options and Updates<br />
10 Options and Updates<br />
This section describes how you can upgrade your system by adding optional<br />
functions and elements of imprint such as latest postal rates, additional texts or ad<br />
slogans.<br />
10.1 Options and Updates Process............................................. 151<br />
How to Access the Options and Updates Menu ................................................. 151<br />
10.2 Using the Mailbox .............................................................. 152<br />
How to Read your Messages........................................................................................ 152<br />
How to Read your Messages........................................................................................ 152<br />
How to Delete your Messages ...................................................................................... 152<br />
How to Delete your Messages ...................................................................................... 153<br />
10.3 Managing Options ............................................................. 154<br />
How to Display the Options ................................................................................. 154<br />
How to Load New Options ............................................................................................ 155<br />
10.4 Managing Custom Text Messages .................................... 156<br />
How to Display the List of Text Messages .......................................................... 156<br />
How to Add a New Text Message................................................................................. 157<br />
How to Modify or Delete a Text Message ..................................................................... 157<br />
10.5 Managing Slogan s............................................................ 158<br />
How to Display the List of Slogans................................................................................ 158<br />
How to Modify or Delete a Slogan................................................................................. 159<br />
How to Download New Slogans.................................................................................... 159<br />
10.6 Managing Postal Rates ...................................................... 160<br />
How to Check the Rate Updates................................................................................... 160<br />
How to Download New Postal Rates ............................................................................ 161<br />
10.7 Updating System Software ................................................ 162<br />
How to Update the System Software ............................................................................ 162
10<br />
Options and Updates<br />
150
Options and Updates Process<br />
10.1 Options and Updates Process<br />
You can update your mailing system by:<br />
• Adding new options, such as increasing the maximum number of accounts<br />
• Adding enhanced online postal expense management or USPS E-services<br />
• Update postal Rates<br />
• Creating additional Texts for the imprint<br />
• Downloading custom Ad slogans<br />
To update your mailing system's operating system, see Online<br />
Services p.95 .<br />
The operations above are available through the supervisor menu Options and<br />
Updates .<br />
How to Access the Options and Updates Menu<br />
How to Access<br />
the Options and<br />
Updates Menu<br />
1 As supervisor (see How to Log in as Supervisor p.124 ):<br />
Press and type 8 or select the path:<br />
> Options and Updates<br />
The Options and Updates menu is displayed.<br />
10<br />
Options and Updates<br />
151
Using the Mailbox<br />
10.2 Using the Mailbox<br />
The mailbox allows you to receive messages from the mailing system or from<br />
customer service via the server.<br />
On the home screen, an icon indicates that the mailbox contains unread messages.<br />
The Mailbox list screen indicates unread messages and allows you to delete read<br />
messages.<br />
How to Read your Messages<br />
How to Read<br />
your Messages<br />
1 As a user:<br />
Press<br />
> Mailbox<br />
and type 8 or select the path:<br />
The Mailbox screen is displayed.<br />
2 Select the message to read and press [OK] .<br />
3 Select Open to read the message.<br />
10<br />
How to Read your Messages<br />
How to Read<br />
your Messages<br />
1 As supervisor (see How to Log in as Supervisor p.124 ):<br />
Press and type 1 or select the path:<br />
> Mailbox<br />
Options and Updates<br />
How to Delete your Messages<br />
How to Delete<br />
your Messages<br />
The Mailbox screen is displayed.<br />
2 Select a message and press [OK] .<br />
3 Select Open to read the message.<br />
1 As a user:<br />
Press and type 8 or select the path:<br />
> Mailbox<br />
The Mailbox screen is displayed.<br />
2 Select the message to be deleted and press [OK] .<br />
3 Select Delete message to erase the message.<br />
152
How to Delete your Messages<br />
How to Delete<br />
your Messages<br />
1 As supervisor (see How to Log in as Supervisor p.124 ):<br />
Press and type 1 or select the path:<br />
> Mailbox<br />
The Mailbox screen is displayed.<br />
2 Select a message and press [OK] .<br />
3 Select Delete to erase the message.<br />
10<br />
Options and Updates<br />
153
Managing Options<br />
10.3 Managing Options<br />
Consulting the Option List<br />
The option list includes the options actually loaded into your mailing system and indicates<br />
the options that are activated.<br />
You can also display details for each option.<br />
For more information about the options you can add to your mailing<br />
system, please contact customer service.<br />
How to Display the Options<br />
How to Display<br />
the Options<br />
To display the option list:<br />
1 As supervisor (see How to Log in as Supervisor p.124 )<br />
either:<br />
10<br />
Press and type 8.1 or select the path:<br />
> Options and Updates > Option list<br />
The Options list screen is displayed.<br />
Options and Updates<br />
2 To display the details of an option, select the option and<br />
press [OK] .<br />
154
Activating New Options<br />
Process for Activating Options<br />
You can activate new options by connecting the mailing system to Online Services<br />
server. New available options are automatically downloaded into your mailing system<br />
and activated.<br />
Contact customer service to have new options ready for downloading<br />
on the Online Services server.<br />
How to Load New Options<br />
How to Load<br />
New Options<br />
To activate an option that is ready for downloading on the Online<br />
Services server:<br />
1 Check that your mailing system is connected to a network or<br />
a telephone line (see Connections p.18 ) and that the<br />
connection is properly configured (see Connection Settings<br />
p.144 ).<br />
2 Select Check for updates. It will trigger a generic call to the<br />
Online Services server. See Manual Calls p.99 .<br />
3 After the call, you can display installed options. See How to<br />
Display the Options p.154 .<br />
10<br />
Options and Updates<br />
155
Managing Custom Text Messages<br />
10.4 Managing Custom Text Messages<br />
You can enhance your mail and increase the “openability” of your mail by adding<br />
custom text messages to the left of the imprint.<br />
As supervisor, you can:<br />
• Add custom text messages (and create a name for menu selection)<br />
• Edit / modify messages<br />
• Delete existing text messages<br />
• Activate a default text message (this setting is described in How to Change the<br />
Default Text p.138 ).<br />
The List of Custom Text Messages<br />
The list of text displays the messages you have created and indicates with a check<br />
mark the default text, if any.<br />
10<br />
How to Display the List of Text Messages<br />
How to Display<br />
the List of Text<br />
Messages<br />
To display the list of text:<br />
1 As supervisor (see How to Log in as Supervisor p.124 ):<br />
Press and type 8.2 or select the path:<br />
> Option and Updates > Text settings<br />
The list of text is displayed in the Text management screen.<br />
Options and Updates<br />
156
Editing Text<br />
Use the procedures below to create, modify or delete texts.<br />
How to Add a New Text Message<br />
How to Add a<br />
New Text<br />
Message<br />
To add a new message:<br />
1 Display the list of text. See How to Display the List of Text<br />
Messages p.156 .<br />
2 Select > Create a text .<br />
3 Enter your text (max. 4 lines, 18 characters per line).<br />
4 Press [OK] to validate.<br />
5 Enter the name to be displayed on the menu for users, then<br />
press [OK] .<br />
How to Modify or Delete a Text Message<br />
How to Modify<br />
or Delete a Text<br />
Message<br />
To modify or delete text:<br />
1 Display the list of text. See How to Display the List of Text<br />
Messages p.156 .<br />
2 Select a message and press [OK] .<br />
The Text setting screen is displayed.<br />
To edit the content of the message or its name:<br />
1 Select Edit .<br />
10<br />
2 You can change the text message and press [OK] to display<br />
the next screen (Use [C] key to clear characters).<br />
3 You can change the text name and press [OK] to validate.<br />
The system updates the message.<br />
To delete a message:<br />
1 Select Delete .<br />
Selected text is displayed.<br />
2 Press [OK] to confirm deletion.<br />
The system updates the message list.<br />
Options and Updates<br />
157
Managing Slogan s<br />
10.5 Managing Slogan s<br />
The Slogans are graphical images you can add on the left hand side of the imprint on<br />
mail pieces.<br />
As supervisor, you can:<br />
• Display the slogan list<br />
• Rename or delete slogans<br />
• Download new slogans.<br />
The available slogans are automatically downloaded into your<br />
mailing system by connecting the mailing system to the Online<br />
Services server as a user. See How to Load New Options p.155 .<br />
See also<br />
• Selecting a slogan to print: p.57<br />
10<br />
Displaying the List of Slogans<br />
The list of slogans includes the slogans that are installed in the mailing system and<br />
indicates with a check mark the activated default slogan.<br />
See also<br />
• How to Change the Default Slogan p.138<br />
Options and Updates<br />
How to Display the List of Slogans<br />
How to Display<br />
the List of<br />
Slogans<br />
To display the list of slogans:<br />
1 As supervisor (see How to Log in as Supervisor p.124 ):<br />
Press and type 8.3 , or select the path:<br />
> Option and Updates > Update Ad Slogans<br />
The list of ad slogans is displayed in the Ad Slogan Management<br />
screen.<br />
158
Modifying the List of Slogans<br />
The procedure below allows you to change the menu name of a slogan or to delete<br />
a slogan from the list.<br />
How to Modify or Delete a Slogan<br />
How to Modify<br />
or Delete a<br />
Slogan<br />
To modify or delete a slogan:<br />
1 Display the list of slogans (see How to Display the List of<br />
Slogans p.158 ).<br />
2 Select the slogan and press [OK] .<br />
The Ad Slogan Setting menu is displayed.<br />
To change the name of the slogan:<br />
1 Select Edit .<br />
2 Change the slogan name using the keypad and press [OK] .<br />
The system updates the slogan list.<br />
To delete the slogan:<br />
1 Select Delete .<br />
The system asks for a confirmation.<br />
2 Press [OK] to confirm deletion.<br />
The system updates the slogan list.<br />
Downloading New Slogans<br />
The procedure below allows you to download new slogans.<br />
10<br />
How to Download New Slogans<br />
How to<br />
Download New<br />
Slogans<br />
To download new slogans:<br />
1 Display the list of slogans (see How to Display the List of<br />
Slogans p.158 ).<br />
2 Select > Check for updates and press [OK] .<br />
The mailing system connects to the Online Services server<br />
and downloads available slogans.<br />
Options and Updates<br />
159
Managing Postal Rates<br />
10.6 Managing Postal Rates<br />
Your mailing system uses rate tables to calculate postage amounts.<br />
As supervisor, you can:<br />
• Display the list of rate tables and see which table the system is currently using<br />
• Download new postal rate tables.<br />
See also<br />
• Options and Updates p.149<br />
Displaying the List of Rate Tables<br />
The newly available rate tables are automatically downloaded<br />
into your mailing system by connecting the mailing system to the<br />
Online Services server as a user. See How to Load New Options<br />
p.155 .<br />
The list of rate tables displays the rate tables that are installed in the mailing system<br />
and indicates with a check mark the active rate table.<br />
10<br />
Rate tables automatically become active on their effective date.<br />
Options and Updates<br />
How to Check the Rate Updates<br />
How to Check<br />
the Rate<br />
Updates<br />
To display the list of rate tables:<br />
1 As supervisor (see How to Log in as Supervisor p.124 ):<br />
Press and type 8.4 or select the path:<br />
> Options and Updates > Rate management<br />
The list of rate tables is displayed in the Rate management<br />
screen. The tables are identified by the rate effective date.<br />
160
Downloading New Postal Rates<br />
The procedure below allows you to download new rate tables.<br />
How to Download New Postal Rates<br />
How to<br />
Download New<br />
Postal Rates<br />
To download new rates:<br />
1 Display the list of rate tables (see How to Check the Rate<br />
Updates p.160 above).<br />
2 Select > Check for updates and press [OK] .<br />
The mailing system connects to the Online Services server<br />
and downloads available rates.<br />
10<br />
Options and Updates<br />
161
Updating System Software<br />
10.7 Updating System Software<br />
Occasionally it will be requested that you download new software for your mailing<br />
system.<br />
The software package may include feature enhancements or updates. Also, if you<br />
purchase an additional service, you may be required to download the software to<br />
support this new service.<br />
You will receive instructions from Customer Service, informing you that you should<br />
perform a software download. When you are ready to download the new software<br />
package, contact your Supervisor, who must connect to the Online Server.<br />
Updating Procedure<br />
To check for available updates:<br />
• Perform a call to the Online Services server (see How to Call Online Services<br />
Manually p.99 ).<br />
• After the call, your mailbox will contain a message indicating that a software<br />
download is available. To open your mailbox, see p.152 ).<br />
Follow the procedure below to update your mailing system.<br />
10<br />
How to Update the System Software<br />
How to Update<br />
the System<br />
Software<br />
To update the system software:<br />
1 As Supervisor (see How to Log in as Supervisor p.124 ):<br />
Press and type 10.5 or select the path:<br />
> Online Services > Server loading list<br />
Options and Updates<br />
2 Select the element to download.<br />
3 Select Detail of download .<br />
4 Choose Now or Later :<br />
Now connects immediately to the Online Services server<br />
and downloads the software package.<br />
Later s the download at a proposed date and time. When the<br />
date and time are reached, the system automatically calls the<br />
Online Services server for downloading.<br />
162
After downloading<br />
The mailing system indicates it has to be re-started.<br />
1 Disconnect and reconnect the mailing system power cord<br />
(see Connections p.18 ).<br />
After restarting, the mailing system calls the server to confirm<br />
installation.<br />
The mailing system is ready for use with the new software.<br />
No information is lost during the updating process: your data and<br />
settings remain unchanged.<br />
10<br />
Options and Updates<br />
163
10<br />
Options and Updates<br />
164
Maintaining your Mailing System<br />
11 Maintaining your Mailing<br />
System<br />
This section contains important information about the maintenance of your mailing<br />
system in order to keep it in good condition.<br />
11.1 Maintaining the Ink Cartridge ........................................... 167<br />
How to Display Ink Level and Cartridge Data ............................................................... 168<br />
How to Display Ink Level and Cartridge Data ............................................................... 168<br />
How to Align the Print Heads .............................................................................. 169<br />
How to Clean the Printing Head Automatically ............................................................. 171<br />
How to Clean the Printing Head Automatically ................................................... 171<br />
How to Clean the Printing Head Manually .................................................................... 171<br />
How to Change the Ink Cartridge.................................................................................. 172<br />
11.2 Maintenance Processes .................................................... 174<br />
How to Run the Installation Wizard ..................................................................... 174<br />
How to Update your Registration ........................................................................ 175
11<br />
Maintaining your Mailing System<br />
166
Maintaining the Ink Cartridge<br />
11.1 Maintaining the Ink Cartridge<br />
About the Ink Cartridge<br />
The ink cartridge for printing is located in the mailing system and contains fluorescent<br />
red ink that has been tested and approved by the postal service.<br />
The ink cartridge uses ink jet technology. It requires the print head nozzles to be<br />
cleaned regularly to provide a good printing quality. The system performs cleaning<br />
automatically or on your request. You can also clean the head manually if the automatic<br />
cleaning is not sufficient.<br />
The ink cartridge printing head has to be mechanically 'aligned'. An alignment<br />
process is provided p.169 .<br />
When there is no more ink in the cartridge, you have to change the cartridge as indicated<br />
p.172 .<br />
Ink Cartridge Maintenance<br />
If you observe poor printing quality (streaked, too light, blurred,<br />
etc.), see Cleaning the Printing Head p.171 .<br />
This section explains how to:<br />
• Check the ink level in the cartridge to make sure you will not be short of ink<br />
• Align the print heads<br />
• Do an automatic cleaning of the print heads<br />
• Clean the print heads manually<br />
• Change the ink cartridge.<br />
11<br />
Note: the term 'Print Headset' is also used to refer to the ink cartridge.<br />
Maintaining your Mailing System<br />
167
Displaying Ink Level and Cartridge Data<br />
You can display the ink level and other cartridge data, such as:<br />
• Ink consumed in percent<br />
• Ink color<br />
• Cartridge status (present or not present)<br />
• First used date<br />
Also check the Best before date on the cartridge box. After this<br />
date, the cartridge warranty is void.<br />
How to Display Ink Level and Cartridge Data<br />
How to Display<br />
Ink Level and<br />
Cartridge Data<br />
To display the ink cartridge data:<br />
1 As a user:<br />
Press and type 12.1 or select the path:<br />
> Ink Cartridge > Ink Cartridge information<br />
The Ink information screen is displayed.<br />
11<br />
Maintaining your Mailing System<br />
How to Display Ink Level and Cartridge Data<br />
How to Display<br />
Ink Level and<br />
Cartridge Data<br />
To display the Ink Level and the Cartridge Data:<br />
1 As supervisor (see How to Log in as Supervisor p.124 ):<br />
Press and type 7.2.1 or select the path:<br />
> Maintenance > Cartridge > Ink information<br />
The Ink information screen is displayed.<br />
168
Aligning the Printing Head<br />
Align the printing head if there is a gap between the top and the bottom of the imprints.<br />
The system requires you to align the printing head after each cartridge<br />
change.<br />
How to Align the Print Heads<br />
How to Align the<br />
Print Heads<br />
To align the print heads:<br />
1 As supervisor (see How to Log in as Supervisor p.124 ):<br />
Press and type 7.2.3 or select the path:<br />
> Maintenance > Ink Cartridge > Headset alignment<br />
The following screen is displayed:<br />
11<br />
2 Insert a piece of paper in the mail path.<br />
The system prints a test pattern.<br />
The headset alignment screen is displayed.<br />
Maintaining your Mailing System<br />
169
3 Observe the pattern and use the up/down keys to select the<br />
letter that corresponds to the straightest and complete<br />
vertical line (here G or H ).<br />
4 Press [OK] to validate.<br />
5 Press to go back to the ink cartridge menu after alignment<br />
is completed.<br />
11<br />
Maintaining your Mailing System<br />
170
Cleaning the Printing Head<br />
If the printing on envelopes or labels looks unclear or dirty in some way, clean the<br />
printing head to restore the head condition.<br />
How to Clean the Printing Head Automatically<br />
How to Clean<br />
the Printing<br />
Head Automatically<br />
To clean the printing head automatically:<br />
1 As a user:<br />
Press and type 12.2 or select the path:<br />
> Ink Cartridge> Cleaning process<br />
The cleaning starts automatically.<br />
How to Clean the Printing Head Automatically<br />
How to Clean<br />
the Printing<br />
Head Automatically<br />
To clean the printing head automatically:<br />
1 As supervisor (see How to Log in as Supervisor p.124 ):<br />
Press and type 7.2.2 or select the path:<br />
> Maintenance > Ink Cartridge > Cleaning process<br />
The cleaning starts automatically.<br />
Manual Cleaning<br />
If automatic cleaning is not sufficient, you can clean the printing head manually.<br />
11<br />
How to Clean the Printing Head Manually<br />
How to Clean<br />
the Printing<br />
Head Manually<br />
To clean the printing head manually:<br />
1 Open the cover.<br />
2 Remove the ink cartridge (see How to Change the Ink Cartridge<br />
p.172 ).<br />
3 Clean the head with a soft damp cloth.<br />
4 Put the cartridge back in place.<br />
Close the cover.<br />
Maintaining your Mailing System<br />
171
Changing the Ink Cartridge<br />
Power supply must be plugged in to move the ink cartridge to the<br />
'replacement' position.<br />
How to Change the Ink Cartridge<br />
How to Change<br />
the Ink Cartridge<br />
1 As a user:<br />
Press and type 12.3 or select the path:<br />
> Ink Cartridge > Cartridge Replacement<br />
As supervisor (see How to Log in as Supervisor p.124 ):<br />
Press and type 7.2.4 or select the path:<br />
> Maintenance > Ink Cartridge > Cartridge Replacement<br />
The cartridge moves to the 'replacement' position, and the<br />
following message is displayed :<br />
11<br />
Maintaining your Mailing System<br />
2 Open the cover, by<br />
pulling it towards you<br />
from the top left.<br />
Pull on the left side of the<br />
blue lever, to unlock the<br />
cartridge.<br />
3 Pull the cartridge<br />
towards you to disengage<br />
it.<br />
172
4 Remove the protective<br />
strips from the new ink<br />
cartridge.<br />
5 Insert the new ink cartridge,<br />
and then push it<br />
forward until it stops.<br />
6 Put the blue lever back<br />
into place.<br />
7 Close the cover.<br />
8 Press [OK] to validate.<br />
11<br />
Maintaining your Mailing System<br />
173
Maintenance Processes<br />
11.2 Maintenance Processes<br />
These processes are only to be completed on request from by Customer Service.<br />
Check that your mailing system is connected to the LAN or to a telephone line before<br />
starting.<br />
As supervisor (see How to Log in as Supervisor p.124 ):<br />
Press and type 7.4 or select the path:<br />
> Maintenance > Processes<br />
1 Installation Process<br />
Installing a mail system for the first time.<br />
2 Disable base<br />
Disable base from service.<br />
Prepare base for removal by saving data on USB key.<br />
3 Swap base<br />
Install a replacement base.<br />
11<br />
4 Withdraw a PSD<br />
Remove PSD from service.<br />
Requires a password from Customer Services to perform.<br />
5 Swap PSD<br />
Allows installation of a new PSD in mail system. Old PSD must have already<br />
been withdrawn.<br />
Maintaining your Mailing System<br />
6 Update registration<br />
This procedure is used if you have changed your address.<br />
Contact your Customer Service to change your information then you will be instructed<br />
to perform the update registration procedure.<br />
Running the Installation Wizard<br />
This type of call should only be completed upon request from Customer Service.<br />
Check that your mailing system is connected to the LAN or to a telephone line before<br />
starting.<br />
How to Run the Installation Wizard<br />
How to Run the<br />
Installation<br />
Wizard<br />
To run the installation wizard:<br />
1 As supervisor (see How to Log in as Supervisor p.124 ):<br />
Press and type 7.4 or select the path:<br />
> Maintenance > Processes<br />
174<br />
A confirmation message is displayed.
2 Press [OK] .<br />
3 Select Installation process (or type 1 )<br />
4 Enter or select the required parameters on each screen and<br />
press [OK] .<br />
5 Press [OK] to complete the installation process and return to<br />
the supervisor main menu.<br />
After installing your mailing system, you will want to add funds to the PSD so you can<br />
begin to process mail. See Adding Funds p.65<br />
Changing Address: Update your Registration<br />
The procedure below allows you to update your postal registration after an address<br />
change.<br />
First contact your Customer Service to update your details and enable the update<br />
registration procedure described below.<br />
Completing this procedure requires your system to be connected<br />
to the Internet or the telephone network (see Connections p.18 ).<br />
How to Update your Registration<br />
How to Update<br />
your Registration<br />
To update your postal registration:<br />
1 As supervisor (see How to Log in as Supervisor p.124 ):<br />
Press and type 7.4 or select the path:<br />
> Maintenance > Processes<br />
11<br />
A confirmation message is displayed.<br />
2 Press [OK] .<br />
3 Select Update registration (or type 6 )<br />
4 Press [OK] to start the connection to postal services.<br />
5 Press after the call is completed.<br />
6 Press [OK] to validate the displayed Geocode.<br />
Maintaining your Mailing System<br />
175
11<br />
Maintaining your Mailing System<br />
176
Troubleshooting<br />
12 Troubleshooting<br />
This section helps you solve problems you may encounter while using your mailing<br />
system.<br />
12.1 Weighing Problems............................................................ 179<br />
12.2 Diagnostics and System Data ............................................ 180<br />
How to Access the Diagnostic Function........................................................................ 180<br />
How to Display the Software Data ................................................................................ 181<br />
How to Display Hardware Data..................................................................................... 181<br />
How to Display the Error Lists....................................................................................... 182<br />
How to Display the Machine Counters.......................................................................... 182
12<br />
Troubleshooting<br />
178
Weighing Problems<br />
12.1 Weighing Problems<br />
The Weighing Platform does not Weigh Properly<br />
The system does not seem to display a correct weight.<br />
Display – — lb _._oz indicates a weighing error.<br />
Check the weighing device as follows.<br />
Possible causes<br />
Actions<br />
There are vibrations or air drafts<br />
in the weighing area.<br />
Something is touching or laying<br />
on the weighing platform.<br />
The weighing platform zero is not<br />
correct.<br />
Weight too heavy for current rate<br />
(you have placed a package on<br />
the platform that is too heavy for<br />
the rate selected).<br />
Weight on the Weighing Platform<br />
(option) is over max capacity (you<br />
have placed a package on the<br />
platform that is too heavy for the<br />
capacity).<br />
Use a solid and steady table:<br />
• Far from any door<br />
• Far from any fan.<br />
Clear the weighing zone and re-zero the weighing<br />
platform (see Weighing Settings p.133 ).<br />
See the weighing platform zeroing procedures in<br />
Weighing Settings p.133<br />
1 Press [OK] to clear the error message.<br />
2 Press the [Rate] key and select a rate class<br />
that can accommodate the weight of the<br />
package.<br />
(Example: select <strong>Priority</strong> if the rate you<br />
had been using was First Class).<br />
3 Press lightly on the Scale to establish the<br />
weight and postage with the new rate.<br />
1 Remove the package and if possible, weigh it<br />
on another Scale.<br />
2 Use Manual Weight Entry mode to enter the<br />
weight and determine the postage.<br />
12<br />
Troubleshooting<br />
To avoid weighing errors, make sure the is clear when starting<br />
the system (if Scale is installed).<br />
179
Diagnostics and System Data<br />
12.2 Diagnostics and System Data<br />
Diagnostics<br />
This section allows you to find the cause of an issue or breakdown of the system,<br />
under the supervision of your customer service.<br />
The system performs self-tests to diagnose the system and generates corresponding<br />
reports.<br />
As Supervisor, you can gain access to the diagnostics that follow:<br />
No. Diagnostic Comments<br />
1 Ping server Sends a message to a server (if connected) to<br />
check the line.<br />
2 Base sensors Reports the status ([0] or [1]) of the sensor below:<br />
• Mail inserted sensor<br />
3 Display The screen displays, successively, a black bar<br />
without text, then a text.<br />
4 Keypad Displays “Key ok” if the test is correct<br />
5 USB Port Checks USB ports.<br />
6 Serial connectors Checks COM port(s).<br />
12<br />
7 Ping tool Checks Lan address.<br />
8 Modem self test Checks the Modem.<br />
9 IP configuration<br />
Checker<br />
Checks Lan connection.<br />
Troubleshooting<br />
How to Access the Diagnostic Function<br />
How to Access<br />
the Diagnostic<br />
Function<br />
To gain access to the diagnostic function:<br />
1 As supervisor (see How to Log in as Supervisor p.124 ):<br />
Press and type 7.3 or select the path:<br />
> Maintenance > Diagnostics<br />
The system requires you press [OK] to start the diagnostic<br />
tests, then displays the list of the tests.<br />
2 Select a test from the list.<br />
180
System Data<br />
As supervisor, you can display data about:<br />
• Software (Meter#, Loader, OS, PACK, XNDF DATA, language, variant).<br />
• Hardware (system) (P/N of the base and the Meter).<br />
• Events occurred in the system (errors, Meter events and server connection<br />
history).<br />
• Machine counters.<br />
How to Display the Software Data<br />
How to Display<br />
the Software<br />
Data<br />
To display the Software Data:<br />
1 As supervisor (see How to Log in as Supervisor p.124 ):<br />
Press and type 7.1.1 or select the path:<br />
> Maintenance > System info > Software information<br />
2 The system displays the data about the software.<br />
How to Display Hardware Data<br />
How to Display<br />
Hardware Data<br />
To display hardware data:<br />
1 As supervisor (see How to Log in as Supervisor p.124 ):<br />
Press and type 7.1.2 or select the path:<br />
> Maintenance > System info > Hardware information<br />
2 The system displays the data about the hardware.<br />
12<br />
Troubleshooting<br />
181
How to Display the Error Lists<br />
How to Display<br />
the Error Lists<br />
To display the error lists:<br />
1 As supervisor (see How to Log in as Supervisor p.124 ):<br />
Press and type 7.1.3 or select the path:<br />
> Maintenance > System info > Error list<br />
2 Select the > Base errors list (or type 1 ) or the > PSD errors<br />
list (or type 2 ) or Server connection history (or type 3 )<br />
3 Press [OK] to validate.<br />
4 Select an output : Screen, USB printer, USB key, then press<br />
[OK] .<br />
5 The system displays the selected list in a table with, for each<br />
error:<br />
- The Code of the error<br />
- The Date where appends the error<br />
- The Cycles count when the error occurred.<br />
- The Description<br />
- The Category<br />
6 Note the Code and refer to your customer service.<br />
12<br />
How to Display the Machine Counters<br />
How to Display<br />
the Machine<br />
Counters<br />
To display the data of the system counters:<br />
1 As supervisor (see How to Log in as Supervisor p.124 ):<br />
Press and type 7.1.4 or select the path:<br />
> Maintenance > System info > Counters<br />
Troubleshooting<br />
2 The system displays the data of the system counters.<br />
182
Specifications<br />
13 Specifications<br />
This sections contains the main specifications of your mailing system.<br />
13.1 Mail Specifications ............................................................. 185<br />
13.2 General Specifications ...................................................... 186<br />
13.3 Weighing platform ............................................................. 187
13<br />
Specifications<br />
184
Mail Specifications<br />
13.1 Mail Specifications<br />
Envelope Basic Characteristics<br />
13<br />
Envelope Dimensions<br />
Your mailing system can handle envelope & flap sizes as illustrated below (note: the<br />
illustration is not drawn to Scale) .<br />
Specifications<br />
Envelope Thickness<br />
Min 0.008" Max 0.63"<br />
185
13<br />
General Specifications<br />
13.2 General Specifications<br />
Dimensions (Width x Length x Height)<br />
• 8.58" x 12.44" x 7.64"<br />
Specifications<br />
Weight<br />
• 8 lb 3 oz<br />
Power<br />
• Frequency: 60 Hz<br />
• Max. current rating (full configuration): 2.5 A<br />
• Power supply: 120 V (+6% -10%) 3 wire grounded circuit<br />
(up to standard NFC15-100)<br />
186
Weighing platform<br />
13.3 Weighing platform<br />
Max capacity: 2lb (standard), 5lb (optional)<br />
13<br />
Specifications<br />
187
13<br />
Specifications<br />
188
Index<br />
A<br />
Access Control 71, 72<br />
Access Rights 71<br />
Account 15, 76, 80<br />
Account Level 104<br />
Account Parameters 79<br />
Account with PIN Code 77<br />
Ad slogan 15, 55<br />
Automatic Date Advance 139<br />
Automatic calls 98<br />
C<br />
Cartridge 32<br />
Cleaning 171<br />
Control Panel 13<br />
Correct Postage Amount 40<br />
Cover 13, 14<br />
D<br />
Date 53, 139, 148<br />
Daylight Savings Time 148<br />
Disconnecting 8<br />
Imprint memory 15<br />
Ink 32<br />
Ink Level 168<br />
Ink Management 103<br />
Ink cartridge 14, 167, 172<br />
M<br />
Machine PIN code 71, 72<br />
Mail Path 13<br />
Mailbox 15, 152<br />
Maintenance Processes 174<br />
Manual weight entry mode 36<br />
Meter 67<br />
Multi Account 93<br />
N<br />
No account 74<br />
No account with access control 75<br />
O<br />
Online Services 97<br />
Option List 154<br />
E<br />
EConfirmation 105<br />
ESignature 105<br />
Energy Star® 20<br />
Envelope Dimensions 185<br />
F<br />
I<br />
Fractional Setting 140<br />
Funds 64, 65<br />
Imprint Memories 58, 141<br />
P<br />
PC Meter Link 146<br />
PIN code 132<br />
Piece Counting 59<br />
Postal security device (PSD) 14<br />
Power 6<br />
R<br />
Rate Protection 103<br />
Rate Wizard 47<br />
Rate selection 46<br />
Rate tables 160<br />
189
Rezero 133<br />
Running Mail 39, 42<br />
Standard weighing 37<br />
Synchronizing Call 100<br />
S<br />
Selecting a Rate 46<br />
Session 29<br />
Single Account 92<br />
Sorting Mail 28<br />
Specifications 186<br />
Standard 33<br />
T<br />
Text 55<br />
Type of Imprint 31<br />
W<br />
Weighing mode 15<br />
Work Session 29<br />
190
191


