Cyborg 06 - MacDev
Cyborg 06 - MacDev
Cyborg 06 - MacDev

Create successful ePaper yourself
Turn your PDF publications into a flip-book with our unique Google optimized e-Paper software.
Users Manual<br />
Mac Developments - Australia<br />
www.macdev.net<br />
Info@macdev.net
<strong>06</strong> <strong>Cyborg</strong> Users Manual Version 1.01<br />
Copyright Mac Developments Pty. Ltd. 2005<br />
All rights reserved<br />
No part of this document may be copied or reproduced in any form or by any means without the prior written consent<br />
of Mac Developments Pty. Ltd.<br />
Notice is hereby given that this manual is part of the article owned in whole by Mac Developments Pty. Ltd., known as indicated in<br />
this manual and drawings. All rights of manufacture and reproduction of such articles or any part thereof are reserved by Mac<br />
Developments Pty Ltd. Neither said article nor any part thereof may be manufactured or reproduced without the written authorization<br />
from Mac Developments Pty. Ltd. All proprietary rights and information are the sole property of Mac Developments Pty. Ltd.<br />
<strong>MacDev</strong>, <strong>Cyborg</strong>, Conquest, Gladiator, MatchStick and Sonic are all registered trademarks of Mac Developments Pty<br />
Ltd.<br />
Statement of Liability<br />
Mac Developments Pty. Ltd. Makes no warranties with respect to this documentation and disclaims any implied warranties<br />
of merchantability or fitness for a particular purpose. The information in this document is subject to change<br />
without notice. Mac Developments Pty. Ltd. assumes no responsibility for its resale or safe handling. Mac Developments<br />
Pty. Ltd. assumes no responsibility for physical injury or property damage resulting from its use.<br />
Caution!<br />
This is not a toy. Misuse may cause serious injury or death. Eye protection designed specifically<br />
for paintball must be worn by user and persons within range. Recommend 18 years or older to<br />
purchase. Persons under 18 must have adult supervision. READ OWNER’S MANUAL BEFORE<br />
USING.
Introduction<br />
The <strong>06</strong> <strong>Cyborg</strong> is an open bolt, electropneumatic marker designed specifically for accuracy and speed. Your <strong>06</strong><br />
<strong>Cyborg</strong> is built from precision machined components manufactured on some of the most sophisticated computer controlled<br />
machinery in the world today. This high quality construction, coupled with careful design by qualified engineers,<br />
results in a fast, accurate and reliable marker.<br />
Specifications<br />
Weight: 2.0lbs<br />
Length: 9.25” (no barrel)<br />
Height: 8.66” (no air source)<br />
Width: 1.18”<br />
Calibre: 0.68”<br />
Power source: 9V battery<br />
Gas source: Compressed air/N2 only<br />
Barrel threads: Standard AutoCocker<br />
Detent threads: Standard Autococker<br />
Inline regulator: 04 Gladiator<br />
Solenoid: Custom 5-way, 5V<br />
Fire rate: true 34bps<br />
Anti chop system: LED Break beam eye<br />
Fire modes: Semi, PSP, NPPL, Millennium, CFOA, adjustable ramp<br />
Operating pressure: 200psi<br />
<strong>MacDev</strong> 2005/<strong>06</strong><br />
Find us on the web at:<br />
www.macdev.net<br />
Please post warranty cards to:<br />
USA<br />
Paintball Kingdom<br />
2407 Ansonville Rd<br />
Marshville NC<br />
USA 28103<br />
Australia/New Zealand<br />
<strong>MacDev</strong><br />
PO Box 2739<br />
Taren Point, NSW<br />
Australia, 2229<br />
Canada<br />
Europe<br />
Hardcore Paintball<br />
31979 Bredin Rd<br />
Kelowna BC<br />
Canada V1Y8T2<br />
OPB<br />
Arabygatan 19-21<br />
352 46 Växjö<br />
Sweden
Getting Started<br />
Your <strong>Cyborg</strong> requires a source of Compressed air to be installed before use. The best air system to use with your<br />
<strong>Cyborg</strong> is the Conquest air system. However, thanks to the 04 Gladiator inline regulator, your <strong>Cyborg</strong> can accept air<br />
input from any air system supplying 400-900psi of compressed air (DO NOT USE CO2).<br />
Mounting an air system<br />
Two mounting holes are provided on the base of the <strong>Cyborg</strong> grip frame for the purpose of attatching your air system.<br />
Please see your air system users manual for details on how to attatch your air system to these mounting points.<br />
Connecting the gas<br />
Now that your air system is mounted, you will need to connect the gas to the base of the Gladiator inline regulator.<br />
This is best achieved using MacLine (if you are using a air system output of 400-700psi) or braided hose (700psi+).<br />
Your <strong>Cyborg</strong> comes from the factory with a MacLine fitting installed in the Gladiator. If you intend to use MacLine, then<br />
you can plumb your gun by pushing the MacLine from your air system into the fitting at the bottom of your Gladiator.<br />
Your <strong>Cyborg</strong> is now ready to use. Screw the barrel into the <strong>Cyborg</strong> and carefully push a paintball hopper into the feed<br />
neck. Your <strong>Cyborg</strong> is now ready to operate. Never operate your <strong>Cyborg</strong> without eye, ear, mouth and neck protection<br />
for yourself and anybody within range.<br />
If you need to change the fitting in the bottom of your Gladiator, please follow the instructions below.<br />
Unscrew the bottom cap from your Gladiator (by hand). Use a wrench to hold the Gladiator bottom cap in place as you<br />
change the air fitting (as shown below). Do not over tighten the air fitting, and use a snug wrench on the Gladiator to<br />
prevent scratching. Now screw the Gladiator bottom cap back into the inline regulator.<br />
Setting the Velocity<br />
Your Sonic <strong>Cyborg</strong> has been factory set to between 275 and 300fps. The Sonic <strong>Cyborg</strong> should be adjusted to comply<br />
with local legal velocities. The Sonic <strong>Cyborg</strong> velocity can be adjusted over the chronograph with an allen key. First gas<br />
up your marker and check the gauge on the side (above the front grip) This gauge indicates the pressure setting of<br />
your inline regulator (Gladiator) and should be set to 200psi at all times.<br />
Now chrono the marker, to increase the velocity turn the LPR adjuster clockwise, or turn the adjuster counter-clockwise<br />
to reduce the velocity. Never set the velocity over 300fps, or use/chrono your <strong>Cyborg</strong> without first ensuring that<br />
you and all other people in range are wearing appropriate protective clothing.<br />
Operating Your <strong>Cyborg</strong><br />
Turning the power on and off<br />
The <strong>Cyborg</strong> on/off switch is located on the underside of the trigger guard. Slide the switch to turn the marker on. When<br />
the <strong>Cyborg</strong> is on, the indicator LED on the side of the grip will ignite. To turn your <strong>Cyborg</strong> off, simply slide the switch in<br />
the opposite direction.<br />
Deactivating the eye system<br />
Your <strong>Cyborg</strong> has the eyes activated when you first turn it on. To deactivate the eyes, hold the trigger until the indicator<br />
LED begins to flash green.
Fine Tuning and Customising your <strong>Cyborg</strong><br />
Your <strong>Cyborg</strong> can be adjusted in many ways to suit your individual playing style. You can adjust the trigger feel, sensitivity<br />
and speed.<br />
Trigger Adjustment<br />
There are 3 set screws around the trigger area to use for fine tuning the trigger. The lower screw on the front of the<br />
trigger is used to adjust the length of the trigger pull - screw it clockwise to reduce the trigger pull length. The second,<br />
higher screw on the front of the trigger is used to adjust the actuation position. Screw this screw clockwise toactuate<br />
the microswitch earlier in the trigger pull.<br />
The final adjustment screw is located on the top of the trigger - winding this screw in a clockwise direction will<br />
increase the trigger pull tension.<br />
Programming Your <strong>Cyborg</strong><br />
The <strong>06</strong> <strong>Cyborg</strong> is equipped with trigger programming. To program your <strong>Cyborg</strong>, you must have the tourney lock disabled.<br />
The tourney lock is a dip switch on your circuit board, to disable the lock, switch the top dip switch to the left. To<br />
lock the programming, push the switch to the right.<br />
To enter programming mode, hold in the trigger and switch the marker on. The indicator LED will flash blue and then<br />
solid green.<br />
The <strong>Cyborg</strong> will now wait for you to select a register. To select the register you would like to change, pull the trigger the<br />
number of times indicated in the table below.<br />
The indicator LED will now flash to indicate the current setting of the register you have selected. Once it ihas finished<br />
flashing, it will stay solid red. It is now waiting for you to input the new setting. Pull the trigger the number of times that<br />
you would like to input. Once you have finished, the board will flash twice and then return to solid green - it is now<br />
awaiting your next register input choice.<br />
Please note that if you change register 1 (fire mode), the marker will exit programming mode automatically.<br />
When you have finished changing register settings, you can exit the programming mode by turning the marker off.<br />
Also, if you have selected a register and do not want to change it, you may safely exit programming mode by turning<br />
the marker off.<br />
Register Settings<br />
1. Fire Mode<br />
This register sets the mode that you would like the <strong>Cyborg</strong> to operate in. Please note that some modes are disabled in certain countries.<br />
1. Semiauto<br />
2. Auto response<br />
3. Full auto<br />
4. Semi2 (uncapped)<br />
5. Assisted ramp (shots added based on rate of fire)<br />
6. Fast ramp (shots added as soon as registers 5 and 6 are reached)<br />
7. Triple shot ramp (3 shots added per pull when 5&6 are reached)<br />
8. PSP1 (Assisted ramp PSP legal)<br />
9. PSP2 (Fast ramp PSP legal)<br />
10. PSP3 (Triple shot ramp PSP legal)<br />
11. NXL<br />
2. Rate of Fire<br />
This is the fire rate cap - set this to stop your marker from cycling too fast.<br />
3. Debounce<br />
Use this setting to avoid the marker recognising false trigger pulls.<br />
4. Dwell<br />
This setting should not be adjusted unless you are advised by a <strong>MacDev</strong> tech.<br />
5. AFA Rate of Fire - this is the rate of fire you need to achieve before ramping modes activate (fire modes 5-10)<br />
6. AFA Shot Count - this is the number of shots you need to pull before ramping modes activate (fire modes 5-10)<br />
7. Fire Holdoff - this setting should not be adjusted unless you are advised by a <strong>MacDev</strong> tech.<br />
8. Eye Holdoff - this is the amount of time that the software will allow for the ball to settle in the breach. Faster hoppers use a lower setting. If paint<br />
breakage occurs try increasing this setting.
9. Anti Bolt Stick - this software oprion can aleviate problems with bolt stick by setting the time the software waits before applying anti bolt stick. setting<br />
1 is off, whilst 2=5s, 3-10s, 4=15s etc.<br />
10. Anti Bolt Stick Time - this is the amount of time added to the dwell to aleviate bolt stick.<br />
11. Eye off rate of fire - 1=same as register 2, otherwise the setting indicates rate of fire.<br />
12. Rate of fire additions - useful for fine tuning the rate of fire, 1=off, 2=0.2, 3=0.4 etc<br />
16 and 17 are used to combat mechanical bounce. If mechanical bounce becomes a problem, try increasing 17 (AMB). Warning increasing this<br />
setting too much may result in slow rates of fire.<br />
Register Description Default<br />
1 Fire Mode 1<br />
2 Rate of Fire 30<br />
3 Debounce 10<br />
4 Dwell 10<br />
5 AFA Rate of Fire 5<br />
6 AFA Shot Count 3<br />
7 Fire Holdoff 15<br />
8 Eye Holdoff 5<br />
9 Anti Bolt Stick 1<br />
10 Anti Bolt Stick Time 1<br />
11 Eye off rate of fire 1<br />
12 Rate of Fire Additions 1<br />
13 Disable Eye Through Trigger (1=on, 2=off) 1<br />
14 Clearing Shot (1=on, 2=off) 1<br />
15 not used -<br />
16 Ebounce2 10<br />
17 AMB 10<br />
Caring for your <strong>Cyborg</strong><br />
The <strong>Cyborg</strong> is a very low maintenance marker, however there are some things that you can do to keep it running at<br />
optimum performance. Always use Dow 33 to lubricate your <strong>Cyborg</strong>, do not use Silicone spray or oil of any kind.<br />
Bolt Maintenance<br />
The Sonic <strong>Cyborg</strong> bolt is made from a very high quality self lubricating plastic with three wiping O-rings. These wiping<br />
O-rings should be kept clean and oiled. During normal usage, the <strong>Cyborg</strong> bolt can become dirty. To remove the bolt,<br />
gently pull the pull pin upwards until it clicks. The bolt and pull pin should then slide freely out of the gun. Clean the<br />
bolt with a clean, dry soft cloth. If you notice scratches along the bolt, it is likely that you have not cleaned it often<br />
enough - it is a good idea to clean the bolt after evey days play, or if it gets excessive paint/dirt in it during the course<br />
of play.<br />
When replacing the bolt, it is critical to ensure that the bottom of the pull pin is located correctly in the slot on the ram<br />
inside the gun. If the bolt is incorrectly installed your <strong>Cyborg</strong> will not operate correctly and damage may result.<br />
Ram Maintenance<br />
The ram of your <strong>Cyborg</strong> does the most work of any part of the gun. For this reason the ram system needs to be kept<br />
clean and well lubricated. Before removing your ram ensure that there is no gas in the gun. First remove the bolt (as<br />
described above in bolt maintenance) and unscrew the ram cap (counter-clockwise) and remove it from the gun. Then<br />
grasp the ram end and pull it out of the <strong>Cyborg</strong>. Now remove the hammer from the ram housing. Clean the old grease<br />
off the ram housing bore using a clean q-tip, and clean the old grease from the ram housing and hammer using a<br />
clean lint free cloth. Use a clean q-tip to re-lubricate the bore of the ram housing with Dow 33, and use your finger to<br />
re-lubricate the o-rings on the hammer as well as the hammer shaft. Slide the hammer back into the ram housing and<br />
re-lubricate the o-rings on the outside of the ram housing. Now your ram is ready to be replaced back into the marker<br />
- slide it back in carefully before securing it in place with the ram nut. Take care that the bolt is replaced correctly as<br />
described above in bolt maintenance.<br />
Ram maintenance can be performed as often as you like, and should be done at least every 20,000 cycles.
Gladiator Inline Regulator Maintenance<br />
To keep your Gladiator working well you should clean and lubricate the piston regularly (at least every 20,000 shots or<br />
so, you may perform this maintenance more often if desired). To do this follow these easy steps:<br />
1. Degas the <strong>Cyborg</strong> of all pressurised gas, then remove the Gladiator from the <strong>Cyborg</strong>. Unscrew the Gladiator bottomworks<br />
and put it aside.<br />
2. Place a clean rag on the tabletop and push the piston assembly out from the top. Separate the piston from the o-<br />
ring retainer and spring washers.<br />
3. Clean the piston, o-rings and o-ring retainers of old grease using a clean rag, do not leave any lint or cotton strands<br />
on or between the o-rings. Re-apply Dow 33 to the o-rings.<br />
4. Clean the piston bore using a Q-tip to remove all old grease.<br />
5. Using a clean Q-tip, apply grease to the piston bore. Do not over apply grease - all you need is a thin film.<br />
6. Slide the spring washers back onto the piston and lubricate the shaft with Dow 33. Now slide the upper o-ring<br />
retainer back onto the shaft. Push the inner retainer o-ring over the shaft and position the outer retainer o-ring in the<br />
groove. Now slide the lower o-ring retainer over the shaft to sandwich the o-rings in place.<br />
7. Slide the piston etc back into the Gladiator topworks and screw the bottom and topworks back together before reinstalling<br />
the Gladiator onto your <strong>Cyborg</strong>.<br />
LPR Maintenance<br />
The LPR should be cleaned and re-lubricated at the same time as the Gladiator inline regulator. Remove the adjuster<br />
cap by unscrewing it from the LPR (counter-clockwise), and remove the spring under the adjuster. Use a pair of<br />
needle nosed pliers to remove the LPR piston. Clean and relubricate the piston bore using a q-tip then clean and relubricate<br />
the piston itself before replacing it back in the LPR body. Replace the LPR spring and adjuster cap. You will<br />
need to re-chrono your marker after doing this.<br />
Troubleshooting<br />
Some common difficulties are detailed in this section, for the latest troubleshooting information, please visit www.<br />
macdev.net. If you require more assistance with troubleshooting related issues, please contact your local macdev/<br />
<strong>Cyborg</strong> tech.<br />
The marker is on, but will not cycle<br />
Ensure that the paint is loaded correctly and that there is gas to the marker. If paint is loaded correctly, point the<br />
<strong>Cyborg</strong> at a safe target and hold the trigger for at least half a second. If the marker cycles then paint was not loaded<br />
correctly.<br />
Check that the trigger actuator adjustment is not set too far in or too far out (always back the adjustment out before<br />
trying to screw it in, because screwing it in too far may damage your trigger switch.<br />
There is a leak from the marker<br />
Check the gauge on the side of the gun. It should be set to approximately 200psi. If the Gladiator needs adjustment,<br />
then adjust the pressure (using a 3/32” allen wrench on the bottom of the Gladiator - counterclockwise increases pressure).<br />
Then re-chrono the marker - the leak should disappear when the velocity is set correctly.<br />
If the leak persists check the ram switching o-ring to ensure it is not dry or damaged. If the leak still will not disappear,<br />
please contact tech. support.<br />
The marker breaks paint<br />
Ensure that the top tube, bolt and barrel of your <strong>Cyborg</strong> are completely clean. Check to make sure that the paint is not<br />
too large for the <strong>Cyborg</strong> barrel. Ensure that your anti chop eyes are turned on and the barrel is screwed in completely.<br />
The marker shoots down under rapid fire<br />
Check to make certain that your air system is set to 400psi or above. When firing the gun ensure that the gauge on<br />
the side of the gun recharges quickly (if this recharges slowly, perform routine Gladiator inline reg maintenance). If the<br />
air system is set correctly and the gauge on the side of the gun recharges well, perform routine maintenance on the<br />
<strong>Cyborg</strong> ram and LPR.
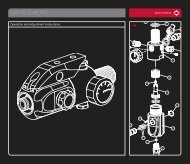
Circuit Board Wiring<br />
<strong>06</strong> <strong>Cyborg</strong> Schematic<br />
This schematic does not show all <strong>Cyborg</strong> parts. Some<br />
parts have been omitted for clarity.