

Instruction Manual - Nature Coast Hobby Shop
Instruction Manual - Nature Coast Hobby Shop
Instruction Manual - Nature Coast Hobby Shop

You also want an ePaper? Increase the reach of your titles
YUMPU automatically turns print PDFs into web optimized ePapers that Google loves.
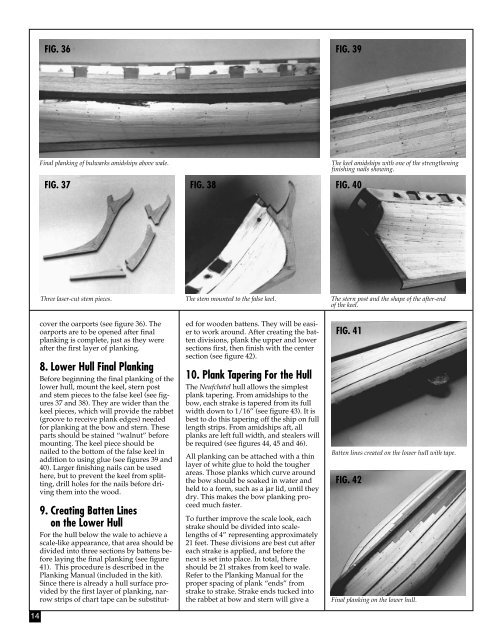
FIG. 36<br />
FIG. 39<br />
Final planking of bulwarks amidships above wale.<br />
FIG. 37<br />
FIG. 38<br />
The keel amidships with one of the strengthening<br />
finishing nails showing.<br />
FIG. 40<br />
14<br />
Three laser-cut stem pieces.<br />
cover the oarports (see figure 36). The<br />
oarports are to be opened after final<br />
planking is complete, just as they were<br />
after the first layer of planking.<br />
8. Lower Hull Final Planking<br />
Before beginning the final planking of the<br />
lower hull, mount the keel, stern post<br />
and stem pieces to the false keel (see figures<br />
37 and 38). They are wider than the<br />
keel pieces, which will provide the rabbet<br />
(groove to receive plank edges) needed<br />
for planking at the bow and stern. These<br />
parts should be stained “walnut” before<br />
mounting. The keel piece should be<br />
nailed to the bottom of the false keel in<br />
addition to using glue (see figures 39 and<br />
40). Larger finishing nails can be used<br />
here, but to prevent the keel from splitting,<br />
drill holes for the nails before driving<br />
them into the wood.<br />
The stem mounted to the false keel.<br />
9. Creating Batten Lines<br />
on the Lower Hull<br />
For the hull below the wale to achieve a<br />
scale-like appearance, that area should be<br />
divided into three sections by battens before<br />
laying the final planking (see figure<br />
41). This procedure is described in the<br />
Planking <strong>Manual</strong> (included in the kit).<br />
Since there is already a hull surface provided<br />
by the first layer of planking, narrow<br />
strips of chart tape can be substituted<br />
for wooden battens. They will be easier<br />
to work around. After creating the batten<br />
divisions, plank the upper and lower<br />
sections first, then finish with the center<br />
section (see figure 42).<br />
10. Plank Tapering For the Hull<br />
The Neufchatel hull allows the simplest<br />
plank tapering. From amidships to the<br />
bow, each strake is tapered from its full<br />
width down to 1/16” (see figure 43). It is<br />
best to do this tapering off the ship on full<br />
length strips. From amidships aft, all<br />
planks are left full width, and stealers will<br />
be required (see figures 44, 45 and 46).<br />
All planking can be attached with a thin<br />
layer of white glue to hold the tougher<br />
areas. Those planks which curve around<br />
the bow should be soaked in water and<br />
held to a form, such as a jar lid, until they<br />
dry. This makes the bow planking proceed<br />
much faster.<br />
To further improve the scale look, each<br />
strake should be divided into scalelengths<br />
of 4” representing approximately<br />
21 feet. These divisions are best cut after<br />
each strake is applied, and before the<br />
next is set into place. In total, there<br />
should be 21 strakes from keel to wale.<br />
Refer to the Planking <strong>Manual</strong> for the<br />
proper spacing of plank “ends” from<br />
strake to strake. Strake ends tucked into<br />
the rabbet at bow and stern will give a<br />
The stern post and the shape of the after-end<br />
of the keel.<br />
FIG. 41<br />
Batten lines created on the lower hull with tape.<br />
FIG. 42<br />
Final planking on the lower hull.


