View / Download Spintastic by Glenda Spencer
View / Download Spintastic by Glenda Spencer
View / Download Spintastic by Glenda Spencer

Create successful ePaper yourself
Turn your PDF publications into a flip-book with our unique Google optimized e-Paper software.
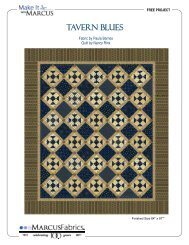
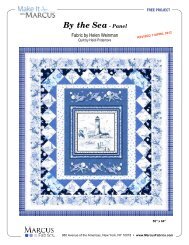
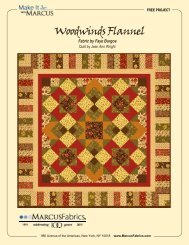
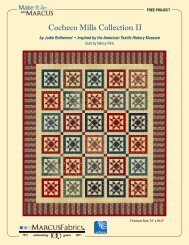
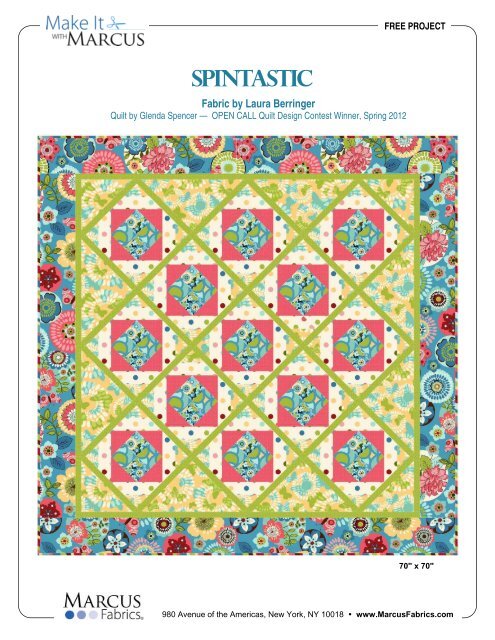
FREE PROJECT<br />
SPINTASTIC<br />
Fabric <strong>by</strong> Laura Berringer<br />
Quilt <strong>by</strong> <strong>Glenda</strong> <strong>Spencer</strong> — OPEN CALL Quilt Design Contest Winner, Spring 2012<br />
70" x 70"<br />
980 Avenue of the Americas, New York, NY 10018 • www.MarcusFabrics.com
Fabric <strong>by</strong> Laura Berringer<br />
SPINTASTIC PAGE 2 of 3<br />
Quilt <strong>by</strong> <strong>Glenda</strong> <strong>Spencer</strong> — OPEN CALL Quilt Design Contest Winner, Spring 2012<br />
Fabric Requirements & Cutting Guide<br />
Butterfly (9392-0150) - 1½ yd.<br />
Bubbles (9388-0150) - ½ yd.<br />
Pink Dots (9387-0126) - ¾ yd.<br />
Green Dots (9387-0114) - 1yd.<br />
Multi Polka Dots (9389-0142) - 1¼ yd.<br />
Multi packed floral (9390-0150) - ½ yd.<br />
Large Floral (9393-0150) - 2yd (border)<br />
Zigzag Stripe (9394-0111) - 3/4yd (binding)<br />
*WOF = Width of Fabric<br />
Finished Quilt Size: 70" x 70"<br />
Bubbles: (13) 7” squares<br />
Multi packed floral: (13) 7” squares<br />
Pink Dots: (13)7 ¼” squares<br />
Multi Polka Dots: (52) 3 7/8” sq (26) 3 7/8” squares<br />
Butterfly: (26) 3 7/8” squares<br />
(2) 9 3/8” squares. Cut diagonally once for corners<br />
(2)18 ¼” squares. Cut diagonally twice for side setting triangles<br />
Green Dots: (18) 1 ½ x WOF, joined together . From this strip, cut the following:<br />
(18) 12 ½” strips<br />
(2) 14 ½” strips<br />
(2) 40 ½” strips<br />
(2) 66 ½” strips<br />
(2) 55 ¼” strips for side sashing & (2) 57 ¼” strips for top & bottom sashing<br />
Large Floral: (7) 6 ½” x WOF, joined together. From this strip, cut the following:<br />
(2)6 ½” x 57 ¼” strips<br />
(2) 6 ½” x 69 ¾” strips<br />
Zigzag Stripe: (8) strips – 2 ½” x WOF, joined together for binding<br />
Instructions<br />
Quick Four-Patch (4P)- Finished 6” square<br />
1. Using a 7” sq. each fabric (Packed Floral and Bubbles), place right sides together.<br />
2. Sew ¼” down each side<br />
3. Using your ruler, cut in half at 3 ½” from edge.<br />
4. Flip so opposite colours are together and the seam is lined up horizontally.<br />
5. Sew ¼” down each side so that has the stitching crosses the last seam.<br />
6. Again, using your ruler, cut in half at 3 ½” from edge.<br />
7. Square to 6 ½”. Repeat to make 13<br />
No Waste Flying Geese Finished (FG) – Finished 3" x 6"<br />
1. Using 1 Pink Dot 7 ¼” square and 4 Multi Polka Dots 3 7/8”sq. follow the directions below for No Waste Flying Geese.<br />
2. Mark the diagonal on the back of the 3 7/8” Multi Polka Dots squares.<br />
3. Place a Multi Polka Dot square on diagonally opposite corners of the 7 ¼” Pink Dot sq. so the diagonal<br />
marks on the smaller squares line up.<br />
MARCUS FABRICS • 980 Avenue of the Americas, New York, NY 10018 • www.MarcusFabrics.com
SPINTASTIC<br />
Fabric <strong>by</strong> Laura Berringer<br />
Quilt <strong>by</strong> <strong>Glenda</strong> <strong>Spencer</strong> — OPEN CALL Quilt Design Contest Winner, Spring 2012<br />
PAGE 3 of 3<br />
4. Sew a ¼” on each side of the line and cut apart.<br />
5. Press away from the Pink Dot piece.<br />
6. Place a Multi Polka Dot square on one of the pieces you just made so the diagonal mark goes from the corner of<br />
the Pink Dot piece to the point between the two Multi Polka Dot pieces.<br />
7. Sew a ¼” on each side of the line and cut apart<br />
8. Press away from the Pink Dot piece.<br />
This makes 4 Flying Geese units. Repeat with each 7 ¼” sq. to make 52 Flying Geese. Square to 3 ½” x 6 ½”.<br />
Half-Square Triangles (HST) – Finished 3"<br />
1. Mark the diagonal on the 3 7/8” Multi Polka Dot sq.<br />
2. Place right sides together with the 3 7/8” Butterfly sq.<br />
3. Sew ¼” on each side on the line and cut apart.<br />
4. Square to 3 ½” and press. Make 52<br />
Block Assembly<br />
To assemble the block, make 3 rows using the illustration as a guide:<br />
1 — HST/FG/HST<br />
2 — FG /4-P/FG<br />
3 — HST/FG/HST<br />
Quilt Assembly<br />
To set the top together make the following rows using<br />
the illustration as a guide:<br />
Row 1 & 5 - Side Setting Triangle/ sashing/block/<br />
sashing/ Side Setting Triangle.<br />
Add the 14 ½” sashing and a Corner Triangle to the top.<br />
Row 2 & 4 - Side Setting Triangle/ sashing/block/<br />
sashing/block/sashing /block/sashing / Side Setting<br />
Triangle<br />
Add a 40 ½” sashing strip to the short side of this row.<br />
Row 3 - Corner Triangle/ sashing/block/sashing/block/<br />
sashing /block/sashing /block/sashing / block/sashing /<br />
Corner Triangle.<br />
Add a 66 ½” sashing strip to each side of this row.<br />
Row 1<br />
14 ½”<br />
40 ½”<br />
66 ½”<br />
Attach the rows together making sure that the sashing<br />
strips match from row to row.<br />
Should measure 55 ¼” square.<br />
Join the 55 ¼” sashing strips to the sides and the 57 ¼”<br />
strips to the top & bottom.<br />
Row 2<br />
66 ½”<br />
40 ½”<br />
Final Border & finishing<br />
Join the Large Floral 6 ½” x 57 ¼” strips to the sides<br />
and the 6 ½” x 69 ¾” strips to the top & bottom.<br />
Quilt, bind and enjoy!<br />
Row 3<br />
Row 4<br />
Row 5<br />
14 ½”<br />
MARCUS FABRICS • 980 Avenue of the Americas, New York, NY 10018 • www.MarcusFabrics.com