
You also want an ePaper? Increase the reach of your titles
YUMPU automatically turns print PDFs into web optimized ePapers that Google loves.
System preparation (continued)<br />
Caution:<br />
● Be very careful to prevent the sound bar from falling when<br />
mounting on the wall.<br />
● Before mounting, check the wall strength. (Do not put<br />
on the veneer plaster or whitewashed wall. The sound<br />
bar may fall.) If unsure, consult a qualified service<br />
technician.<br />
● Mounting screws are not supplied. Use appropriate<br />
ones.<br />
● Check all wall mount angle screws for looseness.<br />
● Select a good location. If not, accidents may occur or<br />
the sound bar may get damaged.<br />
● SHARP is not responsible for accidents resulting<br />
from improper installation.<br />
● Do not let children dangle on the sound bar once it is<br />
attached on the wall as it can cause damage and injury.<br />
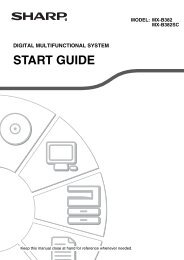
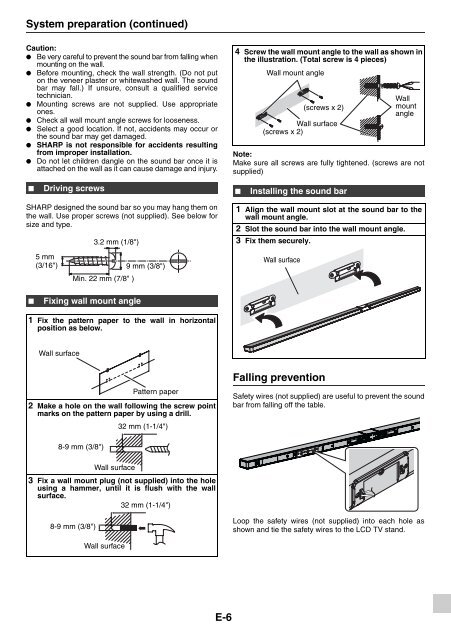
■ Driving screws<br />
SHARP designed the sound bar so you may hang them on<br />
the wall. Use proper screws (not supplied). See below for<br />
size and type.<br />
5 mm<br />
(3/16")<br />
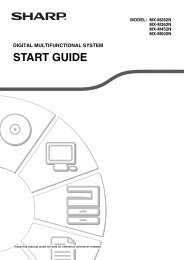
■ Fixing wall mount angle<br />
1 Fix the pattern paper to the wall in horizontal<br />
position as below.<br />
Wall surface<br />
3.2 mm (1/8")<br />
9 mm (3/8")<br />
Min. 22 mm (7/8" )<br />
2 Make a hole on the wall following the screw point<br />
marks on the pattern paper by using a drill.<br />
8-9 mm (3/8")<br />
Pattern paper<br />
Wall surface<br />
3 Fix a wall mount plug (not supplied) into the hole<br />
using a hammer, until it is flush with the wall<br />
surface.<br />
32 mm (1-1/4")<br />
8-9 mm (3/8")<br />
Wall surface<br />
32 mm (1-1/4")<br />
E-6<br />
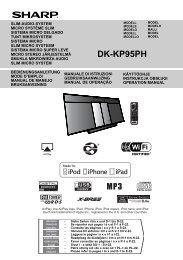
4 Screw the wall mount angle to the wall as shown in<br />
the illustration. (Total screw is 4 pieces)<br />
Wall mount angle<br />
Wall surface<br />
(screws x 2)<br />
Note:<br />
Make sure all screws are fully tightened. (screws are not<br />
supplied)<br />
■ Installing the sound bar<br />
1 Align the wall mount slot at the sound bar to the<br />
wall mount angle.<br />
2 Slot the sound bar into the wall mount angle.<br />
3 Fix them securely.<br />
Wall surface<br />
(screws x 2)<br />
Falling prevention<br />
Wall<br />
mount<br />
angle<br />
Safety wires (not supplied) are useful to prevent the sound<br />
bar from falling off the table.<br />
Loop the safety wires (not supplied) into each hole as<br />
shown and tie the safety wires to the LCD TV stand.