Kelty Pavilion Pitching Instructions
Kelty Pavilion Pitching Instructions
Kelty Pavilion Pitching Instructions

Create successful ePaper yourself
Turn your PDF publications into a flip-book with our unique Google optimized e-Paper software.
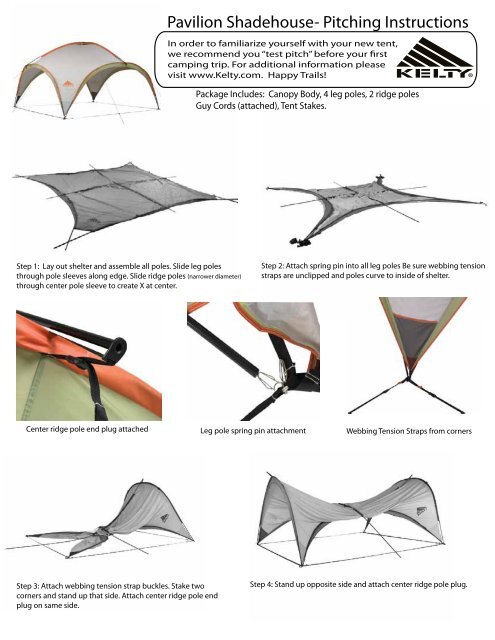
<strong>Pavilion</strong> Shadehouse- <strong>Pitching</strong> <strong>Instructions</strong><br />
In order to familiarize yourself with your new tent,<br />
we recommend you “test pitch” before your first<br />
camping trip. For additional information please<br />
visit www.<strong>Kelty</strong>.com. Happy Trails!<br />
Package Includes: Canopy Body, 4 leg poles, 2 ridge poles<br />
Guy Cords (attached), Tent Stakes.<br />
Step 1: Lay out shelter and assemble all poles. Slide leg poles<br />
through pole sleeves along edge. Slide ridge poles (narrower diameter)<br />
through center pole sleeve to create X at center.<br />
Step 2: Attach spring pin into all leg poles Be sure webbing tension<br />
straps are unclipped and poles curve to inside of shelter.<br />
Center ridge pole end plug attached Leg pole spring pin attachment Webbing Tension Straps from corners<br />
Step 3: Attach webbing tension strap buckles. Stake two<br />
corners and stand up that side. Attach center ridge pole end<br />
plug on same side.<br />
Step 4: Stand up opposite side and attach center ridge pole plug.
<strong>Pavilion</strong> Shadehouse- <strong>Pitching</strong> <strong>Instructions</strong> Pg 2<br />
In order to familiarize yourself with your new tent,<br />
we recommend you “test pitch” before your first<br />
camping trip. For additional information please<br />
visit www.<strong>Kelty</strong>.com. Happy Trails!<br />
Package Includes: Canopy Body, 4 leg poles, 2 ridge poles<br />
Guy Cords (attached), Tent Stakes.<br />
Step 5: Stand up third side and attach center ridge pole plug.<br />
Step 6: With help lift the center of <strong>Pavilion</strong> from inside so top<br />
dome is formed. Stand up final side and attach center ridge<br />
pole plug. Add stakes to remaining corners.<br />
Step 7: Remove 8 guy line cords from pockets on<br />
leg pole sleeve. Stake down each guy line for stability.