Instruction W161-eng - Ventus
Instruction W161-eng - Ventus
Instruction W161-eng - Ventus

Create successful ePaper yourself
Turn your PDF publications into a flip-book with our unique Google optimized e-Paper software.
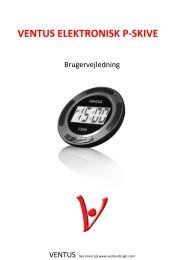
<strong>W161</strong> VENTUS WIRELESS WEATHER STATION WITH FM RADIO Owner’s Manual<br />
Thank you for purchasing the new generation color weather station. Designed and <strong>eng</strong>ineered with<br />
the state-of-art technology and components, this instrument will provide accurate and reliable<br />
measurement of barometric pressure, weather forecast, in/ out humidity, temperature, heat index,<br />
dew point as well as moon phase and radio-controlled clock. Read this manual carefully to fully<br />
explore the features and functions of the new product.<br />
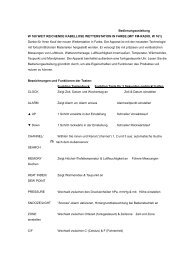
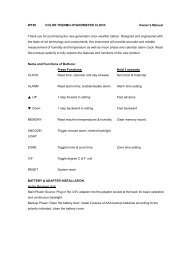
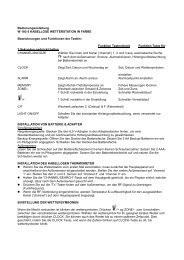
Name and Functions of Buttons:<br />
Press Functions<br />
Hold 3 seconds<br />
CLOCK Read time, calendar and day-of-week Set Clock & Calendar<br />
ALARM Read alarm time; enable/disable alarm Alarm time setting<br />
▲ UP 1 step forward in setting Fast advance<br />
▼ Down 1 step backward in setting Fast backward<br />
CHANNEL/ Select indoor, Channel 1,2,3, auto scroll Search for remote sensor<br />
SEARCH<br />
MEMORY Read max/min temperatures & humidity Clear memory record<br />
HEAT INDEX/<br />
DEW POINT<br />
Read Heat Index & Dew Point<br />
PRESSURE Toggle pressure unit hPa, inHg & mb Altitude setting<br />
SNOOZE/LIGHT<br />
Trigger snooze alarm & extend backlight<br />
ZONE Toggle RC time & Zone time Zone time setting<br />
C/F<br />
Toggle degree C & F unit<br />
Search for Radio-Controlled time<br />
RESET<br />
System reset
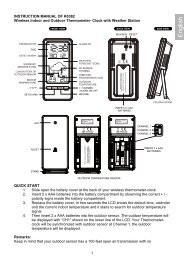
BATTERY & ADAPTER INSTALLATION<br />
Home Receiver Unit:<br />
Main Power Source: Plug in the 6.0V adapter into the adapter socket at the back for basic operation<br />
and continuous backlight.<br />
Backup Power: Lift off the battery cover, install 3 pieces of AA backup batteries according to the<br />
polarity indicated, close the battery cover.<br />
Remote Sensor:<br />
Loosen the screws on the battery door with a small screwdriver, insert 2 pieces of AAA batteries<br />
according to the polarity indicated. Replace the cover and tighten the screws.<br />
ALTITUDE SETTING<br />
After battery installation, the main unit will enter altitude setting mode directly. Press “▲” or “▼” to<br />
select the unit in meter or feet. Press “PRESSURE” to confirm. Then press “▲” or “▼” to enter your<br />
current altitude. Press “PRESSURE” to confirm and exit the setting. This allows the unit to provide a<br />
more accurate weather forecast reading. (For more information, see “WEATHER FORECAST &<br />
BAROMETRIC PRESSURE” section)<br />
SETTING UP THE WIRELESS THERMO-HYGROMETER:<br />
For the first installation, always turn on the home unit and then the remote sensor. Set Channel 1<br />
for the first remote sensor. Set channel 2 and channel 3 for the 2 nd and 3 rd sensor.<br />
Press and hold CHANNEL/SEARCH button on main unit until a beep is sound to search for<br />
remote sensor.<br />
Press the Tx button on the back of remote sensor to transmit RF signal.<br />
When RF connection is established, the respective temperature & humidity of the selected<br />
channel will appear on the main unit.<br />
RADIO-CONTROLLED CLOCK<br />
The unit will start synchronizing the clock after battery/adapter installation or reset. In normal mode,<br />
press “ “ in the battery compartment to enforce searching of radio-controlled clock signal. The<br />
antenna icon will appear during synchronization, if the icon disappear afterwards, radio time signal is<br />
not available at the moment. Try other locations later. Place the unit away from source of<br />
interference such as mobile phones, appliances, TV etc.<br />
Antenna icon with full signal str<strong>eng</strong>th<br />
will appear on screen if the reception of radio-controlled<br />
time is successful. The radio-controlled clock will have a daily synchronization at 02:03 and 03:03<br />
everyday. Each reception cycle is minimum 2.5 minutes and maximum 10 minutes.
WEATHER FORECAST & BAROMETRIC PRESSURE<br />
The unit predicts weather condition of the next 12 – 24 hours based on the change of atmospheric<br />
pressure. The coverage area is around 30 – 50 km. The weather forecast is based on atmospheric<br />
pressure change and is about 70-75% correct. As weather conditions cannot be 100% correctly<br />
forecasted, we cannot be responsible for any loss caused by an incorrect forecast.<br />
SUNNY PARTLY CLOUDY CLOUDY RAINY STORMY<br />
To obtain an accurate weather forecast & barometric pressure reading, you need to input your current<br />
altitude. After the reset of the unit, it will enter the altitude setting mode. Press “▲” or “▼” to set the<br />
unit first, and then press “PRESSURE” and enter your current altitude. Press “PRESSURE” to confirm<br />
and exit the setting. You can also hold “PRESSURE” button to enter altitude setting mode during<br />
normal use.<br />
Press PRESSURE button to select pressure unit between hPa, inHg & mb.<br />
IN/OUT TEMPERATURE & HUMIDITY<br />
Temperature reading is located on the lower left of the display and humidity is on the lower right.<br />
Press “C/F“ button to select temperature unit C/ F.<br />
Press CHANNEL/SEARCH button to select indoor, Ch1, Ch2, Ch3 and auto-channel scrolling<br />
display modes.<br />
IN/OUT HEAT INDEX<br />
Heat Index combines the effects of heat and humidity. It is the apparent temperature of how hot the<br />
heat-humidity combination makes it feels.<br />
Press “Heat Index/Dew Point” button once to show the respective indoor or outdoor heat index on the<br />
lower left display. “HEAT INDEX” icon will appear.
IN/OUT HEAT INDEX ALERT INDICATOR<br />
Heat index alert indicators of the respective indoor or outdoor channels<br />
Caution<br />
Exercise more fatiguing than usual<br />
Extreme caution Heat cramps, exhaustion possible<br />
Danger<br />
Heat exhaustion likely<br />
Extreme danger Heat stroke imminent<br />
IN/OUT DEW POINT<br />
Dew point is the saturation point of the air, or the temperature to which the air has to be cooled in<br />
order to get condensation.<br />
In normal mode, press HEAT INDEX / DEW POINT button twice to show the respective indoor or<br />
outdoor dew point reading on the lower left display. “DEW POINT” icon will appear.<br />
IN/OUT COMFORT LEVEL<br />
In/Out Comfort indicator combines the effect of temperature & humidity and displays in 3 levels:<br />
COMF: Comfortable level, ideal range for both temperature & humidity<br />
WET: Contain excess moisture<br />
DRY: Contain inadequate moisture<br />
COLOR BAR GRAPHS<br />
The color graphs are designed as an intuitive way to gauge the weather at a glance.<br />
The left color bar graph represents the respective In/Out temperature, heat index or dew point of the<br />
current display mode. The right graph represents the respective In/Out humidity. As the<br />
measurements change, the number of illuminated bars changes automatically.<br />
MAXIMUM / MINIMUM MEMORY<br />
Press MEMORY button repeatedly to view the maximum & minimum values of temperature, humidity,<br />
heat index or dew point readings. To clear the memory record, hold MEMORY button while the<br />
respective values are displaying on screen.<br />
TEMPERATURE & HUMIDITY TREND INDICATOR<br />
The icons will indicate Rising, Steady, Falling if the temperature or humidity change is more than 1<br />
degree C (or 2 degree F) within an hour.<br />
CLOCK & CALENDAR<br />
Press “CLOCK” to toggle display between time, calendar and day of the week.<br />
Hold “CLOCK “ button to enter clock setting mode. Using “▲”or “▼“ to adjust and “CLOCK” to confirm,
the following values can be set in sequence:<br />
12/24hr format > Hr > Min > Yr > D/M or M/D format > Month > Date > EXIT<br />
MOON PHASE<br />
Moon phase is displayed according to the current calendar.<br />
HOME TIME, WORLD (ZONE) TIME<br />
Hold “ZONE” to enter world (zone) time setting mode. Press “▲“or “▼“ to enter the desired hour<br />
offset value from –12 to +12 hours. Press “ZONE” to confirm each setting.<br />
Press “ZONE“ button to toggle between home (radio-controlled) time and world (zone) time. “ZONE”<br />
icon appears when world (zone) time is selected. When zone time is not used, set zone time to “0”.<br />
ALARM SETTING<br />
Press “ALARM” to show alarm time and “AL.” icon will appear. Press again to enable or disable the<br />
alarm. Bell icon “<br />
” appears when alarm is enabled.<br />
Hold “ALARM” to enter alarm time setting mode. Press “▲”or “ ▼” to enter the desired Hr/ Min values<br />
and press “ALARM“ to confirm setting.<br />
SNOOZE & BACKLIGHT<br />
When alarm is going off, press SNOOZE/ LIGHT to trigger snooze alarm and “Zz” icon will appear. To<br />
stop alarm for one day, press “ALARM” key. Press SNOOZE/LIGHT for an extended backlight if<br />
adapter is not connected.<br />
FM-RADIO<br />
Press the “Scan” button to search for the radio stations.<br />
Press the “Reset” button to return to the starting point of the search for the radio stations.<br />
LOW BATTERY INDICATION<br />
Low battery indication is available for the home unit itself and all of the 3 remote channels. Replace<br />
the batteries and follow the setup procedure in this instruction manual.<br />
BATTERY DISPOSAL<br />
Replace only with the same or equivalent type recommended by the manufacturer.<br />
Please disposal of old, defective batteries in an environmentally friendly manner in accordance with<br />
the relevant legislation.
SPECIFICATIONS<br />
Indoor Temperature: 0 C to + 50 C (+32 F to +122 F)<br />
In/Out Humidity : 20% - 99% RH<br />
Remote sensor : -20 C to +60 C (-4 F to +140 F)<br />
Channel : max. 3 remote sensors<br />
Transmission : up to 75M (246 ft.) in open area, RF434 MHz<br />
Resolution : 0.1 degree C for temperature, 1% for humidity<br />
Clock : DCF77 Radio-Controlled, Quartz back-up<br />
Power : 6.0V adapter & AA x 3 pcs for main unit<br />
AAA x 2 pcs for remote sensor