

EFIS-D100 Installation Guide - Dynon Avionics
EFIS-D100 Installation Guide - Dynon Avionics
EFIS-D100 Installation Guide - Dynon Avionics

You also want an ePaper? Increase the reach of your titles
YUMPU automatically turns print PDFs into web optimized ePapers that Google loves.
Instrument <strong>Installation</strong><br />
Panel Location and Mounting<br />
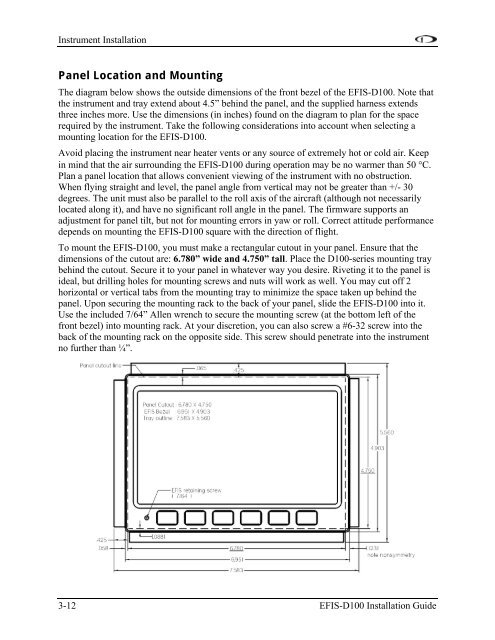
The diagram below shows the outside dimensions of the front bezel of the <strong>EFIS</strong>-<strong>D100</strong>. Note that<br />
the instrument and tray extend about 4.5” behind the panel, and the supplied harness extends<br />
three inches more. Use the dimensions (in inches) found on the diagram to plan for the space<br />
required by the instrument. Take the following considerations into account when selecting a<br />
mounting location for the <strong>EFIS</strong>-<strong>D100</strong>.<br />
Avoid placing the instrument near heater vents or any source of extremely hot or cold air. Keep<br />
in mind that the air surrounding the <strong>EFIS</strong>-<strong>D100</strong> during operation may be no warmer than 50 C.<br />
Plan a panel location that allows convenient viewing of the instrument with no obstruction.<br />
When flying straight and level, the panel angle from vertical may not be greater than +/- 30<br />
degrees. The unit must also be parallel to the roll axis of the aircraft (although not necessarily<br />
located along it), and have no significant roll angle in the panel. The firmware supports an<br />
adjustment for panel tilt, but not for mounting errors in yaw or roll. Correct attitude performance<br />
depends on mounting the <strong>EFIS</strong>-<strong>D100</strong> square with the direction of flight.<br />
To mount the <strong>EFIS</strong>-<strong>D100</strong>, you must make a rectangular cutout in your panel. Ensure that the<br />
dimensions of the cutout are: 6.780” wide and 4.750” tall. Place the <strong>D100</strong>-series mounting tray<br />
behind the cutout. Secure it to your panel in whatever way you desire. Riveting it to the panel is<br />
ideal, but drilling holes for mounting screws and nuts will work as well. You may cut off 2<br />
horizontal or vertical tabs from the mounting tray to minimize the space taken up behind the<br />
panel. Upon securing the mounting rack to the back of your panel, slide the <strong>EFIS</strong>-<strong>D100</strong> into it.<br />
Use the included 7/64” Allen wrench to secure the mounting screw (at the bottom left of the<br />
front bezel) into mounting rack. At your discretion, you can also screw a #6-32 screw into the<br />
back of the mounting rack on the opposite side. This screw should penetrate into the instrument<br />
no further than ¼”.<br />
3-12 <strong>EFIS</strong>-<strong>D100</strong> <strong>Installation</strong> <strong>Guide</strong>


