montage-anleitung - WimTec
montage-anleitung - WimTec
montage-anleitung - WimTec

You also want an ePaper? Increase the reach of your titles
YUMPU automatically turns print PDFs into web optimized ePapers that Google loves.
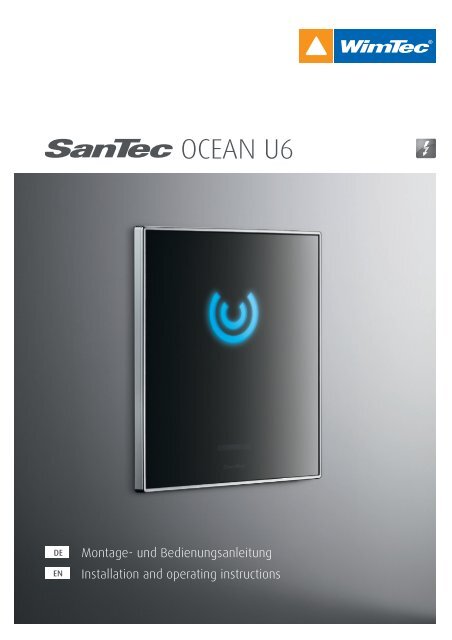
OCEAN U6<br />
DE<br />
EN<br />
Montage- und Bedienungs<strong>anleitung</strong><br />
Installation and operating instructions
DE<br />
OCEAN U6<br />
Allgemeine Hinweise<br />
Gratulation zum Kauf Ihrer Urinalsteuerung SanTec OCEAN.<br />
Damit Sie lange Jahre Freude mit dieser hochwertigen Armatur<br />
haben, empfehlen wir Ihnen folgende Punkte bei der Reinigung<br />
und Pflege zu beachten:<br />
milde, seifenhaltige Reinigungsmittel verwenden<br />
keine kratzenden, scheuernden oder säurehaltigen<br />
Reinigungs- oder Desinfektionsmittel verwenden<br />
keine versiegelnden oder glasveredelnden Reinigungsmittel<br />
(Nano-Effekt, Lotus-Effekt) verwenden<br />
nur mit weichem Schwamm oder Tuch behandeln<br />
keine Reinigung mit Dampfstrahlgeräten<br />
In Verbindung mit Nässe kann es durch Kalkablagerungen im<br />
Bereich von Brausen und Badewannen zu einer Beeinträchtigung<br />
der Touch-Tronic-Funktion kommen. Um dies vorbeugend zu<br />
vermeiden, empfehlen wir ein regelmäßiges Reinigen der<br />
Glasoberfläche mit einem Kraftreiniger.<br />
Diese Anleitung ist gültig für folgende Produkte:<br />
SanTec OCEAN U6 230 V<br />
Glas Weiß Art.Nr. 112 368<br />
Glas Schwarz Art.Nr. 114 577<br />
Lieferumfang:<br />
Glasfrontplatte mit Rahmen, Montagerahmen mit integrierter<br />
Elektronik und Trafo, Magnetventil und Befestigungsmaterial.<br />
!<br />
Es gelten die „Allgemeinen<br />
Installationsbedingungen“<br />
unter www.wimtec.com.<br />
Wichtige Installationshinweise:<br />
Die Montage und Installation darf nur durch einen konzessionierten<br />
Fachbetrieb, gemäß DIN 1988, ÖVE/ÖNORM E8001<br />
sowie VDE 0100 Teil 701 erfolgen.<br />
Die Netzzuleitung ist über einen 2-poligen Hauptschalter mit<br />
mindestens 3 mm Kontaktöffnung zu führen und mit maximal<br />
6 A abzusichern!<br />
Bei der Planung und Errichtung von Sanitäranlagen sind die<br />
entsprechenden örtlichen, nationalen und internationalen Normen<br />
und Vorschriften zu beachten!<br />
2 Urinalsteuerung SanTec OCEAN U6
OCEAN U6<br />
DE<br />
Technische Daten<br />
Betriebsspannung: 230 V / 50 Hz<br />
Leistungsaufnahme: ca. 3 VA<br />
Magnetventil: Kartusche 6 V<br />
Ansprechbereich: ca. 50 cm voreingestellt (30 - 70 cm einstellbar)<br />
Vorspülung: 1 s, wenn Urinal länger als 5 min nicht benutzt wurde<br />
Hauptspülung: 5 s voreingestellt (1 - 15 s einstellbar)<br />
Austrocknungsschutz: Automatische Spülung bei 24 h Nichtbenutzung<br />
Fließdruck:<br />
0,08 - 0,5 MPa (0,8 - 5 bar)<br />
Statischer Druck: max. 0,8 MPa (8 bar)<br />
Durchflussmenge: ca. 0,3 - ca. 0,7 l/s bei 0,3 MPa (3 bar) nach EN 12541 reduzierbar<br />
Wasserzulauf: R 1/2“ IG<br />
Wasserablauf: R 1/2“ AG<br />
Geräuschklasse: I<br />
Frontplatte: B/H/T: 120 x 152 x 14 mm<br />
Wandeinbaukasten: B/H/T: 128 x 122 x 85 mm<br />
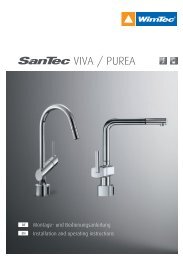
Einbaumaße<br />
Maße in cm<br />
10-19 min 100<br />
OK-FFB<br />
OK-RFB<br />
115 (Laufen Caprino)<br />
137 (Laufen Taro Nova)<br />
51,5<br />
Zulauf<br />
DN 15<br />
Ablauf<br />
DN 50<br />
Höhe Mitte Sensor<br />
100 (im Element<br />
ca. 100-120)<br />
ca. 50 aktiver Bereich<br />
65 (Erwachsene)<br />
0-25<br />
Urinalsteuerung SanTec OCEAN U6 3
DE<br />
OCEAN U6<br />
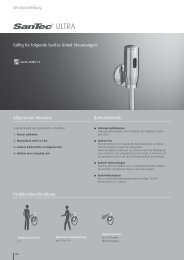
Montage<br />
1 2 3<br />
4<br />
5<br />
6<br />
7<br />
8 9<br />
10<br />
11<br />
!<br />
ACHTUNG!<br />
Folgende Schritte unbedingt<br />
in beschriebener<br />
Reihenfolge ausführen!<br />
4 Urinalsteuerung SanTec OCEAN U6
OCEAN U6<br />
DE<br />
Montage<br />
1. Vorspülung durchführen.<br />
2. Vorabsperrung schließen. Schmutzfilter einsetzen.<br />
3. Magnetventil mit Dichtungen einsetzen. Achtung! Flussrichtung bei MV beachten.<br />
Netzspannung abschalten.<br />
4. Magnetventil anstecken. Netztrafo einbauen und an Stromversorgung anstecken.<br />
5. Elektronikplatte an Trafo anschließen.<br />
6. Netzspannung wieder einschalten und Vorabsperrung öffnen.<br />
7. Montagerahmen mit 4 Schrauben (M 4 x 40 mm) befestigen.<br />
Dabei auf die Kabelverbindungen achten und die Kabel nicht quetschen.<br />
Beim Festziehen der Schrauben darauf achten, dass sich der Montagerahmen<br />
nicht verformt.<br />
Montagerahmen exakt ausrichten. Beigelegtes Spezialfett an der Dichtung auftragen.<br />
8. Gegebenenfalls Spülzeit und Reichweite einstellen (siehe Seite 6)<br />
9. Glasplatte schräg aufsetzen und mit Druck nach hinten in die waagrechte Position drehen.<br />
10. Glasplatte mit Sicherungsschraube unten links fixieren und unten rechts befestigen.<br />
11. SanTec OCEAN U6 ist nun betriebsbereit.<br />
Spülmengen-Übersicht<br />
Spülmenge in l<br />
Fließdruck<br />
2,0 3,0 4,0<br />
1 bar 5,5 s 7,0 s 10,0 s<br />
2 bar 4,5 s 5,5 s 7,5 s<br />
3 bar 3,0 s 4,5 s 6,0 s<br />
4 bar 2,5 s 4,0 s 5,5 s<br />
5 bar 2,5 s 4,0 s 5,0 s<br />
Urinalsteuerung SanTec OCEAN U6 5
ON<br />
OFF<br />
1 2 3 4 5 6<br />
DE<br />
OCEAN U6<br />
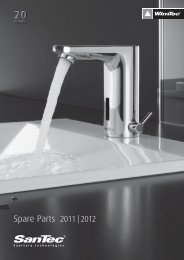
Einstellungen<br />
Die Steuerung verfügt über mehrere, am Dip-Schalter einstellbare Funktionen. Regler ermöglichen das<br />
stufenlose Einstellen verschiedener Werte. Nach Abnehmen der Glasfrontplatte sind diese Einstellelemente<br />
zugänglich:<br />
A: Regler<br />
1 2 3<br />
B: Dip-Schalter<br />
ON<br />
OFF<br />
1 2 3 4 5 6<br />
A - Einstellregler:<br />
1.<br />
Reichweitenregler<br />
50 cm voreingestellt<br />
30 - 70 cm einstellbar<br />
2.<br />
Spülzeitregler<br />
5 s voreingestellt<br />
1 - 10 s einstellbar<br />
3.<br />
Intervall für Austrocknungsschutz<br />
24 h voreingestellt<br />
3 - 48 h einstellbar<br />
1. Reichweitenregler:<br />
Dient zum Justieren der Reichweite des Infrarot-Sensors.<br />
2. Spülzeitregler:<br />
Dient zum Einstellen der Spülzeit der Urinalsteuerung.<br />
3. Intervall für Austrocknungsschutz:<br />
Zum Einstellen des Zeitintervalls für den Austrocknungsschutz.<br />
Wird das Urinal für die voreingestellte Zeit nicht benutzt, löst die Urinalsteuerung selbstständig<br />
eine Spülung für die am Spülzeitregler (2) eingestellte Spülzeit aus.<br />
6 Urinalsteuerung SanTec OCEAN U6
OCEAN U6<br />
DE<br />
Einstellungen<br />
B - Dip-Schalter:<br />
Dip-Schalter ON OFF<br />
1 Austrocknungsschutz aktiviert Austrocknungsschutz deaktiviert<br />
2 Vorspülung aktiviert Vorspülung deaktiviert<br />
3 Vorspülung immer Vorspülung nach 5 min Nichtbenützung<br />
4 Stadion-Modus aktiviert Stadion-Modus deaktiviert<br />
5 Dauerspülfunktion aktiviert Dauerspülfunktion deaktiviert<br />
6 --- ---<br />
Mit (<br />
) gekennzeichnete Funktionen sind werksseitig voreingestellt.<br />
Stadion-Modus:<br />
Bei mehr als 3 Benützungen innerhalb 1 ½ min geht die Steuerung in den Stadion Modus: pro<br />
Minute wird nur eine Spülung ausgelöst.<br />
Funktion<br />
Mindestverweilzeit:<br />
4 s<br />
Intelligente Vorspülung:<br />
1 s, wenn Urinal länger als<br />
5 min nicht benutzt<br />
Einstellbare<br />
Hauptspülung:<br />
von 1 bis 10 s<br />
Austrocknungsschutz:<br />
bei 24 Stunden<br />
Nichtbenutzung<br />
Ersatzteile siehe Seite 14/15<br />
Urinalsteuerung SanTec OCEAN U6 7
EN<br />
OCEAN U6<br />
General notes<br />
Congratulations on purchasing your urinal control SanTec<br />
OCEAN.<br />
In order to ensure that you will be able to enjoy this high-quality<br />
product for many years, please take note of the following cleaning<br />
and maintenance recommendations:<br />
Use mild cleaning agents containing soap<br />
Do not use abrasive, scrubbing, nano sealing or acidic<br />
cleaning agents or disinfectants<br />
Clean the fitting with a soft sponge or cloth only<br />
Do not use steam cleaners<br />
Lime deposits on the glass front panel combined with wetness can<br />
impair the touch-tronic function. To ensure proper operation,<br />
we recommend regular cleaning of the glass panel using a<br />
power cleaner.<br />
These instructions are valid for the following products:<br />
SanTec OCEAN U6 230 V<br />
Glass white Art.No. 112 368<br />
Glass black Art.No. 114 577<br />
Scope of supply:<br />
Glass front plate with frame, mounting frame with integrated<br />
electronics and transformer, magnetic valve and fixing material.<br />
Important installation hints:<br />
Mounting and installation must be performed by licensed<br />
craftsmen to DIN 1988, OVE/ONOERM E8001 as well as VDE<br />
0100 part 701.<br />
!<br />
The “General installation<br />
terms and conditions”<br />
provided at<br />
www.wimtec.com apply.<br />
Make the feeder by a 2-pin main switch with minimum 3 mm<br />
connection opening and protect with maximum 6A! When<br />
planning and installing sanitary systems, the relevant local,<br />
national and international standards and regulations must be<br />
complied with!<br />
8 Urinal control SanTec OCEAN U6
OCEAN U6<br />
EN<br />
Technical specifications:<br />
Operating voltage: 230 V / 50 Hz<br />
Power consumption: approx. 3 VA<br />
Magnetic valve: cartridge 6 V<br />
Active range: Set to 50 cm by default (configurable from 30 - 70 cm)<br />
Pre-flushing: 1 s, if urinal is not used for more than 5 min<br />
Main flushing: set to 5 s by default (configurable from 1 - 15 s)<br />
Dry-out protection: automatic flushing when not in use for 24 h<br />
Flow rate: 0,08 - 0,5 MPa (0,8 - 5 bar)<br />
Static pressure: max. 0,8 MPa (8 bar)<br />
Flow rate: 0.3 - 0.7 l/s at 0.3 MPa (3 bar) acc. to EN 12541, reducible<br />
Water inlet: R 1/2“ IG<br />
Water outlet: R 1/2“ OT<br />
Noise class: I<br />
Front plate: W/H/D: 120 x 152 x 14 mm<br />
Wall mounted box: W/H/D: 128 x 122 x 85 mm<br />
Installation dimensions<br />
Dimensions in cm<br />
10-19 min 100<br />
115 (Laufen Caprino)<br />
137 (Laufen Taro Nova)<br />
51,5<br />
Zulauf<br />
DN 15<br />
Ablauf<br />
DN 50<br />
height middle sensor<br />
100 (in element<br />
approx. 100-120)<br />
Approx. 50<br />
active range<br />
65 (adults)<br />
OK-FFB<br />
OK-RFB<br />
0-25<br />
Urinal control SanTec OCEAN U6 9
EN<br />
OCEAN U6<br />
Installation<br />
1 2 3<br />
4<br />
5<br />
6<br />
7<br />
8 9<br />
10<br />
11<br />
!<br />
ATTENTION!<br />
Following steps must be<br />
done in order as described<br />
necessarily!<br />
10 Urinal control SanTec OCEAN U6
OCEAN U6<br />
EN<br />
Installation<br />
1. Make pre-flush<br />
2. Close shut-off valve. Insert dirt filter.<br />
3. Insert magnetic valve with seal. Attention! Follow flow direction of magnetic valve.<br />
Switch off power supply.<br />
4. Connect magnetic valve. Install transformer and connect to power supply.<br />
5. Connect electronic plate to transformer.<br />
6. Switch on power supply again and open shut-off valve.<br />
7. Fix mounting frame with 4 screws (M 4 x 40 mm). Thereby pay attention to cable connection<br />
and don´t crush the cables. Mind at fixing the screws that the mounting frame will not<br />
deform. Bring mounting frame into line exactly. Apply encloses special grease on sealing.<br />
8. Adjust flushing time and active range if necessary (see page 12)<br />
9. Attach glass front plate slant and swivel under pressure in level position.<br />
10. Lock glass front plate by protect screw at the left bottom and fix at the right bottom.<br />
11. SanTec OCEAN U6 is ready for operation.<br />
Diagram - Flushing quantity<br />
Flush volume in liters<br />
Flow pressure<br />
2,0 3,0 4,0<br />
1 bar 5,5 s 7,0 s 10,0 s<br />
2 bar 4,5 s 5,5 s 7,5 s<br />
3 bar 3,0 s 4,5 s 6,0 s<br />
4 bar 2,5 s 4,0 s 5,5 s<br />
5 bar 2,5 s 4,0 s 5,0 s<br />
Urinal control SanTec OCEAN U6 11
ON<br />
OFF<br />
1 2 3 4 5 6<br />
EN<br />
OCEAN U6<br />
Adjustments<br />
The armature has more, at the DIP-switch adjustable functions. Controllers allow a stepless adjustment<br />
of different datas. After taking off the glass front plate these adjustment elements are accessible:<br />
A: controler<br />
1 2 3<br />
B: Dip-switch<br />
ON<br />
OFF<br />
1 2 3 4 5 6<br />
A – Adjustable controller:<br />
1.<br />
Active range controller<br />
50 cm pre-adjusted<br />
30 – 70 cm adjustable<br />
2.<br />
Flushing time controller<br />
5 s pre-adjusted<br />
10 – 10 s adjustable<br />
3.<br />
Interval for dry out protection<br />
48 h pre-adjusted<br />
3 – 48 h adjustable<br />
1. Active range controller:<br />
Conduce to justify the active range of the infrared sensor.<br />
2. Flushing time controller<br />
Conduce to adjust the flushing time of urinal control.<br />
3. Interval for dry out protection<br />
For adjusting the time interval for the dry out protection.<br />
If the urinal is not used for the adjusted time the urinal releases a flushing for the on flushing<br />
stop controller adjusted (2) time by itself.<br />
12 Urinal control SanTec OCEAN U6
OCEAN U6<br />
EN<br />
Adjustments<br />
B - DIP switch:<br />
Dip-switch ON OFF<br />
1 Dry out protection activated Dry out protection deactivated<br />
2 Pre-flushing activated Pre-flushing deactivated<br />
3 Pre-flushing always Pre-flushing after 5 min non-use<br />
4 Stadium mode activated Stadium mode deactivated<br />
5 Continuous flow activated Continuous flow deactivated<br />
6 --- ---<br />
With ( ) marked functions are pre-adjusted factory-made<br />
Stadium mode:<br />
At more than 3 uses within 1 1/2 min the control switches into stadium mode: only one<br />
flushing per minute will be released.<br />
Function<br />
Minimum stay time:<br />
4 s<br />
Intelligent pre-flushing:<br />
1 s, if urinal was not used for<br />
longer than 5 min<br />
Adjustable main<br />
flushing<br />
from 1 – 10 s<br />
Dry out protection:<br />
at 24 h non-use<br />
Urinal control SanTec OCEAN U6 13
DE/EN<br />
OCEAN U6<br />
Ersatzteile / Spare parts<br />
200 027<br />
221 381<br />
221 398<br />
107 074<br />
231 205<br />
221 312<br />
222 074<br />
221 053<br />
Nr., no.:<br />
200 027<br />
221 381<br />
221 398<br />
107 074<br />
231 205<br />
221 312<br />
222 074<br />
221 053<br />
Bezeichnung, Description<br />
Wandeinbaukasten, Wall recess mounted box<br />
Absperrventil, Shut-off valve<br />
Sanitäroberteil 3/8” für Absperrventil, Sanitary upper part 3/8” for shut-off valve<br />
Filter, Filter<br />
Magnetventil 6 V, Magnetic valve 6 V<br />
Magnetventil-Adapter, Magnetic valve adapter<br />
Dichtung, Sealing<br />
Anschluss verschraubung R 1/2“ AG, Connecting screw R 1/2” outside thread<br />
14 Urinal control SanTec OCEAN U6
ON<br />
O F<br />
ON<br />
O F<br />
OCEAN U6<br />
DE/EN<br />
Ersatzteile / Spare parts<br />
112 924<br />
1 2 3 4 5 6<br />
112 917<br />
112 900<br />
112 894<br />
115 666<br />
112 931<br />
230 611<br />
Nr., no.:<br />
112 924<br />
Bezeichnung, Description<br />
Montagerahmen mit Elektronikmodul, Mounting frame with electronic module<br />
112 900<br />
115 666<br />
Glas-Frontplatte weiß, Glass-front plate white<br />
Glas-Frontplatte schwarz, Glass-front plate black<br />
1 2 3 4 5 6<br />
112 931<br />
230 611<br />
Netzteil, Power supply<br />
Netzstecker, Power plug<br />
Urinal control SanTec OCEAN U6 15
WIMTEC Elektronische Steuerungs- u. Meßgeräte GmbH<br />
p: A - 3325 Ferschnitz, Freidegg 50, AUSTRIA<br />
t: +43 (0) 7473 5000 f: +43 (0) 7473 5000 - 500<br />
m: verkauf@wimtec.com i: www.wimtec.com<br />
Auflage: 29 07 2013 Art.Nr. 1001230