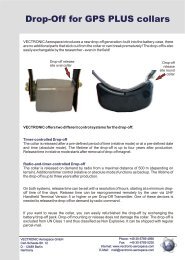
Drop-Off Release Transmitter - Vectronic Aerospace GmbH
Drop-Off Release Transmitter - Vectronic Aerospace GmbH
Drop-Off Release Transmitter - Vectronic Aerospace GmbH

Create successful ePaper yourself
Turn your PDF publications into a flip-book with our unique Google optimized e-Paper software.
Project:<br />
<strong>Drop</strong>-<strong>Off</strong> <strong>Release</strong><br />
<strong>Transmitter</strong><br />
Title:<br />
User's Manual<br />
Document No.: <strong>Drop</strong>-off User’s Manual<br />
Version: 1.3<br />
Last Change: 31.03.2011
Doc. No.: <strong>Release</strong> <strong>Transmitter</strong> User Manual<br />
Date: 31.03.2011<br />
VECTRONIC <strong>Aerospace</strong><br />
Name Date Signature<br />
Prepared by<br />
Annette Krop-<br />
Benesch<br />
23.12.2010<br />
Edited by<br />
Annette Krop-<br />
Benesch<br />
31.03.2011<br />
Checked by<br />
Approved by<br />
Authorised<br />
by<br />
This design is the property of VECTRONIC <strong>Aerospace</strong> <strong>GmbH</strong>. Unauthorized duplication or distribution to a third party is prohibited.<br />
VECTRONIC <strong>Aerospace</strong> 2 /20 Manual_<strong>Drop</strong><strong>Off</strong>-<strong>Transmitter</strong>.docx.doc
Doc. No.: <strong>Release</strong> <strong>Transmitter</strong> User Manual<br />
Date: 31.03.2011<br />
VECTRONIC <strong>Aerospace</strong><br />
DOCUMENT CHANGE RECORD<br />
Issue Date Item(s) Affected Description<br />
1 23.12.2010 - Initial Issue<br />
2 01.02.2011 Installation Automatic installation of program and driver<br />
3 31.03.2011 Battery Charger Addition LCD Battery Charger<br />
This design is the property of VECTRONIC <strong>Aerospace</strong> <strong>GmbH</strong>. Unauthorized duplication or distribution to a third party is prohibited.<br />
VECTRONIC <strong>Aerospace</strong> 3 /20 Manual_<strong>Drop</strong><strong>Off</strong>-<strong>Transmitter</strong>.docx.doc
Doc. No.: <strong>Release</strong> <strong>Transmitter</strong> User Manual<br />
Date: 31.03.2011<br />
VECTRONIC <strong>Aerospace</strong><br />
Table of Contents<br />
1 Product Overview ............................................................................................................... 5<br />
2 The <strong>Release</strong> <strong>Transmitter</strong> ..................................................................................................... 6<br />
3 Quick guide to the keyboard ............................................................................................... 7<br />
4 Quick guide to the <strong>Release</strong> <strong>Transmitter</strong> .............................................................................. 8<br />
5 Charging batteries and inserting them into the transmitter ................................................. 8<br />
6 Connecting the <strong>Transmitter</strong> to the PC ............................................................................... 10<br />
7 <strong>Drop</strong>-off list ...................................................................................................................... 11<br />
8 Configuring drop-offs or upload new firmware ................................................................ 11<br />
9 Releasing a radio drop-off................................................................................................. 11<br />
10 The information menu ................................................................................................... 12<br />
11 The UHF ID-tag receiver .............................................................................................. 12<br />
12 Operating instructions for Sanyo AA/AAA USB Charger ........................................... 13<br />
13 Operating instructions for VARTA LCD Charger 57070 ............................................. 14<br />
14 Manual installation of the <strong>Release</strong> <strong>Transmitter</strong> driver .................................................. 16<br />
This design is the property of VECTRONIC <strong>Aerospace</strong> <strong>GmbH</strong>. Unauthorized duplication or distribution to a third party is prohibited.<br />
VECTRONIC <strong>Aerospace</strong> 4 /20 Manual_<strong>Drop</strong><strong>Off</strong>-<strong>Transmitter</strong>.docx.doc
Doc. No.: <strong>Release</strong> <strong>Transmitter</strong> User Manual<br />
Date: 31.03.2011<br />
VECTRONIC <strong>Aerospace</strong><br />
1 Product Overview<br />
The <strong>Drop</strong>-off <strong>Release</strong> <strong>Transmitter</strong> enables you to communicate with VECTRONIC drop-offs<br />
and receive UHF ID-tag numbers. Its functions are:<br />
<br />
<br />
<br />
while the release transmitter is connected to the PC via USB cable, it transfers drop-off<br />
telemetry data to the computer and sends release times and firmware to the drop-off.<br />
Communication is managed with the GPS PLUS <strong>Drop</strong>-<strong>Off</strong> Manager software<br />
radio-and-timer-controlled drop-off can be released on demand within a range of 500 m<br />
by sending the release command from the transmitter<br />
the release transmitter is able to receive the IDs of VECTRONIC UHF-tags used for the<br />
proximity sensor.<br />
This design is the property of VECTRONIC <strong>Aerospace</strong> <strong>GmbH</strong>. Unauthorized duplication or distribution to a third party is prohibited.<br />
VECTRONIC <strong>Aerospace</strong> 5 /20 Manual_<strong>Drop</strong><strong>Off</strong>-<strong>Transmitter</strong>.docx.doc
Doc. No.: <strong>Release</strong> <strong>Transmitter</strong> User Manual<br />
Date: 31.03.2011<br />
VECTRONIC <strong>Aerospace</strong><br />
2 The <strong>Release</strong> <strong>Transmitter</strong><br />
The release transmitter is switched on with the button. It<br />
will switch off automatically 30 seconds after the last button has<br />
been pressed.<br />
The release transmitter can be connected to a PC for<br />
configuration with an USB cable. The display will then show<br />
USB PC . The keys will not respond while the transmitter is<br />
attached to a PC via USB. After 30 seconds, the backlight of the<br />
display will be switched off; after 5 minutes, the transmitter will<br />
be switched off. It can be switched on again by pressing the<br />
button.<br />
Figure 1: Left: <strong>Release</strong> <strong>Transmitter</strong>, right: waterproof USB-connector with rubber cover as protection<br />
against dirt.<br />
Note: Never use the transmitter without an attached antenna! Otherwise you may<br />
severely damage the transmitter.<br />
Note: In the field, make sure the USB port is always protected by the rubber cover to avoid<br />
dirt entering the port.<br />
This design is the property of VECTRONIC <strong>Aerospace</strong> <strong>GmbH</strong>. Unauthorized duplication or distribution to a third party is prohibited.<br />
VECTRONIC <strong>Aerospace</strong> 6 /20 Manual_<strong>Drop</strong><strong>Off</strong>-<strong>Transmitter</strong>.docx.doc
Doc. No.: <strong>Release</strong> <strong>Transmitter</strong> User Manual<br />
Date: 31.03.2011<br />
VECTRONIC <strong>Aerospace</strong><br />
3 Quick guide to the keyboard<br />
The keyboard is designed to give you easy access to the features of the transmitter. The keys<br />
will not respond if the transmitter is attached to a PC via USB.<br />
Press briefly to switch on the transmitter. The transmitter will automatically give<br />
a list of all registered drop-offs. Press this button at any point in the menus to<br />
reset the transmitter and return to the drop-off list.<br />
Allows you to move up in the drop-off list or the menus<br />
Allows you to move down in the drop-off list or the menus<br />
Triggers the release of a radio drop-off<br />
Opens the transmitter information menu showing battery voltage, hardware<br />
version, software version, and serial number of handheld<br />
Activates the UHF ID-tag receiver<br />
Exits the menu or ID receiver and cancels the fire command<br />
Confirms the fire command<br />
This design is the property of VECTRONIC <strong>Aerospace</strong> <strong>GmbH</strong>. Unauthorized duplication or distribution to a third party is prohibited.<br />
VECTRONIC <strong>Aerospace</strong> 7 /20 Manual_<strong>Drop</strong><strong>Off</strong>-<strong>Transmitter</strong>.docx.doc
Doc. No.: <strong>Release</strong> <strong>Transmitter</strong> User Manual<br />
Date: 31.03.2011<br />
VECTRONIC <strong>Aerospace</strong><br />
4 Quick guide to the <strong>Release</strong> <strong>Transmitter</strong><br />
1. Charge the Eneloop batteries with the Sanyo USB battery charger and insert them<br />
into the transmitter (s. section 5)<br />
2. Connect the <strong>Release</strong> <strong>Transmitter</strong> to the PC via USB cable (s. section 0)<br />
3. Start the GPS PLUS <strong>Drop</strong>-<strong>Off</strong> Manager; it will automatically recognise the <strong>Release</strong><br />
<strong>Transmitter</strong>.<br />
4. Register the drop-offs on the transmitter. To do this, the drop-off first must be<br />
registered in the GPS PLUS <strong>Drop</strong>-<strong>Off</strong> Manager version you are using (refer to GPS PLUS<br />
<strong>Drop</strong>-<strong>Off</strong> Manager manual). Then you can register the drop-off on the transmitter.<br />
5. You are now able to communicate with the drop-off and release it on demand if it is a<br />
radio drop-off.<br />
6. To release a radio-drop off, refer to section 9.<br />
5 Charging batteries and inserting them into the transmitter<br />
Before you are able to use the <strong>Release</strong> <strong>Transmitter</strong>, the included Eneloop batteries need to<br />
be charged. For this, use the included Sanyo USB battery charger only (for further details see<br />
Sanyo manual page 18). You can charge two batteries at the same time. Recharging time is<br />
approximately 5 hours. Raise the adjuster and insert the batteries into the charger. Then<br />
connect the charger’s USB plug to a USB port at your PC.<br />
Note: Make sure that no other equipment is connected to any other USB port or the required<br />
power might be exceeded. Charging might be stopped, the computer might be damaged, or<br />
data might be lost.<br />
While recharging, the LED charge indicator is flashing. When charging has been completed,<br />
the LED remains lit. Remove the USB connector from the USB port, then remove the<br />
batteries from the charger. They will be hot immediately after recharging. Repeat the process<br />
with the second pair of batteries. For storage, lower the adjuster.<br />
Note: Do not use the charger for any other batteries than Eneloop.<br />
Open the transmitter by unscrewing the two screws on the back (see Figure 2, red arrows). Be<br />
careful not to damage the waterproof seal (see Figure 2, grey arrows). Carefully insert the<br />
batteries with the correct polarity (for details refer to picture in battery compartment and<br />
Figure 2).<br />
This design is the property of VECTRONIC <strong>Aerospace</strong> <strong>GmbH</strong>. Unauthorized duplication or distribution to a third party is prohibited.<br />
VECTRONIC <strong>Aerospace</strong> 8 /20 Manual_<strong>Drop</strong><strong>Off</strong>-<strong>Transmitter</strong>.docx.doc
Doc. No.: <strong>Release</strong> <strong>Transmitter</strong> User Manual<br />
Date: 31.03.2011<br />
VECTRONIC <strong>Aerospace</strong><br />
To remove batteries from the compartment, knock the transmitter against your hand and thus<br />
loosen the batteries. Do not insert objects (e.g. screw drivers) into the compartment to force<br />
the batteries out.<br />
Figure 2: Back of <strong>Release</strong> <strong>Transmitter</strong>; red arrows indicate the screws for opening the battery hatch, grey<br />
arrow indicates the waterproof seal. Make sure the batteries are inserted with the correct polarity.<br />
Battery voltage of the release transmitter must not fall under 4.0 Volt. At 4.05 Volt, the<br />
display will warn LowBat.<br />
for a few seconds and switch off the backlight. At a lower<br />
voltage, the transmitter cannot be switched on anymore. Please recharge batteries with the<br />
associated Sanyo battery charger only.<br />
The rechargeable Eneloop batteries delivered with the transmitter do discharge very slowly.<br />
We advise not to exchange them for other batteries, since these might lose voltage during<br />
storage and might not be able to provide enough power to release the collar on demand.<br />
However, if in urgent cases you need to exchange the batteries, and you do not have an<br />
additional set of Eneloop batteries, you can use High Power Alkaline batteries (Do not<br />
recharge these! Danger of explosion!), NiCd rechargeable batteries, or NiMH rechargeable<br />
batteries with current rating > 1A.<br />
This design is the property of VECTRONIC <strong>Aerospace</strong> <strong>GmbH</strong>. Unauthorized duplication or distribution to a third party is prohibited.<br />
VECTRONIC <strong>Aerospace</strong> 9 /20 Manual_<strong>Drop</strong><strong>Off</strong>-<strong>Transmitter</strong>.docx.doc
Doc. No.: <strong>Release</strong> <strong>Transmitter</strong> User Manual<br />
Date: 31.03.2011<br />
VECTRONIC <strong>Aerospace</strong><br />
6 Connecting the <strong>Transmitter</strong> to the PC<br />
Easily connect the transmitter to a PC via USB cable. The transmitter is switched on<br />
automatically and the display will show<br />
USB PC . Thirty seconds after the last<br />
communication between PC and transmitter took place, the display backlight will be switched<br />
off. After 5 minutes, the transmitter is switched off. It can be switched on again by pressing<br />
the<br />
button.<br />
If the transmitter is connected via USB, it is supplied exclusively by the USB port; the output<br />
power is limited to 2 mW.<br />
The <strong>Release</strong> <strong>Transmitter</strong> is operated with the GPS PLUS <strong>Drop</strong>-<strong>Off</strong> Manager. If a transmitter is<br />
connected to the PC, it will be displayed in the upper left section of the program (“Devices”).<br />
Figure 3: Opening window of the GPS Plus <strong>Drop</strong> <strong>Off</strong> Manager with release transmitter connected to PC<br />
For using the software, please refer to the GPS PLUS <strong>Drop</strong>-<strong>Off</strong> Manager manual. You need to<br />
connect the transmitter to a PC for the following tasks:<br />
<br />
<br />
to register a drop-off on the transmitter; this is necessary to enable communication<br />
with this drop-off<br />
to change configuration of a drop-off<br />
This design is the property of VECTRONIC <strong>Aerospace</strong> <strong>GmbH</strong>. Unauthorized duplication or distribution to a third party is prohibited.<br />
VECTRONIC <strong>Aerospace</strong> 10 /20 Manual_<strong>Drop</strong><strong>Off</strong>-<strong>Transmitter</strong>.docx.doc
Doc. No.: <strong>Release</strong> <strong>Transmitter</strong> User Manual<br />
Date: 31.03.2011<br />
VECTRONIC <strong>Aerospace</strong><br />
<br />
to upload new firmware to the drop-off<br />
If you use the transmitter as interface between PC and drop-off, the drop-off needs to be<br />
within a few meters of the transmitter and you must be able to detach and attach the magnet to<br />
the drop-off.<br />
7 <strong>Drop</strong>-off list<br />
If you switch on the transmitter, it will automatically give a list of all drop-offs registered on<br />
the transmitter. The drop-off with the lowest number will be displayed first. Move upwards<br />
and downwards this list with the Up and Down buttons.<br />
8 Configuring drop-offs or upload new firmware<br />
To configure a drop off, this is to change the release settings or to upload new firmware, you<br />
need to connected the transmitter to the PC and start the GPS PLUS <strong>Drop</strong>-<strong>Off</strong> Manager. For<br />
details please refer to the GPS PLUS <strong>Drop</strong>-<strong>Off</strong> Manager manual.<br />
9 Releasing a radio drop-off<br />
The main feature of the release transmitter is to release a radio-and-timer-controlled drop-off<br />
on demand. The maximum range for this is 500 m. If possible, release the drop-off while you<br />
can see the animal.<br />
Note: Prior to preparing the drop-off release make sure the transmitter battery’s voltage is<br />
higher than 4.05 Volt. Otherwise there might not be enough power to reach the drop-off.<br />
Ideally, the battery voltage would be close to 5.0 Volt.<br />
Note: It is possible that the animal is startled when the collar is released and drops down.<br />
Avoid triggering the drop-off if the animal is in a situation where it could get hurt by erratic<br />
movements (e.g. on a cliff edge).<br />
To release a drop-off, switch on the transmitter. Scroll the drop-off list until you have found<br />
the ID of the drop-off you want to release. Press the<br />
button 5 seconds until Fire is<br />
shown in the display. This is the last opportunity to abort the release. Press Exit/Cancel to<br />
abort. Press Enter/OK within 5 seconds to transmit the release command to the drop-off,<br />
otherwise the display will return to the ID list. If you press Enter/OK , the display will switch<br />
to Transm. … . The transmitter now sends the signal to the drop-off for 33 seconds. The only<br />
chance to abort the command in this stage is to press the<br />
button, but it is possible that the<br />
This design is the property of VECTRONIC <strong>Aerospace</strong> <strong>GmbH</strong>. Unauthorized duplication or distribution to a third party is prohibited.<br />
VECTRONIC <strong>Aerospace</strong> 11 /20 Manual_<strong>Drop</strong><strong>Off</strong>-<strong>Transmitter</strong>.docx.doc
Doc. No.: <strong>Release</strong> <strong>Transmitter</strong> User Manual<br />
Date: 31.03.2011<br />
VECTRONIC <strong>Aerospace</strong><br />
drop-off has already received the command and releases anyway. After the command has<br />
reached the drop-off, it takes about 25 seconds to completely release the collar.<br />
Note: There will be no confirmation from the drop-off if the signal was received and the dropoff<br />
triggered. If you are not sure whether the collar has been released, you can resend the<br />
release command.<br />
10 The information menu<br />
With F1 , you can enter the information menu of the transmitter. If you press F1 , the<br />
display will show Battery . Press Enter/OK to view the current battery voltage. Press<br />
Exit/Cancel to return to the menu. With the Up and Down buttons, you can scroll<br />
between the topics:<br />
Battery<br />
Hardware<br />
Software<br />
SerialNo<br />
Voltage of the transmitter battery<br />
Version of the transmitter hardware<br />
Version of the transmitter’s software<br />
Serial Number of the transmitter<br />
While the battery voltage is necessary for you to know to ensure enough power for the dropoff<br />
release, the other three topics are only of interest for diagnostics if there are problems with<br />
the transmitter.<br />
11 The UHF ID-tag receiver<br />
The <strong>Release</strong> <strong>Transmitter</strong> can be used to check if VECTRONIC UHF ID-tags are in range. To<br />
do this, press F2 . The display will switch to ID-Rec. . Press Enter/OK to start searching for<br />
UHF-tags. The display will switch to ID. . While the transmitter is listening for UHFtags,<br />
the dot will blink, even if no UHF-tag has been detected yet. The ID numbers of the<br />
received tags will be shown in the display, e.g. ID.65534 . If more than one UHF-tag is in<br />
range, the ID numbers will be shown alternately. Press Exit/Cancel to leave the IDreception.<br />
This design is the property of VECTRONIC <strong>Aerospace</strong> <strong>GmbH</strong>. Unauthorized duplication or distribution to a third party is prohibited.<br />
VECTRONIC <strong>Aerospace</strong> 12 /20 Manual_<strong>Drop</strong><strong>Off</strong>-<strong>Transmitter</strong>.docx.doc
Doc. No.: <strong>Release</strong> <strong>Transmitter</strong> User Manual<br />
Date: 31.03.2011<br />
VECTRONIC <strong>Aerospace</strong><br />
12 Operating instructions for Sanyo AA/AAA USB Charger<br />
This design is the property of VECTRONIC <strong>Aerospace</strong> <strong>GmbH</strong>. Unauthorized duplication or distribution to a third party is prohibited.<br />
VECTRONIC <strong>Aerospace</strong> 13 /20 Manual_<strong>Drop</strong><strong>Off</strong>-<strong>Transmitter</strong>.docx.doc
Doc. No.: <strong>Release</strong> <strong>Transmitter</strong> User Manual<br />
Date: 31.03.2011<br />
VECTRONIC <strong>Aerospace</strong><br />
13 Operating instructions for VARTA LCD Charger 57070<br />
➊ Connect the charger with one of the three possible power<br />
sources:<br />
a) AC 100-240V by power adaptor<br />
b) DC 12V by car cord<br />
c) DC 5V (500mA) by USB cord<br />
➋ Power on but no batteries in the charger: VARTA logo as<br />
power indicator.<br />
➌ Insert either 2 or 4 AA or AAA rechargeable batteries into<br />
the battery compartment. The batteries must be loaded in<br />
pairs and should therefore have similar charge status. A mix<br />
of AA and AAA batteries is possible. Make sure that the<br />
batteries are inserted according to the correct polarity and<br />
that each battery is touching both contacts.<br />
➍ The actual charging level is indicated by up to three bars per<br />
battery symbol. It will only take 10 seconds to do this power<br />
check. The result will be displayed on the blue LCD.<br />
➎ After starting the charging, a new bar fixes its position at the<br />
filling of a further 1/3 capacity. Indication works as follows<br />
a) rolling bar(s) = charging<br />
b) all three bars fixed = charging finished<br />
c) empty battery symbol = no charge (error)<br />
➏ The charging time is about 120mins (2 AA cells), 240mins (4<br />
AA cells) and 150mins (2 or 4 AAA cells) and depends on<br />
the initial capacity and charging conditions.<br />
➐ Charging time with USB-In function is around 5 hours for 2<br />
and around 10 hours for 4 batteries.<br />
➑ The automatic charging control function prevents the<br />
batteries from being overcharged. The battery performance is<br />
maintained by trickle charge.<br />
This battery charger is designed for use anywhere in the world<br />
(100-240V, 50-60Hz). If necessary, you may however need an<br />
adapter for the respective country.<br />
This design is the property of VECTRONIC <strong>Aerospace</strong> <strong>GmbH</strong>. Unauthorized duplication or distribution to a third party is prohibited.<br />
VECTRONIC <strong>Aerospace</strong> 14 /20 Manual_<strong>Drop</strong><strong>Off</strong>-<strong>Transmitter</strong>.docx.doc
Doc. No.: <strong>Release</strong> <strong>Transmitter</strong> User Manual<br />
Date: 31.03.2011<br />
VECTRONIC <strong>Aerospace</strong><br />
Safety<br />
This battery charger is intended for use only with rechargeable batteries. Charging other types<br />
of batteries (alkaline, RAM, zinc-carbon) may cause the cells to burst and in the worst case<br />
result in injuries. The charger is equipped with a safety timer control, a delta V cut-off<br />
function and a temperature control function. Do not attempt to recharge any corroded,<br />
damaged or leaking batteries.<br />
Protect our environment<br />
Further information on battery disposal is available at www.varta-consumer.com.<br />
This design is the property of VECTRONIC <strong>Aerospace</strong> <strong>GmbH</strong>. Unauthorized duplication or distribution to a third party is prohibited.<br />
VECTRONIC <strong>Aerospace</strong> 15 /20 Manual_<strong>Drop</strong><strong>Off</strong>-<strong>Transmitter</strong>.docx.doc
Doc. No.: <strong>Release</strong> <strong>Transmitter</strong> User Manual<br />
Date: 31.03.2011<br />
VECTRONIC <strong>Aerospace</strong><br />
14 Manual installation of the <strong>Release</strong> <strong>Transmitter</strong> driver<br />
In some cases, the driver for the release transmitter will not be installed automatically. If this<br />
is the case, follow these steps for Windows XP:<br />
1. Insert the VECTRONIC CD into your PC.<br />
2. Connect the <strong>Release</strong> transmitter to your PC via an USB cable. Your PC will automatically<br />
try to install the device and the Found New Hardware Wizard will open:<br />
3. Select “No, not this time” and click on “Next”.<br />
This design is the property of VECTRONIC <strong>Aerospace</strong> <strong>GmbH</strong>. Unauthorized duplication or distribution to a third party is prohibited.<br />
VECTRONIC <strong>Aerospace</strong> 16 /20 Manual_<strong>Drop</strong><strong>Off</strong>-<strong>Transmitter</strong>.docx.doc
Doc. No.: <strong>Release</strong> <strong>Transmitter</strong> User Manual<br />
Date: 31.03.2011<br />
VECTRONIC <strong>Aerospace</strong><br />
4. Select “Install from a list or specific location”<br />
This design is the property of VECTRONIC <strong>Aerospace</strong> <strong>GmbH</strong>. Unauthorized duplication or distribution to a third party is prohibited.<br />
VECTRONIC <strong>Aerospace</strong> 17 /20 Manual_<strong>Drop</strong><strong>Off</strong>-<strong>Transmitter</strong>.docx.doc
Doc. No.: <strong>Release</strong> <strong>Transmitter</strong> User Manual<br />
Date: 31.03.2011<br />
VECTRONIC <strong>Aerospace</strong><br />
5. Select “Search removeable media”. Go to the VECTRONIC CD and select the folder<br />
“<strong>Drop</strong> <strong>Off</strong> Manager \ USB Driver for <strong>Release</strong> <strong>Transmitter</strong>”.<br />
6. Select continue anyway. The driver will now be installed. After the driver has been<br />
installed successfully, switch on the release transmitter by pressing the button. You<br />
can now use the release transmitter.<br />
Follow these steps for Windows Vista / 7:<br />
1. Insert the VECTRONIC CD into your PC.<br />
2. Connect the <strong>Release</strong> transmitter to your PC via an USB cable. Your PC will<br />
automatically try to install the device.<br />
3. A warning will appear reporting that the device was not installed correctly. Open the<br />
Device Manager: Go to “Start” “Control Panel” “Hardware and Sound” <br />
“Devices and Printers: Device Manager”.<br />
This design is the property of VECTRONIC <strong>Aerospace</strong> <strong>GmbH</strong>. Unauthorized duplication or distribution to a third party is prohibited.<br />
VECTRONIC <strong>Aerospace</strong> 18 /20 Manual_<strong>Drop</strong><strong>Off</strong>-<strong>Transmitter</strong>.docx.doc
Doc. No.: <strong>Release</strong> <strong>Transmitter</strong> User Manual<br />
Date: 31.03.2011<br />
VECTRONIC <strong>Aerospace</strong><br />
4. Open the node “Other Devices” and double-click on GPS Plus <strong>Release</strong> <strong>Transmitter</strong>.<br />
5. Click on “Update Driver”.<br />
6. Select “Browse my computer for driver software”.<br />
This design is the property of VECTRONIC <strong>Aerospace</strong> <strong>GmbH</strong>. Unauthorized duplication or distribution to a third party is prohibited.<br />
VECTRONIC <strong>Aerospace</strong> 19 /20 Manual_<strong>Drop</strong><strong>Off</strong>-<strong>Transmitter</strong>.docx.doc
Doc. No.: <strong>Release</strong> <strong>Transmitter</strong> User Manual<br />
Date: 31.03.2011<br />
VECTRONIC <strong>Aerospace</strong><br />
7. Browse on the VECTRONIC CD for the folder “<strong>Drop</strong> <strong>Off</strong> Manager \ USB Driver for<br />
<strong>Release</strong> <strong>Transmitter</strong>” and click “Next”.<br />
8. Windows will warn you that it cannot verify the publisher of this driver software.<br />
Click on “Install this driver software anyway”. Windows will now install the driver<br />
software.<br />
9. After the driver has been installed successfully, switch on the release transmitter by<br />
pressing the<br />
button. You can now use the release transmitter.<br />
This design is the property of VECTRONIC <strong>Aerospace</strong> <strong>GmbH</strong>. Unauthorized duplication or distribution to a third party is prohibited.<br />
VECTRONIC <strong>Aerospace</strong> 20 /20 Manual_<strong>Drop</strong><strong>Off</strong>-<strong>Transmitter</strong>.docx.doc