Controlled Impact Rescue Tool (CIRT) Operator's Manual - Raytheon
Controlled Impact Rescue Tool (CIRT) Operator's Manual - Raytheon
Controlled Impact Rescue Tool (CIRT) Operator's Manual - Raytheon
You also want an ePaper? Increase the reach of your titles
YUMPU automatically turns print PDFs into web optimized ePapers that Google loves.
MAINTENANCE PROCEDURES__________________________<br />
Required <strong>Tool</strong>s for Maintenance:<br />
• Spanner Wrench, 1/4” Pin, Adjustable • Hex Driver, Ball End, 1/4” with screw-<br />
from 2” to 4-3/4”<br />
holder tip<br />
• Hex Driver, Ball End, 3/16” • Hex Driver, Ball End, 5/32”<br />
• Wrench, 1-1/4”, Open Ended • Screw Driver, Flat Tip, ¼”<br />
• Dead-Blow Hammer • Screw Driver, Phillips Head, #2<br />
• Bearing Extraction <strong>Tool</strong> TD93DW84 • Metal Hammer<br />
• Pin Punch, 3/16” diameter<br />
Additional Items Required:<br />
• Remington “Rem Action” Cleaner • Thread Locking Compound, Medium<br />
• Remington “Rem Oil” Lubricant • Compressed air<br />
• Anti-seize compound<br />
<strong>CIRT</strong> Maintenance Procedures<br />
Before performing any maintenance<br />
operation open the Bolt and verify that the<br />
<strong>CIRT</strong> is not loaded. Using two people place<br />
the <strong>CIRT</strong> horizontally on a sturdy work<br />
surface. Ensure you are wearing appropriate<br />
personal protective equipment for the tools<br />
you are using.<br />
Section 1 – Foot<br />
Removal and Reinstallation<br />
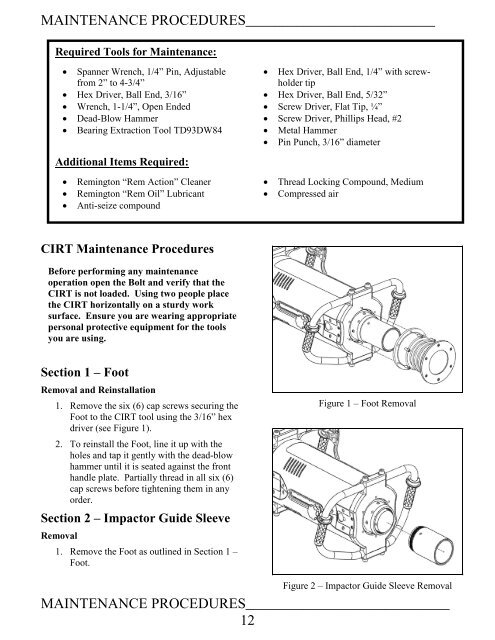
1. Remove the six (6) cap screws securing the<br />
Foot to the <strong>CIRT</strong> tool using the 3/16” hex<br />
driver (see Figure 1).<br />
2. To reinstall the Foot, line it up with the<br />
holes and tap it gently with the dead-blow<br />
hammer until it is seated against the front<br />
handle plate. Partially thread in all six (6)<br />
cap screws before tightening them in any<br />
order.<br />
Section 2 – <strong>Impact</strong>or Guide Sleeve<br />
Removal<br />
1. Remove the Foot as outlined in Section 1 –<br />
Foot.<br />
Figure 1 – Foot Removal<br />
Figure 2 – <strong>Impact</strong>or Guide Sleeve Removal<br />
MAINTENANCE PROCEDURES____________________________<br />
12


