INSTRUCTION HANDBOOK - Utax
INSTRUCTION HANDBOOK - Utax INSTRUCTION HANDBOOK - Utax
System Menu Checking Total Copy Count Check the total copy count from the operation panel. You can check the following values. • Number of copies for each color mode, number of prints, number of faxes, and total of all of these • Number of original pages scanned for copy mode, scanner mode, and fax send mode, and total of all of these You can also print this information as a counter report. Counter Report NOTE: Before printing reports, verify that either 11 × 8 1/2" or A4 paper is loaded into a cassette. 1 Press the System Menu/Counter key. 2 Press [Check the counter]. m Menu / Counter End Language Job Accounting Printer Default MP tray Setting BOX Management Check the counter Document Management Register Orig. Size Print Report User Adjustment 3 The counts are displayed on the touch panel. To print a counter report, press [Print Report]. To finish checking, press [Close]. The display is returned to the System Menu screen. 7-46
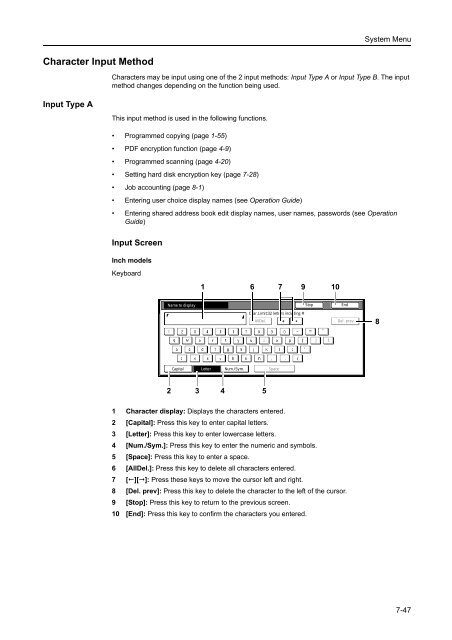
System Menu Character Input Method Input Type A Characters may be input using one of the 2 input methods: Input Type A or Input Type B. The input method changes depending on the function being used. This input method is used in the following functions. • Programmed copying (page 1-55) • PDF encryption function (page 4-9) • Programmed scanning (page 4-20) • Setting hard disk encryption key (page 7-28) • Job accounting (page 8-1) • Entering user choice display names (see Operation Guide) • Entering shared address book edit display names, user names, passwords (see Operation Guide) Input Screen Inch models Keyboard 1 6 7 9 10 Name to display Stop End Char.Limit:32 letters including # AllDel. Del. prev 8 Capital Letter Num./Sym. Space 2 3 4 5 1 Character display: Displays the characters entered. 2 [Capital]: Press this key to enter capital letters. 3 [Letter]: Press this key to enter lowercase letters. 4 [Num./Sym.]: Press this key to enter the numeric and symbols. 5 [Space]: Press this key to enter a space. 6 [AllDel.]: Press this key to delete all characters entered. 7 [][]: Press these keys to move the cursor left and right. 8 [Del. prev]: Press this key to delete the character to the left of the cursor. 9 [Stop]: Press this key to return to the previous screen. 10 [End]: Press this key to confirm the characters you entered. 7-47
- Page 244 and 245: Included Scanner Utilities About th
- Page 246 and 247: Included Scanner Utilities NOTE: Re
- Page 248 and 249: Included Scanner Utilities 2 To ver
- Page 250 and 251: System Menu Default Settings Defaul
- Page 252 and 253: System Menu Original Image Quality
- Page 254 and 255: System Menu 3 Select [APS] or [Defa
- Page 256 and 257: System Menu Setting Auto % Priority
- Page 258 and 259: System Menu 4 Press [Close] to save
- Page 260 and 261: System Menu 3 The current functions
- Page 262 and 263: System Menu 3 Use numeric keys to e
- Page 264 and 265: System Menu 3 Press [] or [] to sel
- Page 266 and 267: System Menu • Normal 1: From 60 g
- Page 268 and 269: System Menu Auto Detect Originals S
- Page 270 and 271: System Menu Selecting Output Destin
- Page 272 and 273: System Menu Silent Mode Configures
- Page 274 and 275: System Menu Activating Auto Sleep I
- Page 276 and 277: System Menu Setting Hard Disk Encry
- Page 278 and 279: System Menu Registering Non-standar
- Page 280 and 281: System Menu 2 Press [User Adjustmen
- Page 282 and 283: System Menu 5 Press [PRT Chart]. A
- Page 284 and 285: System Menu 6 Press [+] or [-] to e
- Page 286 and 287: System Menu Setting Document Manage
- Page 288 and 289: System Menu 1 Referring to Accessin
- Page 290 and 291: System Menu Hard Disk Management Ve
- Page 292 and 293: System Menu Toner Coverage Report T
- Page 296 and 297: System Menu Capital keyboard Name t
- Page 298 and 299: System Menu 3 Press [b], [c], [d] a
- Page 300 and 301: System Menu 7-52
- Page 302 and 303: Job Accounting Overview of Job Acco
- Page 304 and 305: Job Accounting Managing Accounts Yo
- Page 306 and 307: Job Accounting 2 Press [] or [] to
- Page 308 and 309: Job Accounting Restricting FAX Usag
- Page 310 and 311: Job Accounting Restricting Printer
- Page 312 and 313: Job Accounting 3 Select the departm
- Page 314 and 315: Job Accounting By function: copying
- Page 316 and 317: Job Accounting Activating and Deact
- Page 318 and 319: Job Accounting Printer Error Report
- Page 320 and 321: Job Accounting Fax Job Accounting A
- Page 322 and 323: Job Accounting Using Job Accounting
- Page 324 and 325: Job Accounting 8-24
- Page 326 and 327: Troubleshooting Solving Malfunction
- Page 328 and 329: Troubleshooting Symptom Checkpoints
- Page 330 and 331: Troubleshooting Responding to Error
- Page 332 and 333: Troubleshooting Display Checkpoints
- Page 334 and 335: Troubleshooting Display Checkpoints
- Page 336 and 337: Troubleshooting Display Checkpoints
- Page 338 and 339: Troubleshooting Memory Device Error
- Page 340 and 341: Troubleshooting Display Checkpoints
- Page 342 and 343: Troubleshooting Scanner Error Codes
System Menu<br />
Character Input Method<br />
Input Type A<br />
Characters may be input using one of the 2 input methods: Input Type A or Input Type B. The input<br />
method changes depending on the function being used.<br />
This input method is used in the following functions.<br />
• Programmed copying (page 1-55)<br />
• PDF encryption function (page 4-9)<br />
• Programmed scanning (page 4-20)<br />
• Setting hard disk encryption key (page 7-28)<br />
• Job accounting (page 8-1)<br />
• Entering user choice display names (see Operation Guide)<br />
• Entering shared address book edit display names, user names, passwords (see Operation<br />
Guide)<br />
Input Screen<br />
Inch models<br />
Keyboard<br />
1<br />
6 7 9 10<br />
Name to display<br />
Stop<br />
End<br />
Char.Limit:32 letters including #<br />
AllDel.<br />
Del. prev<br />
8<br />
Capital<br />
Letter Num./Sym. Space<br />
2 3 4 5<br />
1 Character display: Displays the characters entered.<br />
2 [Capital]: Press this key to enter capital letters.<br />
3 [Letter]: Press this key to enter lowercase letters.<br />
4 [Num./Sym.]: Press this key to enter the numeric and symbols.<br />
5 [Space]: Press this key to enter a space.<br />
6 [AllDel.]: Press this key to delete all characters entered.<br />
7 [][]: Press these keys to move the cursor left and right.<br />
8 [Del. prev]: Press this key to delete the character to the left of the cursor.<br />
9 [Stop]: Press this key to return to the previous screen.<br />
10 [End]: Press this key to confirm the characters you entered.<br />
7-47


