Installation Instructions - Quadratec
Installation Instructions - Quadratec
Installation Instructions - Quadratec

Create successful ePaper yourself
Turn your PDF publications into a flip-book with our unique Google optimized e-Paper software.
Vizualogic ® A-1250 & A-1150<br />
DVD Headrest “JK” Wrangler <strong>Installation</strong> <strong>Instructions</strong><br />
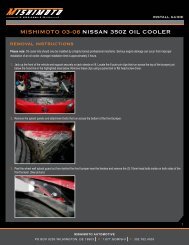
13. Gently pry off the plastic Fascia Panel that’s in front of<br />
the gear shifter and just below the lower bank of switches<br />
as shown. A thin straight slot screwdriver works well.<br />
Pry from the top corners only. (Figure 8)<br />
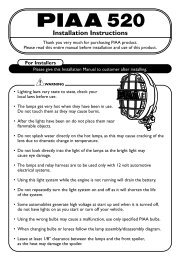
14. Remove the two center dashboard fasteners located<br />
directly behind the Fascia Panel using a 7mm or 9/32 Nut<br />
Driver. (Figure 9)<br />
15. Route the System Power Harness underneath the center<br />
console and towards dash.<br />
16. Disconnect the driver side Auxiliary Power Outlet<br />
plug and pull down passenger side power outlet.<br />
*But Do NOT Unplug.<br />
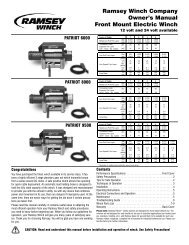
17. Route the power harness (the Red, Yellow and Black<br />
wires) from the control module and underneath the seat<br />
slider; through the center console and out the opening just<br />
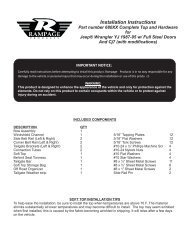
below the Auxiliary Power Outlets. Locate the three red<br />
wire harness taps for the next procedure. Note how wire<br />
taps are installed but do NOT attach wire taps at this<br />
time. (Figure 10 & 11)<br />
For additional copies of these instructions<br />
please visit our website<br />
for a downloadable PDF Version.<br />
18. Begin attaching wire tap connectors to the proper<br />
wires. There are 3 wires to connect.<br />
a. Attach a wire tap connector to the (RED with GREEN<br />
stripe) wire at the passenger side auxiliary power outlet<br />
and connect the YELLOW wire from the power harness as<br />
shown to the wire tap. (Figures 10 & 14)<br />
b. Attach a wire tap connector to the (BLACK with<br />
WHITE stripe) wire at the passenger side Auxiliary Power<br />
Outlet plug and connect the BLACK wire from the power<br />
harness to the wire tap as shown. (Figures 12 & 14)<br />
Page 4 www.quadratec.com<br />
Figure 8<br />
Gently Pry<br />
Figure 9<br />
Driver Side Aux<br />
Power Outlet<br />
Figure 10<br />
Figure 11<br />
Remove Bolts<br />
Wire Tap<br />
Crimp with Pliers<br />
Fascia Panel<br />
Passenger Side<br />
Aux Power Outlet<br />
Route Wires<br />
Through Dash