Installation Instructions - Quadratec
Installation Instructions - Quadratec
Installation Instructions - Quadratec

Create successful ePaper yourself
Turn your PDF publications into a flip-book with our unique Google optimized e-Paper software.
%<br />
Free Call!<br />
%800-745-5337<br />
800-745-5337<br />
Simple and Easy to Follow <strong>Installation</strong> Manual<br />
www.quadratec.com<br />
Essentials<br />
Expert Advice<br />
®
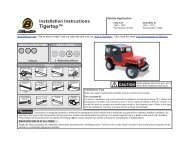
Vizualogic ® A-1250 & A-1150<br />
DVD Headrest<br />
“JK” Wrangler <strong>Installation</strong> <strong>Instructions</strong><br />
Note: Be sure to read this entire instruction sheet AND the Vizualogic instruction sheet before beginning your installation. This sheet<br />
outlines the installation of a Vizualogic brand DVD Headrest Kit into a 2007 or newer Jeep Wrangler. These instructions are intended<br />
to assist with the installation process and by no means replace the Vizualogic installation manual.<br />
Tools Required:<br />
•Torx ® T30 driver (for center console fasteners)<br />
• 7mm or 9/32 nut driver (for dash fascia panel fasteners)<br />
• Screwdriver – straight slot (to pry dash fascia panel snaps)<br />
• Pliers (to crimp wire taps)<br />
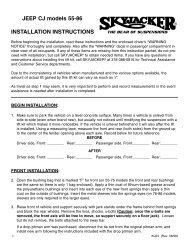
1. Recline both front seats to allow room to remove<br />
both front seat headrests. With the headrests erected,<br />
press both side releases buttons as shown. (Figure 1)<br />
2. We suggest that you save the removed front seat<br />
headrests. Do not discard.<br />
3. Disconnect the upholstery channels on both seats.<br />
This can be somewhat strenuous so proceed with care.<br />
(Figure 2)<br />
4. Carefully insert video monitor cables through headrest<br />
guide posts according to the manufacturer’s installation<br />
manual. Route the cables down the seat back and exit the<br />
cables next to the center console. Install the DVD Headrests<br />
into the guide posts in the high position and remove<br />
the slack in the cable. Not too tight here. Remember that<br />
headrest need to freely adjust up and down. (Figure 2A)<br />
5. Remove the four torx head fasteners (size T30) that secure<br />
the center console to the vehicle’s floor. There are two<br />
bolts at the rear of the center console (left and right) and<br />
two towards the front (left and right). Fastener removal allows<br />
the console to be lifted upwards a few inches to<br />
neatly tuck away the monitor cables and other system<br />
wiring inside the console’s shell. (Figure 3)<br />
Recline Seat<br />
Carefully Disconnect<br />
Upholstery Channels<br />
Upholstery Channels<br />
Hook Together Between<br />
Seat Back and Pad<br />
Press to Release<br />
Carefully Route Cables<br />
Through Headrest<br />
Guide Posts<br />
Remove All 4 T30<br />
Torx Head Bolts<br />
Page 2 www.quadratec.com<br />
Figure 1<br />
Figure 2<br />
Figure 2A<br />
Figure 3<br />
J J
Vizualogic ® A-1250 & A-1150<br />
DVD Headrest<br />
“JK” Wrangler <strong>Installation</strong> <strong>Instructions</strong><br />
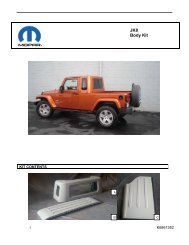
Figure 4<br />
Driver<br />
Side Cables<br />
Figure 5<br />
Hook Material<br />
Figure 6<br />
Figure 7<br />
A/V Control<br />
Module<br />
Seat Slider Rail<br />
Passenger<br />
Side Cables<br />
Audio/Video<br />
Module<br />
Loop Material<br />
Route Wires Below Seat Slider Rail<br />
For additional copies of these instructions please<br />
visit our website for a downloadable PDF Version.<br />
6. Route the Driver and Passenger side monitor cables as<br />
shown. Use two cable zip ties to neatly bundle each set of<br />
DVD cables where the cables exit the seat back and meet<br />
the center console. Route the four monitor cables underneath<br />
the center console and exit the four cables at the<br />
middle of the passenger side seat slider as shown.<br />
(Figure 4)<br />
7. Reconnect the upholstery channels on both front seats.<br />
8. Adhere the rough “hook” side of the “hook and loop”<br />
fastener material onto the floor carpet and under the front<br />
passenger seat as shown. (Figure 5)<br />
9. Adhere the softer furry “loop” side of the “hook and<br />
loop” fastener material onto Audio/Video Module as<br />
shown. (Figure 6)<br />
10. Attach the FM Transmitter Antenna to the A/V Control<br />
Module and route underneath the seat slider and<br />
under the center console. Extend the FM Transmitter Antenna<br />
towards the radio and underneath the center console.<br />
11. Connect the monitor wires to the A/V Control Module<br />
according to the Vizualogic installation manual. Again,<br />
route all wires below the seat slider rails.<br />
12. Connect the System Power Harness to the A/V Module<br />
according to the Vizualogic installation manual. Once<br />
again, route all wires below the seat slider rails. Use several<br />
zip ties to neatly bundle the wires. Attach the A/V<br />
Module underneath the front passenger seat with the<br />
hook and loop fastener material. (Figure 7)<br />
Page 3 www.quadratec.com
Vizualogic ® A-1250 & A-1150<br />
DVD Headrest “JK” Wrangler <strong>Installation</strong> <strong>Instructions</strong><br />
13. Gently pry off the plastic Fascia Panel that’s in front of<br />
the gear shifter and just below the lower bank of switches<br />
as shown. A thin straight slot screwdriver works well.<br />
Pry from the top corners only. (Figure 8)<br />
14. Remove the two center dashboard fasteners located<br />
directly behind the Fascia Panel using a 7mm or 9/32 Nut<br />
Driver. (Figure 9)<br />
15. Route the System Power Harness underneath the center<br />
console and towards dash.<br />
16. Disconnect the driver side Auxiliary Power Outlet<br />
plug and pull down passenger side power outlet.<br />
*But Do NOT Unplug.<br />
17. Route the power harness (the Red, Yellow and Black<br />
wires) from the control module and underneath the seat<br />
slider; through the center console and out the opening just<br />
below the Auxiliary Power Outlets. Locate the three red<br />
wire harness taps for the next procedure. Note how wire<br />
taps are installed but do NOT attach wire taps at this<br />
time. (Figure 10 & 11)<br />
For additional copies of these instructions<br />
please visit our website<br />
for a downloadable PDF Version.<br />
18. Begin attaching wire tap connectors to the proper<br />
wires. There are 3 wires to connect.<br />
a. Attach a wire tap connector to the (RED with GREEN<br />
stripe) wire at the passenger side auxiliary power outlet<br />
and connect the YELLOW wire from the power harness as<br />
shown to the wire tap. (Figures 10 & 14)<br />
b. Attach a wire tap connector to the (BLACK with<br />
WHITE stripe) wire at the passenger side Auxiliary Power<br />
Outlet plug and connect the BLACK wire from the power<br />
harness to the wire tap as shown. (Figures 12 & 14)<br />
Page 4 www.quadratec.com<br />
Figure 8<br />
Gently Pry<br />
Figure 9<br />
Driver Side Aux<br />
Power Outlet<br />
Figure 10<br />
Figure 11<br />
Remove Bolts<br />
Wire Tap<br />
Crimp with Pliers<br />
Fascia Panel<br />
Passenger Side<br />
Aux Power Outlet<br />
Route Wires<br />
Through Dash
Vizualogic ® A-1250 & A-1150<br />
DVD Headrest “JK” Wrangler <strong>Installation</strong> <strong>Instructions</strong><br />
Figure 12<br />
Yellow Harness<br />
Power Wire<br />
Black Harness<br />
Power Wire<br />
Figure 13<br />
Wire Tap Blue/Pink Wire<br />
Plug Attached<br />
to Driver Side<br />
Power Outlet<br />
Figure 14<br />
Red Harness<br />
Power Wire<br />
Power Outlet Plug<br />
Driver Side<br />
12+ Power Outlet<br />
Passenger Side<br />
12+ Power Outlet<br />
Lift Dash<br />
Panel<br />
Red Harness Power Wire<br />
19. Disconnect the plug attached to the driver side power<br />
outlet.<br />
a. Attach a wire tap connector to the (BLUE with PINK stripe)<br />
wire at the Driver side Auxiliary Power Outlet plug. Connect<br />
the RED wire from the power harness to the wire tap as<br />
shown. (Figure 13)<br />
b. Tuck all wiring away and Reconnect the driver side<br />
Auxiliary Power Outlet plug.<br />
20. Reinstall the two center dashboard fasteners and<br />
the Fascia Panel.<br />
21. Lift the rear of the center console above the floor an<br />
inch or so and finish tucking all harness wiring underneath.<br />
22. Secure the four torx fasteners that secure the center console<br />
to the floor.<br />
23. You are now ready to test and enjoy your Headrest<br />
Monitor/DVD System. Be sure to read and understand the<br />
Vizualogic Owner’s Manual.<br />
WIRE TAP<br />
CONNECTOR<br />
Blue with Pink Stripe<br />
WIRE TAP<br />
CONNECTOR<br />
Red with Green Stripe<br />
Black with White Stripe<br />
Simplified Wire Illustration from Steps 18 and 19.<br />
WIRE TAP<br />
CONNECTOR<br />
RED FROM POWER HARNESS<br />
YELLOW FROM POWER HARNESS<br />
BLACK FROM POWER HARNESS<br />
Page 5 www.quadratec.com