VL2500 Spot User Manual - Production Services Ireland
VL2500 Spot User Manual - Production Services Ireland
VL2500 Spot User Manual - Production Services Ireland

Create successful ePaper yourself
Turn your PDF publications into a flip-book with our unique Google optimized e-Paper software.
Floor Mounting the Luminaire<br />
INSTALLATION : INSTALLATION PROCEDURES 2<br />
The luminaire enclosure is sufficient to stabilize the luminaire in a floor installation, provided that the<br />
mounting surface is flat and sturdy. Be sure to leave enough space around the base (enclosure) of the<br />
luminaire to allow proper, uninterrupted airflow for cooling.<br />
Connecting Data and Power<br />
A maximum of 32 luminaires may be connected in any one DMX data link.<br />
Note: This maximum limit applies to the luminaire "daisy chain" only. Your system or console may<br />
require fewer luminaires on a single data link path. Consult your console documentation for more<br />
information.<br />
To connect power and data:<br />
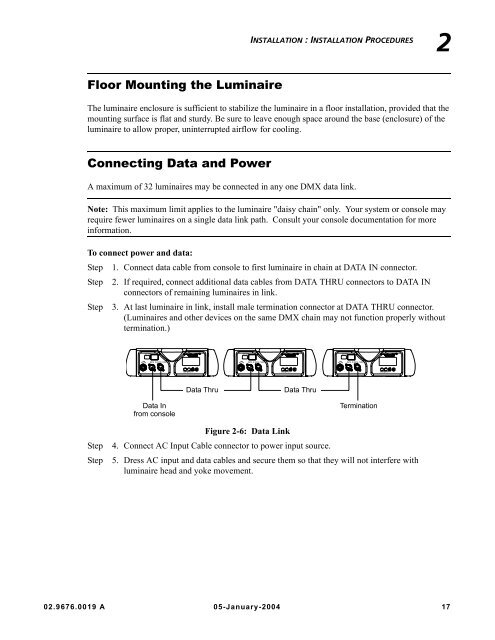
Step 1. Connect data cable from console to first luminaire in chain at DATA IN connector.<br />
Step 2. If required, connect additional data cables from DATA THRU connectors to DATA IN<br />
connectors of remaining luminaires in link.<br />
Step 3. At last luminaire in link, install male termination connector at DATA THRU connector.<br />
(Luminaires and other devices on the same DMX chain may not function properly without<br />
termination.)<br />
AC ~ IN<br />
AC PWR<br />
DATA IN DATA THRU<br />
Data In<br />
from console<br />
MENUENTER<br />
AC ~ IN<br />
AC PWR<br />
DATA IN DATA THRU<br />
Figure 2-6: Data Link<br />
Step 4. Connect AC Input Cable connector to power input source.<br />
Step 5. Dress AC input and data cables and secure them so that they will not interfere with<br />
luminaire head and yoke movement.<br />
02.9676.0019 A 05-January-2004 17<br />
MENUENTER<br />
Data Thru Data Thru<br />
AC ~ IN<br />
AC PWR<br />
DATA IN DATA THRU<br />
Termination<br />
MENUENTER