Assembly Instructions Standard 2 Seat Sofas - Nabru - Sofas
Assembly Instructions Standard 2 Seat Sofas - Nabru - Sofas Assembly Instructions Standard 2 Seat Sofas - Nabru - Sofas
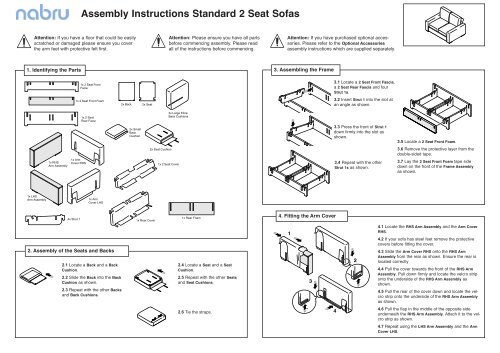
1x LHS Arm Assembly 1x RHS Arm Assembly 4x Strut 1 Assembly Instructions Standard 2 Seat Sofas Attention: If you have a floor that could be easily scratched or damaged please ensure you cover the arm feet with protective felt first. 1. Identifying the Parts 1x 2 Seat Front Facia 1x 2 Seat Front Foam 1x Arm Cover RHS 1x 2 Seat Rear Facia 1x Arm Cover LHS 2. Assembly of the Seats and Backs 2.1 Locate a Back and a Back Cushion. 2.2 Slide the Back into the Back Cushion as shown. 2.3 Repeat with the other Backs and Back Cushions. 2x Back 2x Small Back Cushion 2x Seat 1x Rear Cover 2x Seat Cushion Attention: Please ensure you have all parts before commencing assembly. Please read all of the instructions before commencing. 2x Large Fibre Back Cushions 1x 2 Seat Cover 1x Rear Foam 2.4 Locate a Seat and a Seat Cushion. 2.5 Repeat with the other Seats and Seat Cushions. 2.6 Tie the straps. Attention: If you have purchased optional accessories. Please refer to the Optional Accessories assembly instructions which are supplied separately. 3. Assembling the Frame 4. Fitting the Arm Cover 1 3 3.1 Locate a 2 Seat Front Fascia, a 2 Seat Rear Fascia and four Strut 1s. 3.2 Insert Strut 1 into the slot at an angle as shown. 3.3 Press the front of Strut 1 down firmly into the slot as shown. 3.4 Repeat with the other Strut 1s as shown. 4 2 3.5 Locate a 2 Seat Front Foam. 3.6 Remove the protective layer from the double-sided tape. 3.7 Lay the 2 Seat Front Foam tape side down on the front of the Frame Assembly as shown. 4.1 Locate the RHS Arm Assembly and the Arm Cover RHS. 4.2 If your sofa has steel feet remove the protective covers before fitting the cover. 4.3 Slide the Arm Cover RHS onto the RHS Arm Assembly from the rear as shown. Ensure the rear is located correctly 4.4 Pull the cover towards the front of the RHS Arm Assembly. Pull down firmly and locate the velcro strip onto the underside of the RHS Arm Assembly as shown. 4.5 Pull the rear of the cover down and locate the velcro strip onto the underside of the RHS Arm Assembly as shown. 4.6 Pull the flap in the middle of the opposite side underneath the RHS Arm Assembly. Attach it to the velcro strip as shown. 4.7 Repeat using the LHS Arm Assembly and the Arm Cover LHS.
1x LHS<br />
Arm <strong>Assembly</strong><br />
1x RHS<br />
Arm <strong>Assembly</strong><br />
4x Strut 1<br />
<strong>Assembly</strong> <strong>Instructions</strong> <strong>Standard</strong> 2 <strong>Seat</strong> <strong>Sofas</strong><br />
Attention: If you have a floor that could be easily<br />
scratched or damaged please ensure you cover<br />
the arm feet with protective felt first.<br />
1. Identifying the Parts<br />
1x 2 <strong>Seat</strong> Front<br />
Facia<br />
1x 2 <strong>Seat</strong> Front Foam<br />
1x Arm<br />
Cover RHS<br />
1x 2 <strong>Seat</strong><br />
Rear Facia<br />
1x Arm<br />
Cover LHS<br />
2. <strong>Assembly</strong> of the <strong>Seat</strong>s and Backs<br />
2.1 Locate a Back and a Back<br />
Cushion.<br />
2.2 Slide the Back into the Back<br />
Cushion as shown.<br />
2.3 Repeat with the other Backs<br />
and Back Cushions.<br />
2x Back<br />
2x Small<br />
Back<br />
Cushion<br />
2x <strong>Seat</strong><br />
1x Rear Cover<br />
2x <strong>Seat</strong> Cushion<br />
Attention: Please ensure you have all parts<br />
before commencing assembly. Please read<br />
all of the instructions before commencing.<br />
2x Large Fibre<br />
Back Cushions<br />
1x 2 <strong>Seat</strong> Cover<br />
1x Rear Foam<br />
2.4 Locate a <strong>Seat</strong> and a <strong>Seat</strong><br />
Cushion.<br />
2.5 Repeat with the other <strong>Seat</strong>s<br />
and <strong>Seat</strong> Cushions.<br />
2.6 Tie the straps.<br />
Attention: If you have purchased optional accessories.<br />
Please refer to the Optional Accessories<br />
assembly instructions which are supplied separately.<br />
3. Assembling the Frame<br />
4. Fitting the Arm Cover<br />
1<br />
3<br />
3.1 Locate a 2 <strong>Seat</strong> Front Fascia,<br />
a 2 <strong>Seat</strong> Rear Fascia and four<br />
Strut 1s.<br />
3.2 Insert Strut 1 into the slot at<br />
an angle as shown.<br />
3.3 Press the front of Strut 1<br />
down firmly into the slot as<br />
shown.<br />
3.4 Repeat with the other<br />
Strut 1s as shown.<br />
4<br />
2<br />
3.5 Locate a 2 <strong>Seat</strong> Front Foam.<br />
3.6 Remove the protective layer from the<br />
double-sided tape.<br />
3.7 Lay the 2 <strong>Seat</strong> Front Foam tape side<br />
down on the front of the Frame <strong>Assembly</strong><br />
as shown.<br />
4.1 Locate the RHS Arm <strong>Assembly</strong> and the Arm Cover<br />
RHS.<br />
4.2 If your sofa has steel feet remove the protective<br />
covers before fitting the cover.<br />
4.3 Slide the Arm Cover RHS onto the RHS Arm<br />
<strong>Assembly</strong> from the rear as shown. Ensure the rear is<br />
located correctly<br />
4.4 Pull the cover towards the front of the RHS Arm<br />
<strong>Assembly</strong>. Pull down firmly and locate the velcro strip<br />
onto the underside of the RHS Arm <strong>Assembly</strong> as<br />
shown.<br />
4.5 Pull the rear of the cover down and locate the velcro<br />
strip onto the underside of the RHS Arm <strong>Assembly</strong><br />
as shown.<br />
4.6 Pull the flap in the middle of the opposite side<br />
underneath the RHS Arm <strong>Assembly</strong>. Attach it to the velcro<br />
strip as shown.<br />
4.7 Repeat using the LHS Arm <strong>Assembly</strong> and the Arm<br />
Cover LHS.
5. Fitting the Rear Cover<br />
5.1 Locate the Rear<br />
Foam.<br />
5.2 Remove the protective<br />
layer from the<br />
double-sided tape.<br />
5.3 Lay the Rear<br />
Foam tape side down<br />
on the back of the<br />
Frame <strong>Assembly</strong> as<br />
shown.<br />
5.4 Locate the Rear<br />
Cover.<br />
5.5 Position the Rear<br />
Cover onto the rear of<br />
the Frame <strong>Assembly</strong><br />
as shown.<br />
6. Fitting the Arm and Frame Covers<br />
6.1 Locate the 2 <strong>Seat</strong> Cover.<br />
6.2 Position the 2 <strong>Seat</strong> Cover<br />
onto the Frame <strong>Assembly</strong> as<br />
shown.<br />
6.3 Locate the ends of the<br />
2 <strong>Seat</strong> Cover around the 2 <strong>Seat</strong><br />
Front Foam as shown.<br />
6.4 Pull the flaps underneath<br />
the Frame <strong>Assembly</strong>. Attach the<br />
velcro strips on the opposite<br />
flaps as shown.<br />
5.6 Locate the ends<br />
of the Rear Cover<br />
around the Rear<br />
Foam as shown.<br />
5.7 Pull the flaps<br />
underneath the<br />
Frame <strong>Assembly</strong>.<br />
Attach the velcro<br />
strips on the opposite<br />
flaps as shown.<br />
7. Fitting the Backs and <strong>Seat</strong>s<br />
6.5 Locate the LHS Arm<br />
<strong>Assembly</strong> complete with the<br />
Arm Cover LHS and pushing<br />
down firmly, attach it to the end<br />
of the frame assembly as<br />
shown.<br />
6.6 Repeat using the RHS Arm<br />
<strong>Assembly</strong> as shown.<br />
7.1 Locate the assembled<br />
Backs.<br />
7.2 Position the Back<br />
ensuring the slots locate<br />
correctly as shown. Tuck<br />
the flap on the assembled<br />
Back in the inside of the<br />
assembled frame. See<br />
step 7.3.<br />
7.3 Repeat with the next<br />
Back as shown.<br />
8. Fitting the Cushions<br />
8.1 Locate the Large Fibre Back<br />
Cushions.<br />
8.2 Position as shown.<br />
7.4 Locate the assembled <strong>Seat</strong> Cushions.<br />
7.5 Position the <strong>Seat</strong> Cushion as shown.<br />
7.6 Repeat with the next <strong>Seat</strong> Cushion.<br />
The Company’s policy is one of continuous product<br />
improvement and the right is reserved to modify the<br />
information contained herein without notice.<br />
Printed in the UK (10.08)<br />
© <strong>Nabru</strong> Furniture 2008


