Crocus SHDSL G703.pdf - FTP Directory Listing
Crocus SHDSL G703.pdf - FTP Directory Listing Crocus SHDSL G703.pdf - FTP Directory Listing
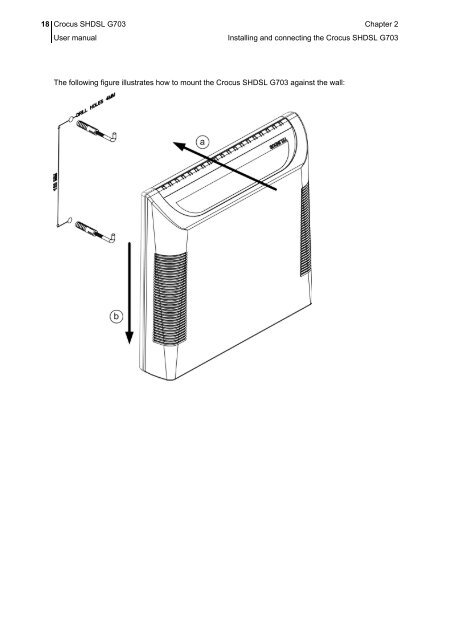
18 Crocus SHDSL G703 Chapter 2 User manual Installing and connecting the Crocus SHDSL G703 The following figure illustrates how to mount the Crocus SHDSL G703 against the wall:
Crocus SHDSL G703 Chapter 2 19 User manual Installing and connecting the Crocus SHDSL G703 2.5 Installation and connection precautions ESD WARNING The circuit boards are sensitive to electrostatic discharges (ESD) and should be handled with care. It is advisable to ensure an optimal electrical contact between yourself, the working area and a safety ground before touching any circuit board. Take special care not to touch any component or connector on the circuit board. EMC WARNING The complete Crocus family and the CN4 card nest are fully EMC compliant. Because of the modular structure of the CN4 card nest, all unused slots (power slots, card slots and interface slots) have to be covered with the appropriate blanking modules at installation time. To ensure compliance with EMC directive 89/336/EEC, shielded cables or ferrite beads have to be used. NOTE This unit may be powered by an IT Power System. The connectors of the Crocus SHDSL G703 should only be connected to the following circuit types: Connector name Connector label Connector type Circuit type line line RJ45 TNV-1 1 TNV-3 2 management CTRL subD SELV G703 interface - RJ45/BNC SELV 1. Without Remote Power 2. With Remote Power • SELV (Safety Extra Low Voltage): local connection (e.g. PC to Crocus SHDSL G703) or leased line inside the building. • TNV-1 (Telecom Network Voltage): leased line outside the building. • TNV-2: PSTN from PABX inside the building. • TNV-3: PSTN from operator PABX outside the building.
- Page 1 and 2: Crocus SHDSL G703 User and referenc
- Page 3 and 4: Crocus SHDSL G703 User manual Copyr
- Page 5 and 6: Crocus SHDSL G703 User manual Prefa
- Page 7 and 8: Crocus SHDSL G703 User manual Prefa
- Page 9 and 10: Crocus SHDSL G703 User manual Prefa
- Page 11 and 12: Crocus SHDSL G703 User and referenc
- Page 13 and 14: Crocus SHDSL G703 1 User manual Use
- Page 15 and 16: Crocus SHDSL G703 Chapter 1 3 User
- Page 17 and 18: Crocus SHDSL G703 Chapter 1 5 User
- Page 19 and 20: Crocus SHDSL G703 Chapter 1 7 User
- Page 21 and 22: Crocus SHDSL G703 Chapter 1 9 User
- Page 23 and 24: Crocus SHDSL G703 Chapter 1 11 User
- Page 25 and 26: Crocus SHDSL G703 Chapter 2 13 User
- Page 27 and 28: Crocus SHDSL G703 Chapter 2 15 User
- Page 29: Crocus SHDSL G703 Chapter 2 17 User
- Page 33 and 34: Crocus SHDSL G703 Chapter 2 21 User
- Page 35 and 36: Crocus SHDSL G703 Chapter 2 23 User
- Page 37 and 38: Crocus SHDSL G703 Chapter 2 25 User
- Page 39 and 40: Crocus SHDSL G703 Chapter 2 27 User
- Page 41 and 42: Crocus SHDSL G703 Chapter 2 29 User
- Page 43 and 44: Crocus SHDSL G703 Chapter 2 31 User
- Page 45 and 46: Crocus SHDSL G703 Chapter 3 33 User
- Page 47 and 48: Crocus SHDSL G703 Chapter 3 35 User
- Page 49 and 50: Crocus SHDSL G703 Chapter 3 37 User
- Page 51 and 52: Crocus SHDSL G703 Chapter 3 39 User
- Page 53 and 54: Crocus SHDSL G703 Chapter 4 41 User
- Page 55 and 56: Crocus SHDSL G703 Chapter 4 43 User
- Page 57 and 58: Crocus SHDSL G703 Chapter 4 45 User
- Page 59 and 60: Crocus SHDSL G703 Chapter 4 47 User
- Page 61 and 62: Crocus SHDSL G703 Chapter 4 49 User
- Page 63 and 64: Crocus SHDSL G703 Chapter 4 51 User
- Page 65 and 66: Crocus SHDSL G703 Chapter 5 53 User
- Page 67 and 68: Crocus SHDSL G703 Chapter 5 55 User
- Page 69 and 70: Crocus SHDSL G703 Chapter 5 57 User
- Page 71 and 72: Crocus SHDSL G703 Chapter 5 59 User
- Page 73 and 74: Crocus SHDSL G703 Chapter 5 61 User
- Page 75 and 76: Crocus SHDSL G703 Chapter 5 63 User
- Page 77 and 78: Crocus SHDSL G703 Chapter 5 65 User
- Page 79 and 80: Crocus SHDSL G703 Chapter 5 67 User
18 <strong>Crocus</strong> <strong>SHDSL</strong> G703 Chapter 2<br />
User manual<br />
Installing and connecting the <strong>Crocus</strong> <strong>SHDSL</strong> G703<br />
The following figure illustrates how to mount the <strong>Crocus</strong> <strong>SHDSL</strong> G703 against the wall:


