F 170B / F 170T / F 170H - Benassi
F 170B / F 170T / F 170H - Benassi
F 170B / F 170T / F 170H - Benassi

You also want an ePaper? Increase the reach of your titles
YUMPU automatically turns print PDFs into web optimized ePapers that Google loves.
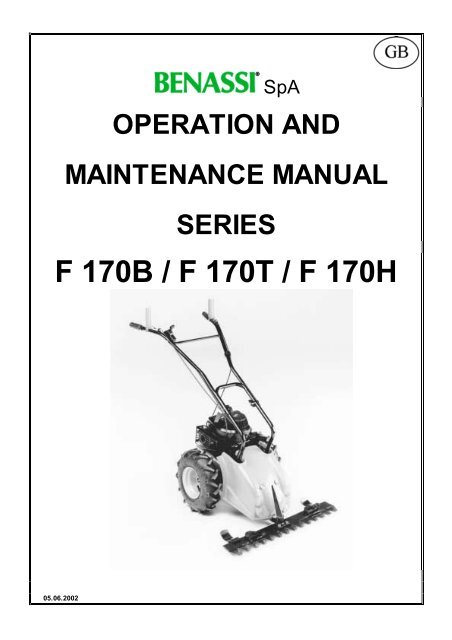
SpA<br />
OPERATION AND<br />
MAINTENANCE MANUAL<br />
SERIES<br />
F <strong>170B</strong> / F <strong>170T</strong> / F <strong>170H</strong><br />
05.06.2002
SpA F 170<br />
CONTENTS<br />
• INTRODUCTION<br />
• IDENTIFICATION AND TECHNICAL<br />
CHARACTERISTICS<br />
• PACKING AND TRANSPORT<br />
• SAFETY RULES AND LIMITS ON USE<br />
• STARTING AND STOPPING THE<br />
MACHINE<br />
• OPERATING AND REGULATING THE<br />
MACHINE<br />
• MAINTENANCE<br />
• TESTS FOR SAFETY<br />
• WARRANTY<br />
• CERTIFICATION<br />
INTRODUCTION<br />
• Thank you for having selected our product. We would like to welcome you<br />
among our many customers.<br />
• We are certain that you will appreciate the performance and the operating<br />
ease of this machine.<br />
• Our wide experience in the sector, the use of top grade materials and the high<br />
quality production ensure the flawless efficiency of the machine, which is<br />
designed to give many years of use if operated and maintained correctly.<br />
• We have therefore composed this manual to familiarize you with the use of the<br />
machine, its construction, operating features and applications, which will also<br />
facilitate maintenance.<br />
• Pay special attention to the rules in this manual that are preceded by the<br />
symbol below:<br />
CAUTION<br />
• This symbol indicates that the failure to comply with these rules may lead to<br />
personal injury.<br />
CONDITIONS OF USE<br />
The machine can be used only as grass-mower<br />
2
SpA F 170<br />
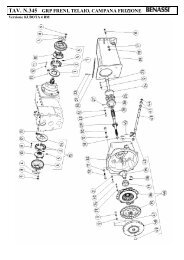
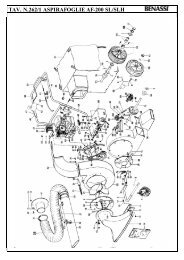
1. Wheel engage-release lever<br />
2. Accelerator hand lever<br />
3. Lever for blade motion<br />
4. Handles<br />
5. Motor ignition<br />
6. Grass divider<br />
7. Central cutting blade<br />
8. Fuel inlet<br />
9. “Primer” push-button<br />
10. Handlebar regulator<br />
11. Motor oil cap<br />
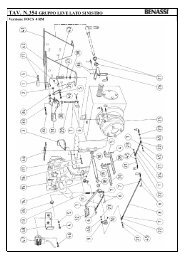
LIST OF MACHINE PARTS<br />
-Fig. n°1-<br />
TECNAMOTOR MOTOR<br />
HONDA MOTOR<br />
3
Model: F170 T<br />
Weight: 47,5 Kg.<br />
Motor: 4 stroke<br />
Make: TECUMSEH<br />
Model: VANTAGE 35 T<br />
Swept volume: 148 cc.<br />
Max. pow er to driv ing shaft:<br />
HP: 3,5 (Kw 2,6) at 2.950 rpm/1’<br />
SpA F 170<br />
IDENTIFICATION AND TECHNICAL CHARACTERISTICS<br />
Model: F170 B<br />
Weight: 48 Kg.<br />
Motor: 4 stroke<br />
Make: BRIGGS & STRATTON<br />
SPRINT 375<br />
Model: 98902<br />
Swept volume: 148 cc.<br />
Max. pow er to driv ing shaft:<br />
HP: 3,5 (Kw 2,6) at 3.000 rpm/1’<br />
Model: F170 H<br />
Weight: 48 Kg.<br />
Motor: 4 tempi benzina<br />
Make: HONDA<br />
Model: GCV 135<br />
Swept volume: 135 cc.<br />
Max. pow er to driv ing shaft:<br />
HP: 4,5 (Kw 3,4) aT 3.100 rpm/1’<br />
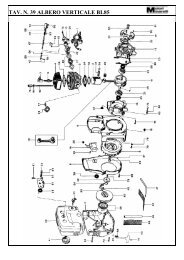
• Motor fuel: Petrol 100/130 Octane<br />
• Complete with self-winding start-up device<br />
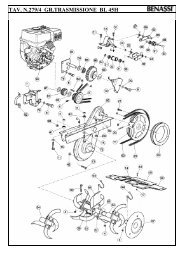
-Fig. n°2-<br />
• Safety device on handles to stop machine<br />
• Dry air filter<br />
• Consumption at 3600 r.p.m.: 0.8 Kg/hour<br />
• Motor oil: AGIP DIESEL SIGMA SAE 30<br />
• Oil quantity in gearbox : 0.5 Kg<br />
• Gearbox: oil bath single gear<br />
• Gearbox oil: SHELL TELLUS T22<br />
• Mowing speed : 2,15 Km/h<br />
• Manually controlled wheel release and cutting bar<br />
• Steering handles mounted on vibration-damping supports<br />
• "Tractor" type rubber wheels 360 x 85 (3.50-6)<br />
• Central mowing unit with E.S.M. bar with 81 cm width or<br />
cm.71<br />
• Clutch with belt tightening pulley.<br />
For machine identification (serial number, motor, weight, power) refer to the data plate as shown in the<br />
photo. See Ref. "A in Fig. 2.<br />
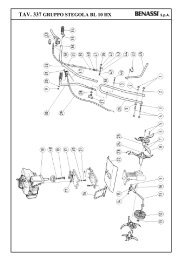
-Fig. n°3-<br />
4
SpA F 170<br />
PACKING AND TRANSPORT<br />
◊ WIDTH: 100 cm. ◊ DEPTH: 47 cm. ◊ HEIGHT: 63 cm.<br />
-Fig.n.4-<br />
• Remov e the power mower f rom its packing.<br />
• Fix the handles to the handlebar support using the two screws and<br />
two knobs pre-mounted on the handle. Make sure to position the<br />
control cables correctly .<br />
• Fix the bar to the machine, remov ing the hooked spring (Fig.4<br />
Ref .A) located on the pin of the bar support (Ref .B). Insert the pin<br />
of the bar support into the f rame (Ref .C) and reinsert the spring<br />
(Ref .A) in the direction of the hole. Take the plastic cy linder (Fig.4<br />
ref .D), insert it into the grass div ider (Ref . E) and insert all into the<br />
pin of the bar (Ref .F) correspondingly to the hole on the grass<br />
div ider and on the cy linder. Fix the grass div ider (Ref . E) to the bar,<br />
inserting two screws (Ref .G) into the threaded holes on the bar<br />
corresponding to the grass div ider.<br />
• If the machine is to be transported, empty out the petrol tank and alway s apply the plastic protectiv e strip to the<br />
E.S.M. cutting bar blade. Read the E.S.M. sheet attached.<br />
IMPORTANT: THE PACKED MACHINE IS SUPPLIED WITH THE MOTOR WITHOUT OIL OR PETROL.<br />
SAFETY RULES<br />
• Read caref ully the operation and maintenance manual enclosed with the machine.<br />
• The use of the machine is prohibited to persons under 16 y ears of age.<br />
• The operator is liable f or damages since the machine is under his control.<br />
• Those unf amiliar with the machine or who hav e nev er used it are obliged to read the operation and maintenance<br />
manual bef ore operation.<br />
• In case of transport, disassemble the bar and empty the petrol out of the tank.<br />
• If the machine is lef t unattended, ensure that it cannot start up again.<br />
• Bef ore running the machine, the operator must hav e a 5 meter radius of f ree space around him.<br />
• Dry any petrol leaks.<br />
• Fill up the tank with the motor of f . Filling the tank or transf erring f uel must alway s be perf ormed outdoors, away f rom<br />
f lames or heat sources. Do not smoke during this operation.<br />
• When mowing in mountainous areas or on slopes, mow horizontally and use non-skid equipment on shoes and wheels.<br />
• If the blade needs replacement, observ e E.S.M. operation and maintenance procedures.<br />
• If the bar suf f ers impact, check the condition of the bar bef ore resuming work.<br />
• Keep f eet and hands f ar away f rom the cutting bar and all rotating parts.<br />
• Do not run the motor where exhaust containing carbon monoxide may accumulate.<br />
• Nev er use the mower incomplete or without its saf ety dev ice.<br />
• Do not assemble/disassemble or clean the cutting bar or other equipment with the motor running.<br />
• Caution! When the clutch is engaged the cutting bar is alway s in motion.<br />
• Caution! Do not mow areas with slopes exceeding 30%.<br />
• We will not be held liable for accidents caused by the failure to observe these rules.<br />
STARTING AND STOPPING THE POWER MOWER<br />
Ev ery time y ou get ready to start the motor, make a caref ul check of the f ollowing:<br />
-Fig. n°5-<br />
• Make sure that f uel is in the tank.<br />
• Check the motor oil level: CAUTION: MACHINES OUT OF THE FACTORY DO NOT<br />
CONTAIN OIL IN THE MOTOR. Make sure to add oil up to the lev el on the dipstick.<br />
• CONSULT THE OPERATION AND MAINTENANCE MANUAL OF THE MOTOR UNDER<br />
"BEFORE START-UP"<br />
• Check that all saf ety sy stems are released and f unctioning.<br />
• Start the machine alway s in the open air and stay at its side.<br />
• Bring the accelerator hand lev er (Fig. 5) to the "MAX" position, grasp the cord handle<br />
(Fig. 6) and pull it slightly until y ou f eel some resistance, then pull harder. Make sure<br />
that the cord does not return by itself -- accompany it with y our hand.<br />
• With the motor running, bring the accelerator lev er (Fig. 5) to the middle position To make the machine go f orward<br />
squeeze the clutch lev er (Fig. 7 Ref . B) ; if y ou leav e the lev er, the machine stops.<br />
• To mov e the mower f reely f orward or back, squeeze the wheel release lev er (neutral position) af ter squeezing the<br />
clutch lever.<br />
5
SpA F 170<br />
SAFETY DEVICE FOR STOPPING THE MOTOR<br />
The main f unction of the lev er Fig. 7 is to turn of f the motor when releasing y our hands f rom the steering handles.<br />
Ev ery time y ou get ready to start the motor, check if the engaging and disengaging of the transmission to the wheels<br />
and to the bar through the lev ers on the handlebars work regularly .<br />
-Fig. n°6-<br />
-Fig. n°7-<br />
OPERATING AND REGULATING THE MACHINE<br />
Bef ore y ou start mowing, oil the cutting blade, then start the motor as f ollows:<br />
• Engaging the transmission to the wheels and the cutting bar by means of the clutch lev er must be carried out with<br />
the motor at a middle r.p.m. and by slowly releasing the lev er.<br />
• When starting to mow, position the accelerator lev er at 3/4 or at "MAX" to ensure adequate power.<br />
• When mowing along a wall or the edge of a sidewalk, be caref ul to keep a saf ety distance so that the blade does not<br />
suf f er impact. If not, the cutting bar may undergo damage.<br />
• If the belt slips, loosen the register located on the clutch lev er and leav e a trav el of approximately 5 mm bef ore the<br />
clutch engagement.<br />
• Adjusting the height of the handles is carried out by mov ing the knobs securing them on the handlebar support. This<br />
will allow two positions (Fig. 1 Ref . 10).<br />
• To regulate the motor, read the manual on the motor under "REGULATIONS".<br />
-Fig. n°8-<br />
-Fig. n°9-<br />
6
SpA F 170<br />
MAINTENANCE<br />
• For changing the oil and other maintenance operations on the motor (spark plugs, air f ilter, regulations), ref er to the<br />
motor manual prov ided.<br />
• NB: To unscrew the oil drain plug of the motor, disassemble the rear cov er (Fig. 8 Ref . D).<br />
• Empty the gearbox of oil by unscrewing the oil drain plug, let the oil drain completely . Af ter screwing back the cap<br />
tightly , f ill to the correct lev el with new oil recommended by the manuf acturer.<br />
• Do not leav e the exhausted oil in the env ironment.<br />
• Check periodically the oil lev el and f ill in with new oil if necessary .<br />
• If the grass is not cut in a satisf actory manner despite the adjustments, the blade must be sharpened or replaced.<br />
Follow the instructions on the E.S.M. maintenance sheet.<br />
• For any mechanical repair, especially during the warranty period, we recommend to go to a specialized repair shop of<br />
the dealer.<br />
• For transporting conv enience, the handles can be disassembled by means of the two knobs (Fig. 1 Ref . 10). The<br />
same is recommended f or the cutting bar, which is easily disassembled by remov ing the special split pin on the bar<br />
support (Fig. 9 Ref . E). Alway s use glov es and apply the protectiv e strip to the blade.<br />
• Regularly check that screws are tight. Pay special attention to the screws f astening the bar to its support.<br />
• Lubricate periodically the crown wheel f or the wheel transmission (Fig. 9 Ref . “F”).<br />
CAUTION:!!<br />
It is advised not to keep the motor running when the machine is not<br />
being used for its specific purpose<br />
WARRANTY<br />
The machines and accessories are guaranteed f or 12 months, with the exception of electrical parts or parts in rubber.<br />
The manuf acturer shall replace pieces recognized as def ectiv e f ree of charge. Labour and transport shall be at the<br />
expense of the purchaser. Warranty requests must be made through dealers authorized by the manuf acturer.<br />
With regard to materials not of our manuf acture, with special ref erence to the motor, the rules laid down by the<br />
respectiv e manuf acturers shall apply . Any requests f or repair shall theref ore be directed to the specif ic serv ice centres<br />
in the respectiv e areas.<br />
For any problem or repair, contact the dealer where the machine was purchased.<br />
SAFETY TESTS AND CERTIFICATION<br />
Declaration of CE conf ormity in accordance with the directiv e 98/37/CE and the directiv e EMC 89/338/CE modif ied<br />
92/31/CE.<br />
40010 San Matteo della Decima BO Italy Via Lampedusa 1 Tel. (051) 820511<br />
We hereby declare that the machine conf orms with the essential requirements f or health and saf ety in accordance with<br />
directiv e 98/37/CE and the directiv e EMC 89/338/CE modif ied 92/31/CE.<br />
POWER MOWER TYPE<br />
MODEL F 170 B / F170 H / F 170 T<br />
For v erif ication of the conf ormity with the abov e-mentioned Directiv es ref erence has been made to the f ollowing: EN292-<br />
1, EN292-2 EN 709<br />
CHAIRMAN OF THE BOARD<br />
S.Matteo della Decima li<br />
05/06/2002<br />
RESULT AND TESTS<br />
POWER MOWER TYPE MODEL F 170 B / F 170 H / F 170 T<br />
Acoustic pressure to the operator: LAeq = dB (A) 86 -<br />
Proof conditions : height 1,6 m f rom handlebar middle - Vibration to handles with weighting ISO 1033 v alue m/sec 2 1,72<br />
7
SpA F 170<br />
S.p.A.<br />
VIA LAMPEDUSA 1<br />
40010 S. MATTEO DELLA DECIMA (BO)<br />
ITALY<br />
TEL. 0039/051/820511 TELEFAX 0039/051/682.61.64<br />
8