Monteringsanvisning - ASSA OEM
Monteringsanvisning - ASSA OEM
Monteringsanvisning - ASSA OEM

You also want an ePaper? Increase the reach of your titles
YUMPU automatically turns print PDFs into web optimized ePapers that Google loves.
<strong>Monteringsanvisning</strong><br />
Regel <strong>ASSA</strong> 560L/19, låsbar<br />
<strong>ASSA</strong> 560L/19 kan användas för såväl höger som<br />
vänsterhängda portar. Handtagets gång bestäms av hur<br />
stoppstiften ”S” monteras. Stoppstiften placeras diagonalt<br />
vid ”H” alternativt ”V”, se bild.<br />
6.<br />
Skruva fast låshuset med de 4 medföljande säkerhetsskruven.<br />
Tillse att låshuset nabbar går in i urtagen i bottenplåten.<br />
Viktigt!<br />
Vid provmontering av handtag utan cylinder, använd vanlig<br />
spårskruv. Byt sedan till envägsskruven (denna går ej att<br />
demontera).<br />
7.<br />
8.<br />
Montera låscylindern i handtaget med de medföljande<br />
cylinderskruvarna.<br />
Skruva fast handtaget med de 2 medföljande envägs<br />
maskinskruven.<br />
Montering<br />
1. Mät ut centrumhöjden för låshuset = regelns handtagshöjd<br />
+5 mm.<br />
2. Fäst bottenplåten med spik i lämpligt hål.<br />
3. Skruva fast bottenplåten med vanlig skruv genom stoppstiften<br />
”S”. Stoppstiften placeras i hålen märkta ”H” eller<br />
”V” beroende på om handtaget ska vridas åt höger eller<br />
vänster.<br />
9.<br />
Ställ handtaget i öppet läge (stängerna indragna) och<br />
skruva fast stångbyglarna så långt ut som möjligt med de<br />
medföljande envägsskruven.<br />
L<br />
V<br />
H<br />
UPP<br />
H<br />
V<br />
S<br />
4.<br />
Träd stångbyglarna på regelns stänger.<br />
5.<br />
Koppla stängerna på låshusets länkar ”L”.<br />
Länkens långa tapp ska vara i stången.<br />
<strong>ASSA</strong> <strong>OEM</strong> AB<br />
Box 121 99<br />
402 42 Göteborg<br />
Tel. 031-704 40 00<br />
info.gbg@assaoem.se<br />
www.assaoem.se
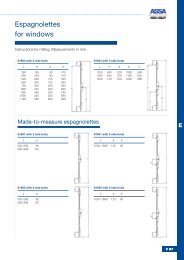
Fitting instructions<br />
Bolt <strong>ASSA</strong> 560L/19, lockable<br />
<strong>ASSA</strong> 560L/19 can be used for both right and left hung doors.<br />
This is determined by how the stoppers ”S” are positioned.<br />
The stoppers are placed in the hole ”H” or ”V”, see drawing.<br />
6.<br />
Fix the lock housing to the back plate with 4 one-way<br />
screws, ensuring that the housing fits correctly to the<br />
back plate.<br />
Important!<br />
When sample fitting for ensuring correct operation and<br />
when fixing the handle without cylinder, use normal screws.<br />
Change thereafter to the one-way screws (these can’t be<br />
removed).<br />
Fitting instructions<br />
1. Mark the center height for the lock housing = handle<br />
height +5 mm.<br />
7.<br />
8.<br />
9.<br />
Fix the cylinder to the handle with the cylinderscrews.<br />
Fix the handle to the lock housing using the 2 one-way<br />
maching screws.<br />
Move the handle into open position (rods retracted)<br />
and fix the rod guides as close to the outer ends possible<br />
using the supplied one-way screws.<br />
V<br />
H<br />
UPP<br />
H<br />
V<br />
2.<br />
Use nails to fix the back plate through a suitable hole.<br />
S<br />
3.<br />
Fix the backplate with the screws through the stoppers<br />
”S”. The 2 stoppers is placed in the holes marked ”H” if the<br />
handle is to move to the right, ”V” if the handle is to move<br />
to the left.<br />
L<br />
4.<br />
Insert the bolt rods through the rod guides.<br />
5.<br />
Connect the rods to the linkage arms ”L”. The longer pin<br />
should be inserted into the rod.<br />
<strong>ASSA</strong> <strong>OEM</strong> AB<br />
Box 121 99<br />
402 42 Göteborg<br />
+46 (0)31-704 40 00<br />
info.gbg@assaoem.se<br />
www.assaoem.se