Create successful ePaper yourself
Turn your PDF publications into a flip-book with our unique Google optimized e-Paper software.
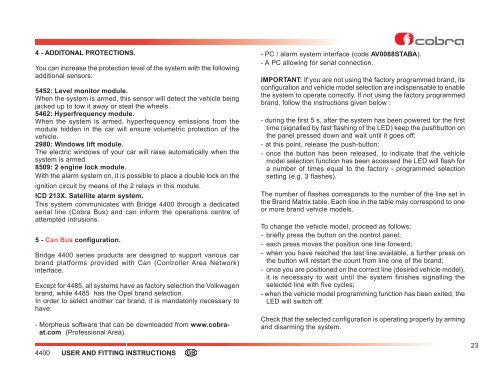
4 - ADDITONAL PROTECTIONS.<br />
You can increase the protection level of the system with the following<br />
additional sensors:<br />
5452: Level monitor module.<br />
When the system is armed, this sensor will detect the vehicle being<br />
jacked up to tow it away or steal the wheels.<br />
5462: Hyperfrequency module.<br />
When the system is armed, hyperfrequency emissions from the<br />
module hidden in the car will ensure volumetric protection of the<br />
vehicle.<br />
2980: Windows lift module.<br />
The electric windows of your car will raise automatically when the<br />
system is armed.<br />
8509: 2 engine lock module.<br />
With the alarm system on, it is possible to place a double lock on the<br />
ignition circuit by means of the 2 relays in this module.<br />
ICD 213X. Satellite alarm system.<br />
This system communicates with Bridge <strong>4400</strong> through a dedicated<br />
serial line (Cobra Bus) and can inform the operations centre of<br />
attempted intrusions.<br />
5 - Can Bus configuration.<br />
Bridge <strong>4400</strong> series products are designed to support various car<br />
brand platforms provided with Can (Controller Area Network)<br />
interface.<br />
Except for 4485, all systems have as factory selection the Volkwagen<br />
brand, while 4485 has the Opel brand selection.<br />
In order to select another car brand, it is mandatorily necessary to<br />
have:<br />
- Morpheus software that can be downloaded from www.cobraat.com<br />
(Professional Area).<br />
<strong>4400</strong> USER AND FITTING INSTRUCTIONS GB<br />
- PC / alarm system interface (code AV0088STABA).<br />
- A PC allowing for serial connection.<br />
IMPORTANT: If you are not using the factory programmed brand, its<br />
configuration and vehicle model selection are indispensable to enable<br />
the system to operate correctly. If not using the factory programmed<br />
brand, follow the instructions given below :<br />
- during the first 5 s, after the system has been powered for the first<br />
time (signalled by fast flashing of the LED) keep the pushbutton on<br />
the panel pressed down and wait until it goes off;<br />
- at this point, release the push-button;<br />
- once the button has been released, to indicate that the vehicle<br />
model selection function has been accessed the LED will flash for<br />
a number of times equal to the factory - programmed selection<br />
setting (e.g. 3 flashes).<br />
The number of flashes corresponds to the number of the line set in<br />
the Brand Matrix table. Each line in the table may correspond to one<br />
or more brand vehicle models.<br />
To change the vehicle model, proceed as follows:<br />
- briefly press the button on the control panel;<br />
- each press moves the position one line forward;<br />
- when you have reached the last line available, a further press on<br />
the button will restart the count from line one of the brand;<br />
- once you are positioned on the correct line (desired vehicle model),<br />
it is necessary to wait until the system finishes signalling the<br />
selected line with five cycles;<br />
- when the vehicle model programming function has been exited, the<br />
LED will switch off.<br />
Check that the selected configuration is operating properly by arming<br />
and disarming the system.<br />
23


