Installation VTX1800 Complete System. - Galfer Brakes
Installation VTX1800 Complete System. - Galfer Brakes
Installation VTX1800 Complete System. - Galfer Brakes

You also want an ePaper? Increase the reach of your titles
YUMPU automatically turns print PDFs into web optimized ePapers that Google loves.
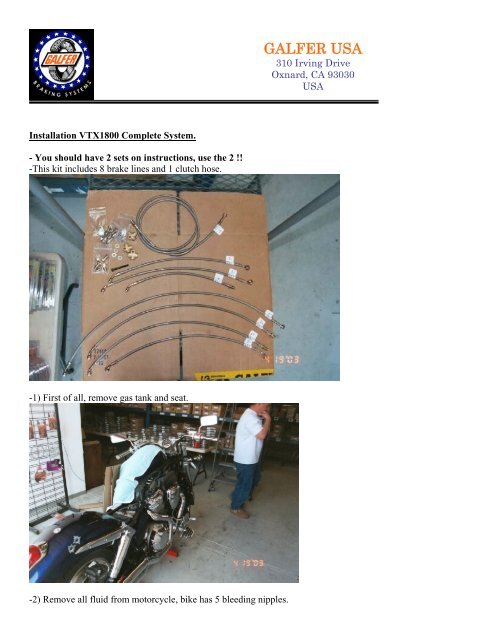
GALFER USA<br />
310 Irving Drive<br />
Oxnard, CA 93030<br />
USA<br />
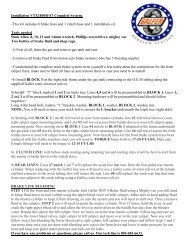
<strong>Installation</strong> <strong>VTX1800</strong> <strong>Complete</strong> <strong>System</strong>.<br />
- You should have 2 sets on instructions, use the 2 !!<br />
-This kit includes 8 brake lines and 1 clutch hose.<br />
-1) First of all, remove gas tank and seat.<br />
-2) Remove all fluid from motorcycle, bike has 5 bleeding nipples.
GALFER USA<br />
310 Irving Drive<br />
Oxnard, CA 93030<br />
USA<br />
-3) Understand the complete stock brake system write yourself a few notes about the connections for the front<br />
caliper lines, make sure to label all lines as you remove them in case you need to re-install.<br />
-4) Set up one of the “T” block on the frame by the gas tank.<br />
-5) Remove rear stock line and stock junction block (under seat area)<br />
-6) install <strong>Galfer</strong> rear hose, (Diagram 1 ) and route it as shown in picture, use stock frame clamps to bring rear<br />
hose to the <strong>Galfer</strong> “T”. (See picture on step 4)
GALFER USA<br />
310 Irving Drive<br />
Oxnard, CA 93030<br />
USA<br />
-7) Remove stock foot brake line. Route line labeled as Diagram #2 from foot master cylinder to 3-way splitter<br />
on frame.<br />
Foot master cylinder end banjo:
GALFER USA<br />
310 Irving Drive<br />
Oxnard, CA 93030<br />
USA<br />
-8) Install the 2 other splitters on triple clamp. Please see that you have to install the supplied “L” bracket and<br />
have a washer in between each part. The sequence should be:<br />
Long Allen head bolt, washer, “L” bracket, washer, 3way splitter, washer, 3 way splitter, washer, nut.
-9) Install Line diagram 3 from “T” block to right caliper \<br />
GALFER USA<br />
310 Irving Drive<br />
Oxnard, CA 93030<br />
USA
GALFER USA<br />
310 Irving Drive<br />
Oxnard, CA 93030<br />
USA<br />
Install position 4 line to the other “T” connection that receives line from rear brake junction (Junction by<br />
motorcycle frame) in this picture .<br />
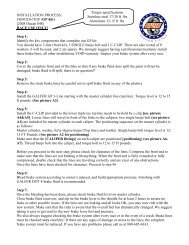
-10) position 7 brake line must go from “T” on the frame to the outside front “T”, the one that is receiving the<br />
line from position 4 at the caliper.
GALFER USA<br />
310 Irving Drive<br />
Oxnard, CA 93030<br />
USA<br />
-11) Position 5 or diagram #5, it is the line that goes from<br />
master cylinder to “T” on triple clamp. In this picture it is the<br />
only line going upwards.<br />
-12) Position 6, front line that travels from caliper to “T”. This line will plug the upper hole on left caliper.
Caliper end:<br />
GALFER USA<br />
310 Irving Drive<br />
Oxnard, CA 93030<br />
USA
GALFER USA<br />
310 Irving Drive<br />
Oxnard, CA 93030<br />
USA<br />
FINAL PICTURES, SYSTEM FULLY INSTALLED:<br />
Lower “T’s”<br />
Right Caliper
GALFER USA<br />
310 Irving Drive<br />
Oxnard, CA 93030<br />
USA<br />
“T” on bike frame.<br />
“T” on bike front end.<br />
The last step is to bleed the system; a vacuum pump is HIGHLY suggested since there is lots of brake fluid to<br />
be used. Fill up the master cylinders all around (2) and pump the levers front and rear separately. The lever on<br />
the front will get hard right away but do not let that fool you, there are 6 pistons on the front calipers and you<br />
must have the rear brake lines and system well bled before all pistons will be operational. Once you’ve bled
GALFER USA<br />
310 Irving Drive<br />
Oxnard, CA 93030<br />
USA<br />
everything leave brake levers under pressure for a few hours so that you can verify that the lines are not leaking.<br />
Torque specifications to banjo bolts are 12 to 15ft pounds.<br />
If you have any problems or questions, please call us and we will help you the best we can.<br />
Our tech line is 800-685-6633.<br />
Thank you for choosing <strong>Galfer</strong> and GOOD LUCK!!