AirLive WL-5460APv2_e9 User's Manual
AirLive WL-5460APv2_e9 User's Manual
AirLive WL-5460APv2_e9 User's Manual

You also want an ePaper? Increase the reach of your titles
YUMPU automatically turns print PDFs into web optimized ePapers that Google loves.
<strong>WL</strong>-5460AP v2<br />
802.11g Multi-function<br />
Wireless Access Point<br />
User’s <strong>Manual</strong><br />
1 <strong>WL</strong>5460AP v2 User’s <strong>Manual</strong>
Declaration of Conformity<br />
We, Manufacturer/Importer<br />
OvisLink Corp.<br />
5F., NO.6, Lane 130, Min-Chuan Rd.,<br />
Hsin-Tien City, Taipei County, Taiwan<br />
Declare that the product<br />
802.11g Multi-function Wireless Access Point<br />
<strong>WL</strong>-5460AP , <strong>WL</strong>-5450AP<br />
is in conformity with<br />
In accordance with 89/336 EEC-EMC Directive and 1999/5 EC-R & TTE Directive<br />
Clause<br />
Description<br />
■ EN 300 328 V1.6.1 Electromagnetic compatibility and Radio spectrum Matters (ERM);<br />
(2004-11) Wideband transmission equipment operating in the 2.4GHz ISM band<br />
And using spread spectrum modulation techniques; Part 1:technical<br />
Characteristics and test conditions Part2:Harmonized EN covering<br />
Essential requirements under article 3.2 of the R&TTE Directive<br />
■ EN 301 489-1 V1.4.1 Electromagnetic compatibility and Radio spectrum Matters (ERM);<br />
(2002-08) Electromagnetic compatibility(EMC) standard for radio equipment and<br />
■ EN 301 489-17 V1.2.1 Services; Part 17:Specific conditions for wideband data and<br />
(2002-08) HIPERLAN equipment<br />
■ EN 55022: 1998/A1<br />
:2000/A2:2003<br />
■ EN 55024:1998/A1<br />
:2001/A2:2003<br />
■ EN 50385<br />
Limits and methods of measurement of radio disturbance<br />
characteristics of information technology equipment<br />
Information Technology equipment-Immunity characteristics-Limits and<br />
Methods of measurement<br />
Product standard to demonstrate the Compliance of radio base<br />
stations and Fixed terminal stations for wireless Telecommunication<br />
System with the Basic restrictions or the reference levels related to<br />
human exposure to radio Frequency electromagnetic fields ( 110 MHz<br />
– 40 GHz ) - General public<br />
■ EN 60950-1:2001/ Safety for information technology equipment including electrical<br />
A11:2004 business equipment<br />
■ CE marking<br />
Manufacturer/Importer<br />
Signature:<br />
Name : Albert Yeh<br />
Position/ Title : Vice President Date: 2007/4/18<br />
(Stamp)
<strong>WL</strong>-5450(5460)AP CE Declaration Statement<br />
Country Declaration Country Declaration<br />
cs<br />
Česky [Czech]<br />
da<br />
Dansk [Danish]<br />
de<br />
Deutsch<br />
[German]<br />
et<br />
Eesti [Estonian]<br />
en<br />
English<br />
es<br />
Español<br />
[Spanish]<br />
el<br />
Ελληνική [Greek]<br />
OvisLink Corp. tímto prohlašuje, že tento<br />
<strong>WL</strong>-5450(5460)AP je ve shodě se základními<br />
požadavky a dalšími příslušnými ustanoveními<br />
směrnice 1999/5/ES.<br />
lt<br />
Lietuvių<br />
[Lithuanian]<br />
Undertegnede OvisLink Corp. erklærer herved, at nl<br />
følgende udstyr <strong>WL</strong>-5450(5460)APoverholder de Nederlands [Dutch<br />
væsentlige krav og øvrige relevante krav i direktiv<br />
1999/5/EF.<br />
Hiermit erklärt OvisLink Corp., dass sich das mt<br />
Gerät <strong>WL</strong>-5450(5460)APin Übereinstimmung mit Malti [Maltese]<br />
den grundlegenden Anforderungen und den<br />
übrigen einschlägigen Bestimmungen der<br />
Richtlinie 1999/5/EG befindet.<br />
Käesolevaga kinnitab OvisLink Corp. seadme hu<br />
<strong>WL</strong>-5450(5460)AP vastavust direktiivi 1999/5/EÜ Magyar<br />
põhinõuetele ja nimetatud direktiivist tulenevatele [Hungarian]<br />
teistele asjakohastele sätetele.<br />
Hereby, OvisLink Corp., declares that this pl<br />
<strong>WL</strong>-5450(5460)AP is in compliance with the Polski [Polish]<br />
essential requirements and other relevant<br />
provisions of Directive 1999/5/EC.<br />
Por medio de la presente OvisLink Corp. declara<br />
que el <strong>WL</strong>-5450(5460)APcumple con los<br />
requisitos esenciales y cualesquiera otras<br />
disposiciones aplicables o exigibles de la<br />
Directiva 1999/5/CE.<br />
ΜΕ ΤΗΝ ΠΑΡΟΥΣΑ OvisLink Corp. ΔΗΛΩΝΕΙ<br />
ΟΤΙ<strong>WL</strong>-5450(5460)AP ΣΥΜΜΟΡΦΩΝΕΤΑΙ<br />
ΠΡΟΣ ΤΙΣ ΟΥΣΙΩΔΕΙΣ ΑΠΑΙΤΗΣΕΙΣ ΚΑΙ ΤΙΣ<br />
ΛΟΙΠΕΣ ΣΧΕΤΙΚΕΣ ΔΙΑΤΑΞΕΙΣ ΤΗΣ ΟΔΗΓΙΑΣ<br />
1999/5/ΕΚ.<br />
fr<br />
Par la présente OvisLink Corp. déclare que<br />
Français [French] l'appareil <strong>WL</strong>-5450(5460)AP est conforme aux<br />
exigences essentielles et aux autres dispositions<br />
pertinentes de la directive 1999/5/CE<br />
it<br />
Con la presente OvisLink Corp. dichiara che<br />
Italiano [Italian] questo <strong>WL</strong>-5450(5460)AP è conforme ai requisiti<br />
essenziali ed alle altre disposizioni pertinenti<br />
stabilite dalla direttiva 1999/5/CE.<br />
lv<br />
Ar šo OvisLink Corp. deklarē, ka<br />
Latviski [Latvian] <strong>WL</strong>-5450(5460)AP atbilst Direktīvas 1999/5/EK<br />
būtiskajām prasībām un citiem ar to saistītajiem<br />
noteikumiem.<br />
sv<br />
Svenska<br />
[Swedish]<br />
pt<br />
Português<br />
[Portuguese]<br />
sl<br />
Slovensko<br />
[Slovenian]<br />
sk<br />
Slovensky [Slovak]<br />
fi<br />
Suomi [Finnish]<br />
Íslenska [Icelandic]<br />
Härmed intygar OvisLink Corp. att denna no<br />
<strong>WL</strong>-5450(5460)AP står I överensstämmelse med Norsk [Norwegian]<br />
de väsentliga egenskapskrav och övriga<br />
relevanta bestämmelser som framgår av direktiv<br />
1999/5/EG.<br />
iuo OvisLink Corp. deklaruoja, kad<br />
šis<strong>WL</strong>-5450(5460)AP atitinka esminius reikalavimus<br />
ir kitas 1999/5/EB Direktyvos nuostatas.<br />
Hierbij verklaart OvisLink Corp. dat het toestel<br />
<strong>WL</strong>-5450(5460)AP in overeenstemming is met de<br />
essentiële eisen en de andere relevante bepalingen<br />
van richtlijn 1999/5/EG.<br />
Hawnhekk, OvisLink Corp, jiddikjara li dan<br />
<strong>WL</strong>-5450(5460)AP jikkonforma mal-ħtiġijiet<br />
essenzjali u ma provvedimenti oħrajn relevanti li<br />
hemm fid-Dirrettiva 1999/5/EC.<br />
Alulírott, OvisLink Corp nyilatkozom, hogy a<br />
<strong>WL</strong>-5450(5460)AP megfelel a vonatkozó alapvetõ<br />
követelményeknek és az 1999/5/EC irányelv egyéb<br />
elõírásainak.<br />
Niniejszym OvisLink Corp oświadcza, że<br />
<strong>WL</strong>-5450(5460)AP jest zgodny z zasadniczymi<br />
wymogami oraz pozostałymi stosownymi<br />
postanowieniami Dyrektywy 1999/5/EC.<br />
OvisLink Corp declara que este<br />
<strong>WL</strong>-5450(5460)APestá conforme com os requisitos<br />
essenciais e outras disposições da Directiva<br />
1999/5/CE.<br />
OvisLink Corp izjavlja, da je ta <strong>WL</strong>-5450(5460)AP v<br />
skladu z bistvenimi zahtevami in ostalimi relevantnimi<br />
določili direktive 1999/5/ES.<br />
OvisLink Corp týmto vyhlasuje, že <strong>WL</strong>-5450(5460)AP<br />
spĺňa základné požiadavky a všetky príslušné<br />
ustanovenia Smernice 1999/5/ES.<br />
OvisLink Corp vakuuttaa täten että<br />
<strong>WL</strong>-5450(5460)AP tyyppinen laite on direktiivin<br />
1999/5/EY oleellisten vaatimusten ja sitä koskevien<br />
direktiivin muiden ehtojen mukainen<br />
Hér með lýsir OvisLink Corp yfir því að<br />
<strong>WL</strong>-5450(5460)AP er í samræmi við grunnkröfur og<br />
aðrar kröfur, sem gerðar eru í tilskipun 1999/5/EC.<br />
OvisLink Corp erklærer herved at utstyret<br />
<strong>WL</strong>-5450(5460)AP er i samsvar med de<br />
grunnleggende krav og øvrige relevante krav i<br />
direktiv 1999/5/EF.<br />
A copy of the full CE report can be obtained from the following address:<br />
OvisLink Corp.<br />
5F, No.6 Lane 130,<br />
Min-Chuan Rd, Hsin-Tien City,<br />
Taipei, Taiwan, R.O.C.<br />
This equipment may be used in AT, BE, CY, CZ, DK, EE, FI, FR, DE, GR, HU, IE, IT, LV, LT, LU, MT, NL, PL,<br />
PT, SK, SI, ES, SE, GB, IS, LI, NO, CH, BG, RO, TR
FCC Certifications<br />
This equipment has been tested and found to comply with the limits for a Class B digital device,<br />
pursuant to Part 15 of the FCC Rules. These limits are designed to provide reasonable protection<br />
against harmful interference in a residential installation. This equipment generates uses and can<br />
radiate radio frequency energy and, if not installed and used in accordance with the instructions,<br />
may cause harmful interference to radio communications. However, there is no guarantee that<br />
interference will not occur in a particular installation. If this equipment does cause harmful<br />
interference to radio or television reception, which can be determined by turning the equipment<br />
off and on, the user is encouraged to try to correct the interference by one or more of the<br />
following measures:<br />
• Reorient or relocate the receiving antenna.<br />
• Increase the separation between the equipment and receiver.<br />
• Connect the equipment into an outlet on a circuit different from that to which the receiver is<br />
connected.<br />
• Consult the dealer or an experienced radio/TV technician for help.<br />
CAUTION:<br />
Any changes or modifications not expressly approved by the grantee of this device could void the<br />
user’s authority to operate the equipment.<br />
This device complies with Part 15 of the FCC rules. Operation is subject to the following two<br />
conditions: (1) This device may not cause harmful interference, and (2) This device must accept<br />
any interference received, including interference that may cause undesired operation.<br />
FCC RF Radiation Exposure Statement<br />
This equipment complies with FCC RF radiation exposure limits set forth for an uncontrolled<br />
environment. This equipment should be installed and operated with a minimum distance of 20cm<br />
between the radiator and your body.<br />
CE Mark Warning<br />
This is a Class B product. In a domestic environment, this product may cause radio interference,<br />
in which case the user may be required to take adequate measures.<br />
All trademarks and brand names are the property of their respective proprietors.<br />
Specifications are subject to change without prior notification.<br />
2<br />
<strong>WL</strong>5460AP v2 User’s <strong>Manual</strong>
Table of Contents<br />
INTRODUCTION................................................................................................................................................................ 1<br />
FEATURES........................................................................................................................................................................ 2<br />
PARTS, NAMES, AND FUNCTIONS..................................................................................................................................... 3<br />
FACTORY DEFAULT SETTINGS......................................................................................................................................... 5<br />
<strong>WL</strong>-5460AP v2............................................................................................................................................................ 5<br />
HARDWARE CONNECTION ............................................................................................................................................... 6<br />
ABOUT THE WIRELESS OPERATION MODES..................................................................................................................... 7<br />
ACCESS POINT MODE .................................................................................................................................................... 8<br />
CLIENT MODE (INFRASTRUCTURE) ................................................................................................................................9<br />
CLIENT MODE (AD-HOC) .............................................................................................................................................. 10<br />
BRIDGE MODE .............................................................................................................................................................. 11<br />
WDS REPEATER MODE ............................................................................................................................................... 12<br />
UNIVERSAL REPEATER MODE...................................................................................................................................... 13<br />
WISP ( CLIENT ROUTER) MODE.................................................................................................................................. 14<br />
WISP + UNIVERSAL REPEATER MODE........................................................................................................................ 15<br />
CONFIGURATION ........................................................................................................................................................... 16<br />
MODE............................................................................................................................................................................ 17<br />
AP MODE SETTING........................................................................................................................................................ 18<br />
Security.................................................................................................................................................... 19<br />
Advanced Settings..................................................................................................................................................... 23<br />
CLIENT MODE SETTING................................................................................................................................................. 27<br />
BRIDGE MODE SETTING ................................................................................................................................................ 29<br />
WDS REPEATER MODE SETTING................................................................................................................................... 31<br />
UNIVERSAL REPEATER MODE SETTING......................................................................................................................... 33<br />
WISP (CLIENT ROUTER) MODE SETTING ...................................................................................................................... 35<br />
WISP + UNIVERSAL REPEATER MODE SETTING............................................................................................................ 38<br />
STATUS ......................................................................................................................................................................... 40<br />
TCP/IP ......................................................................................................................................................................... 43<br />
REBOOT ........................................................................................................................................................................ 45<br />
OTHER .......................................................................................................................................................................... 46<br />
APPENDIX A .................................................................................................................................................................. 49<br />
3<br />
<strong>WL</strong>5460AP v2 User’s <strong>Manual</strong>
Introduction<br />
. <strong>WL</strong>-<strong>5460APv2</strong> is world's most popular multi-function access point. It features an impressive total of 7<br />
wireless multi-function modes that are not available in normal access point. In addition, the ACK timeout and<br />
RSSI feature makes it suitable for long distance application. From ordinary AP application to Hotspot and<br />
WISP usage, you will find the <strong>WL</strong>-5460AP is the device you want.<br />
. <strong>WL</strong>-<strong>5460APv2</strong> is an IEEE802.11b/g compliant 11 Mbps & 54 Mbps Ethernet Wireless Access Point. The<br />
Wireless Access Point is equipped with two 10/100 M Auto-sensing Ethernet ports for connecting to LAN and<br />
also for cascading to next Wireless Access Point.<br />
. <strong>WL</strong>-<strong>5460APv2</strong> provides 64/128bit WEP encryption, WPA-PSK, WPA2-PSK and IEEE802.1x which<br />
ensures a high level of security to protect users’ data and privacy. The MAC Address filter prevents the<br />
unauthorized MAC Addresses from accessing your Wireless LAN. Your network security is therefore double<br />
assured.<br />
The web-based management utility is provided for easy configuration that your wireless network connection<br />
is ensured to be always solid and hassle free.<br />
1 <strong>WL</strong>5460AP v2 User’s <strong>Manual</strong>
Features<br />
1. 2x100Mbps LAN ports for Wireless AP cascade.,2MB flash,16MB SDRAM.<br />
2. 18dBm output Power.<br />
3. AP , Client, Bridge ,WDS Repeater, Universal Repeater mode.<br />
4. WISP Client Router, WISP+ Universal Repeater mode.<br />
5. Allows WEP 64/128 bit.<br />
6. Support WPA-PSK, WPA2-PSK encryption.<br />
7. Support data rate automatic fallback.<br />
8. Automatic channel selection.<br />
9. Allowable channels: 1~11 (USA [FCC]), 1~13 (Europe [ETSI])<br />
10. Client access control.<br />
11. Supports 802.1x/Radius client with EAP-TLS, TKIP, AES encryption.<br />
12. Supports IAPP.<br />
13. Adjustable Tx power, Tx rate, and SSID broadcast.<br />
14. ACK Timeout , Watch dog function.<br />
15. Web interface management.<br />
16. Support System event log and statistics.<br />
17. MAC filtering (For wireless only).<br />
2 <strong>WL</strong>5460AP v2 User’s <strong>Manual</strong>
Parts, Names, and Functions<br />
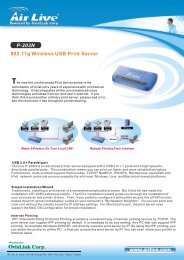
1. Front Panel: (LED Indicators) (5460AP / 5460AP v2)<br />
LED<br />
Status<br />
Indicator Color Solid Flashing<br />
1 Power Green Turns solid green when power is N/A.<br />
applied to this device.<br />
2 Status Red Turns solid red when the device is<br />
booting, after boot successfully, the<br />
light turn off.<br />
3~6<br />
Wireless<br />
Link/Act. Green Turns solid green when connected<br />
and associated to at least a client<br />
Receiving/<br />
Sending data<br />
station.<br />
WEP/WPA Orange Turns solid orange when wireless N/A<br />
security is enabled.<br />
MAC Ctrl Orange Turns solid orange when MAC Control N/A<br />
is enabled.<br />
Bridge / Orange Turn solid orange when Bridge or N/A<br />
Repeater<br />
Repeater is enabled.<br />
7~8<br />
LAN 1<br />
Turns solid green when linked to a Receiving/<br />
Green<br />
Wired LAN 2<br />
local network.<br />
Sending data<br />
Table 1: LED Indicators<br />
3 <strong>WL</strong>5460AP v2 User’s <strong>Manual</strong>
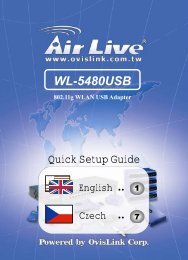
2. Rear Panel: Connection Ports (5460AP / 5460AP v2)<br />
Port/button<br />
Functions<br />
A 12V DC Connects the power adapter plug<br />
B LAN1 Connects to Ethernet<br />
C LAN2 Connects to Ethernet<br />
D (Factory)<br />
RESET<br />
Press over 3 seconds to reboot this device.<br />
Press for over 10 seconds to restore factory settings.<br />
Performing the Factory Reset will erase all previously entered<br />
device settings.<br />
Table 2: Connection Ports<br />
4 <strong>WL</strong>5460AP v2 User’s <strong>Manual</strong>
Factory Default Settings<br />
Setting<br />
Wireless Access Point<br />
Device Name<br />
<strong>WL</strong>-5460AP v2<br />
SSID<br />
Default value: airlive<br />
Channel Default value: 13<br />
WEP<br />
Default value: Disabled<br />
IP Address Default value: 192.168.100. 252<br />
DHCP Server • In AP, Client, and Repeater mode, the default DHCP Server is<br />
disabled, Please set your PC's IP to the same subnet as the AP to<br />
access the AP.<br />
• In WISP mode, the default DHCP server is enabled. Please restart<br />
your PC to renew the IP address.<br />
DHCP Server IP Range 192.168.100.100~192.168.100.200<br />
Table 3: Default Setting<br />
5 <strong>WL</strong>5460AP v2 User’s <strong>Manual</strong>
Hardware Connection<br />
Note: Before you starting hardware connection, you are advised to find an appropriate location to place the<br />
Access Point. Usually, the best place for the Access Point is at the center of your wireless network, with line<br />
of straight to all your wireless stations. Also, remember to adjust the antenna; usually the higher the antenna<br />
is placed; the better will be the performance.<br />
1. Connect to your local area network: connect an Ethernet cable to one of the Ethernet port.<br />
2. (LAN1 or LAN2) of this Wireless Access Point, and the other end to a hub, switch, router, or another<br />
wireless access point.<br />
3. Power on the device: connect the included AC power adapter to the Wireless Access Point’s power port<br />
and the other end to a wall outlet.<br />
.Check the LED:<br />
The Power and LAN # LED should be ON. LAN# LED will even blink if there is traffic.<br />
The Link/Act LED will be on in static when associated with a station and blink whenever this AP receives data<br />
packets in the air.<br />
If the Status LED glows after self-test, it means the Wireless Access Point fails on self test. Please ask your<br />
dealer for technical support.<br />
4. Please make sure your computer IP is in the same subnet as the AP (i.e. 192.168.100.x).<br />
5. please make sure your computer has wireless network adapter installed.<br />
6. Open the web browser and enter http://192.168.100.252/.<br />
6 <strong>WL</strong>5460AP v2 User’s <strong>Manual</strong>
About the Wireless Operation Modes<br />
The <strong>WL</strong>-5460AP v2 device provides all 7 modes of wireless operational applications with:<br />
1 Access Point Mode.<br />
2 Client Mode.<br />
3 Bridge Mode.<br />
4 WDS Repeater Mode.<br />
5 Universal Repeater Mode.<br />
6 WISP (Client Router) Mode.<br />
7 WISP + Universal Repeater Mode.<br />
This device is shipped with configuration that is functional right out of the box. If you want to change the<br />
settings in order to perform more advanced configuration or even change the mode of operation, you can use<br />
the web-based utility provided by the manufacturer as described in the following sections.<br />
7 <strong>WL</strong>5460AP v2 User’s <strong>Manual</strong>
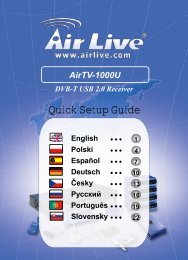
Access Point Mode<br />
When acting as an access point (default setting), this device connects all the stations (PC/notebook with<br />
wireless network adapter) to a wired network. All stations can have the Internet access if only the Access<br />
Point has the Internet connection. See the sample application below.<br />
To set the operation mode to “Access Point”, please go to “Mode AP” and click the Setup button.<br />
8 <strong>WL</strong>5460AP v2 User’s <strong>Manual</strong>
Client Mode (Infrastructure)<br />
If set to Client (Infrastructure) mode, this device can work like a wireless station when it’s connected to a<br />
computer so that the computer can send packets from wired end to wireless interface.<br />
Refer to the illustration below. This station (AP1 plus the connected computer 1) can associate to another<br />
Access Point (AP2), and then can have the Internet access if the other Access Point (AP2) has the Internet<br />
connection.<br />
To set the operation mode to “Client (Infrastructure)”, Please go to “Mode Client” and click the Setup<br />
button.<br />
In the “Network Type” field, select as “infrastructure” for configuration.<br />
9 <strong>WL</strong>5460AP v2 User’s <strong>Manual</strong>
Client Mode (Ad-hoc)<br />
If set to the Client (Ad-hoc) mode, this device can work like a wireless station when it is connected to a<br />
computer so that the computer can send packets from wired end to wireless interface. You can share files<br />
and printers between wireless stations (PC and laptop with wireless network adapter installed).<br />
See the sample application below.<br />
To set the operation mode to “Client (Ad-Hoc)”, Please go to “Mode Client” and click the Setup button.<br />
In the “Network Type” field, select as “infrastructure” for configuration.<br />
10 <strong>WL</strong>5460AP v2 User’s <strong>Manual</strong>
Bridge Mode<br />
In this mode, 2 access points in two remote locations connect to each other to provide a wireless bridge<br />
between 2 remote LANs. It is mostly used by enterprise to connect 2 remote office's network together. The<br />
bridge modes are connected by using either the WDS (Wireless Distribution System) or Ad-Hoc topology.<br />
This feature is also useful when users want to bridge networks between buildings where it is impossible to<br />
deploy network cable connections between these buildings.<br />
To set the operation mode to “Bridge”, Please go to “Mode Bridge” and click the Setup button for<br />
configuration.<br />
11 <strong>WL</strong>5460AP v2 User’s <strong>Manual</strong>
WDS Repeater Mode<br />
A repeater's function is to extend the wireless coverage of another wireless AP or router.<br />
For WDS repeater to work, the remote wireless AP/Router must also support WDS function.<br />
To set the operation mode to “WDS Repeater”, Please go to “Mode WDS Repeater” and click the Setup<br />
button for configuration.<br />
12 <strong>WL</strong>5460AP v2 User’s <strong>Manual</strong>
Universal Repeater Mode<br />
A universal repeater can also extend the wireless coverage of another wireless AP or router. But the<br />
universal repeater does not require the remote device to have WDS function. Therefore, it can work with<br />
almost any wireless device.<br />
Note: When you are using the universal repeater mode, please make sure the remote AP/Router‘s WDS<br />
function is turned off.<br />
To set the operation mode to “Universal Repeater”, Please go to “Mode Universal Repeater” and click<br />
the Setup button for configuration.<br />
13 <strong>WL</strong>5460AP v2 User’s <strong>Manual</strong>
WISP ( Client Router) Mode<br />
WISP (Client Router) mode<br />
In WISP mode, the AP will behave just the same as the Client mode for wireless function. However, Router<br />
functions are added between the wireless WAN side and the Ethernet LAN side. Therefore, The WISP<br />
subscriber can share the WISP connection without the need for extra router.<br />
To set the operation mode to “WISP”, Please go to “Mode WISP” and click the Setup button for<br />
configuration.<br />
14 <strong>WL</strong>5460AP v2 User’s <strong>Manual</strong>
WISP + Universal Repeater Mode<br />
In this mode, the AP behaves virtually the same as the WISP mode, except one thing: the AP can also send<br />
wireless signal to the LAN side. That means the AP can connect with the remote WISP AP and the indoor<br />
wireless card, and then provide IP sharing capability all at the same time! However, the output power is<br />
divided between 2 wireless sides and proper antenna installation can influence the performance greatly.<br />
To set the operation mode to “WISP + Universal Repeater”, Please go to “Mode WISP + Universal<br />
Repeater” and click the Setup button for configuration.<br />
15 <strong>WL</strong>5460AP v2 User’s <strong>Manual</strong>
Configuration<br />
1. Start your computer. Connect an Ethernet cable between your computer and the Wireless Access Point.<br />
2. Make sure your wired station is set to the same subnet as the Wireless Access Point, i.e. 192.168.100.X<br />
3. Start your WEB browser. In the Address box, enter the following:<br />
http://192.168.100.252/<br />
The configuration menu is divided into five categories:<br />
Mode, Status, TCP/IP, Reboot and Other.<br />
Click on the desired setup item to expand the page in the main navigation page. The setup pages<br />
covered in this utility are described below.<br />
16 <strong>WL</strong>5460AP v2 User’s <strong>Manual</strong>
Mode<br />
You can choose and setup different wireless mode for detail configurations<br />
Wireless Mode<br />
AP<br />
Select the AP and press Setup button for Wireless AP mode configuration.<br />
Client<br />
Bridge<br />
WDS Repeater<br />
Universal Repeater<br />
WISP<br />
WISP + Universal<br />
Repeater<br />
Select the Client and press Setup button for Wireless Client mode<br />
configuration.<br />
Select the Bridge and press Setup button for Wireless Bridge mode<br />
configuration.<br />
Select the WDS Repeater and press Setup button for Wireless WDS Repeater<br />
mode configuration.<br />
Select the Universal Repeater and press Setup button for Wireless Universal<br />
repeater mode configuration.<br />
Select the WISP and press Setup button for WISP (Client Router) mode<br />
configuration.<br />
Select the WISP + Universal Repeater and press Setup button for WISP<br />
+ Universal Repeater mode configuration.<br />
17 <strong>WL</strong>5460AP v2 User’s <strong>Manual</strong>
AP Mode Setting<br />
Alias Name<br />
Disable Wireless<br />
LAN Interface<br />
Band<br />
SSID<br />
Channel Number<br />
You can set the alias name for this device. Limited not exceed 32 characters.<br />
Check the box to disable the Wireless LAN Interface, by so doing; you won’t be able<br />
to make wireless connection with this Access Point in your located network. In other<br />
words, this device will not be visible by any wireless station.<br />
You can choose one mode of the following you need.<br />
2.4GHz (B): 802.11b supported rate only.<br />
2.4GHz (G): 802.11g supported rate only.<br />
2.4GHz (B+G): 802.11b supported rate and 802.11g supported rate. The default<br />
is 2.4GHz (B+G) mode.<br />
The SSID differentiates one <strong>WL</strong>AN from another; therefore, all access points and all<br />
devices attempting to connect to a specific <strong>WL</strong>AN must use the same SSID. It is<br />
case-sensitive and must not exceed 32 characters. A device will not be permitted<br />
to join the BSS unless it can provide the unique SSID. An SSID is also referred to as<br />
a network name because essentially it is a name that identifies a wireless network.<br />
The default SSID is airlive.<br />
Allow user to set the channel manually or automatically.<br />
If set channel manually, just select the channel you want to specify.<br />
If “Auto” is selected, user can set the channel range to have Wireless Access Point<br />
automatically survey and choose the channel with best situation for communication.<br />
The number of channels supported depends on the region of this Access Point. All<br />
stations communicating with the Access Point must use the same channel.<br />
The default channel is 13.<br />
18 <strong>WL</strong>5460AP v2 User’s <strong>Manual</strong>
Wireless<br />
Isolation<br />
Security<br />
Client Allow user to set the function Enabled or Disabled.<br />
By the function, all wireless clients can't mutual link, but wireless client still link with<br />
LAN port adapter.<br />
The default value is Disabled.<br />
Press the setup button for detail configurations<br />
To provide a certain level of security, the IEEE 802.11 standard has defined two types of authentication<br />
methods: Open System or Shared Key. And <strong>WL</strong>-<strong>5460APv2</strong> also support other wireless authentication and<br />
encryption methods for enhance your wireless network.<br />
With Open System authentication, a wireless PC can join any network and receive any messages that are<br />
not encrypted. With Shared Key authentication, only those PCs that possess the correct authentication key<br />
can join the network. By default, IEEE 802.11 wireless devices operate in an Open System network and<br />
None data encryption. If you want secure your wireless network, you need to setup wireless security related<br />
function to enable security network.<br />
None<br />
Encryption: None (Encryption is set to None by default.)<br />
If the Access Point is using Encryption None, then the wireless adapter will need to be set to the same<br />
authentication mode.<br />
WEP<br />
Encryption: WEP<br />
If selected WEP encryption, you must set WEP key value:<br />
19 <strong>WL</strong>5460AP v2 User’s <strong>Manual</strong>
Encryption<br />
WEP<br />
Authentication Type You can select Open System or Shared Key type for authentication.<br />
Key Length<br />
You can set 64bit or 128bit Encryption.<br />
Key Format<br />
Select ASCII if you are using ASCII characters (case-sensitive).<br />
Select HEX if you are using hexadecimal numbers (0-9, or A-F).<br />
Default TX Key<br />
You can enter 4 different Encryption Key and select one key to use as default.<br />
10 hexadecimal digits or 5 ASCII characters are needed if 64-bit WEP is used;<br />
26 hexadecimal digits or 13 ASCII characters are needed if 128-bit WEP is used.<br />
Shared Key is used when both the sender and the recipient share a secret key. So you can choose Open<br />
system, or one Shared Key authentication method.<br />
WPA-PSK<br />
Encryption: WPA-PSK (TKIP) or WPA-PSK (AES)<br />
Wi-Fi Protected Access (WPA) with Pre-Shared Key (PSK) provides better security than WEP keys. It does<br />
not require a RADIUS server in order to provide association authentication, but you do have to enter a shared<br />
key for the authentication purpose. The encryption key is generated automatically and dynamically.<br />
20 <strong>WL</strong>5460AP v2 User’s <strong>Manual</strong>
Encryption<br />
You can select WPA-PSK (TKIP) or WPA-PSK (AES) method for data<br />
encryption.<br />
Pre-shared Key There are two formats for choice to set the Pre-shared key, i.e. Passphrase and<br />
Hex. If Hex is selected, users will have to enter a 64 characters string. For easier<br />
configuration, the Passphrase (at least 8 characters) format is recommended.<br />
Group Key Life Time Enter the number of seconds that will elapse before the group key change<br />
automatically. The default is 86400 seconds.<br />
WPA2-PSK<br />
Encryption: WPA2-PSK (AES) or WPA-PSK Mixed<br />
WPA2-PSK authentication method is almost like WPA-PSK, You can choose the Pre-Shared Key format and<br />
enter the Pre-shared key,<br />
21 <strong>WL</strong>5460AP v2 User’s <strong>Manual</strong>
Encryption<br />
Pre-shared Key<br />
Group Key Life Time<br />
802.1x / RADIUS<br />
You can select WPA2-PSK (AES) or WPA2-PSK Mixed method for data<br />
encryption<br />
There are two formats for choice to set the Pre-shared key, i.e. Passphrase and<br />
Hex. If Hex is selected, users will have to enter a 64 characters string. For easier<br />
configuration, the Passphrase (at least 8 characters) format is recommended.<br />
Enter the number of seconds that will elapse before the group key change<br />
automatically. The default is 86400 seconds.<br />
Encryption: 802.1x / RADIUS<br />
security<br />
You can select None, WEP, WPA (TKIP), WPA (AES), WPA2 (AES), WPA2<br />
Mixed method for data encryption.<br />
Encryption: None<br />
No data encryption and Use 802.1x Authentication is disable.<br />
Encryption: WEP<br />
802.1x Authentication is enabled and the RADIUS Server will proceed to check the 802.1x Authentication,<br />
and make the RADIUS server to issue the WEP key dynamically.<br />
You can select WEP 64bits or WEP 128bits for data encryption.<br />
Encryption: WPA (TKIP) / WPA (AES)<br />
WPA-RADIUS authentication use WPA (Wi-Fi Protect Access) data encryption for 802.1x authentication.<br />
22 <strong>WL</strong>5460AP v2 User’s <strong>Manual</strong>
WPA is an encryption standard proposed by WiFi for advance protection by utilizing a password key (TKIP)<br />
or certificate. It is more secure than WEP encryption.<br />
Encryption: WPA2-AES / WPA2-Mixed<br />
The two most important features beyond WPA to become standardized through 802.11i/WPA2 are:<br />
pre-authentication, which enables secure fast roaming without noticeable signal latency. Pre-authentication<br />
provides a way to establish a PMK security association before a client associates. The advantage is that the<br />
client reduces the time that it's disconnected to the network.<br />
Authentication RADIUS Enter the RADIUS Server IP address and Password provided by your ISP.<br />
Server<br />
Port: Enter the RADIUS Server’s port number provided by your ISP. The default<br />
is 1812.<br />
IP Address: Enter the RADIUS Server’s IP Address provided by your ISP.<br />
Password: Enter the password that the AP shares with the RADIUS Server.<br />
Accounting RADIUS Enter the Accounting RADIUS Server IP address and Password provided by your<br />
Server<br />
ISP<br />
Advanced Settings Press the setup button for detail configurations<br />
It is not recommended that settings in this page to be changed unless advanced users want to change to<br />
meet their wireless environment for optimal performance.<br />
Fragment Threshold Fragmentation mechanism is used for improving the efficiency<br />
when high traffic flows along in the wireless network. If your<br />
802.11g Wireless LAN PC Card often transmit large files in wireless<br />
23 <strong>WL</strong>5460AP v2 User’s <strong>Manual</strong>
RTS Threshold<br />
network, you can enter new Fragment Threshold value to split the<br />
packet. The value can be set from 256 to 2346. The default value<br />
is 2346.<br />
RTS Threshold is a mechanism implemented to prevent the “Hidden Node”<br />
problem. “Hidden Node” is a situation in which two stations are within range of<br />
the same Access Point, but are not within range of each other. Therefore, they<br />
are hidden nodes for each other. When a station starts data transmission with<br />
the Access Point, it might not notice that the other station is already using the<br />
wireless medium. When these two stations send data at the same time, they<br />
might collide when arriving simultaneously at the Access Point. The collision<br />
will most certainly result in a loss of messages for both stations.<br />
Thus, the RTS Threshold mechanism provides a solution to prevent data<br />
collisions. When you enable RTS Threshold on a suspect “hidden<br />
station”, this station and its Access Point will use a Request to Send<br />
(RTS). The station will send an RTS to the Access Point, informing<br />
that it is going to transmit the data. Upon receipt, the Access Point<br />
will respond with a CTS message to all station within its range to<br />
notify all other stations to defer transmission. It will also confirm the<br />
requestor station that the Access Point has reserved it for the<br />
time-frame of the requested transmission.<br />
If the “Hidden Node” problem is an issue, please specify the packet size. The<br />
RTS mechanism will be activated if the data size exceeds the value you set..<br />
The default value is 2347.<br />
Warning: Enabling RTS Threshold will cause redundant network overhead<br />
that could negatively affect the throughput performance instead of providing<br />
a remedy.<br />
Beacon Interval<br />
Data Rate<br />
This value should remain at its default setting of 2347. Should you encounter<br />
inconsistent data flow, only minor modifications of this value are<br />
recommended.<br />
Beacon Interval is the amount of time between beacon transmissions. Before<br />
a station enters power save mode, the station needs the beacon interval to<br />
know when to wake up to receive the beacon (and learn whether there are<br />
buffered frames at the access point).<br />
By default, the unit adaptively selects the highest possible rate for<br />
transmission. Select the basic rates to be used among the following options:<br />
Auto, 1, 2, 5.5, 11or 54 Mbps. For most networks the default setting is Auto<br />
which is the best choice. When Auto is enabled the transmission rate will<br />
24 <strong>WL</strong>5460AP v2 User’s <strong>Manual</strong>
Preamble Type<br />
Broadcast SSID<br />
IAPP<br />
select the optimal rate. If obstacles or interference are present, the system will<br />
automatically fall back to a lower rate.<br />
A preamble is a signal used in wireless environment to synchronize the<br />
transmitting timing including Synchronization and Start frame delimiter. In a<br />
"noisy" network environment, the Preamble Type should be set to Long<br />
Preamble. The Short Preamble is intended for applications where minimum<br />
overhead and maximum performance is desired. If in a "noisy" network<br />
environment, the performance will be decreased.<br />
Select enabled to allow all the wireless stations to detect the SSID of this<br />
Access Point.<br />
IAPP (Inter Access Point Protocol) is designed for the enforcement of unique<br />
association throughout a ESS (Extended Service Set) and a secure exchange<br />
of station’s security context between current access point (AP) and new AP<br />
during handoff period.<br />
802.11g Protection The 802.11g standard includes a protection mechanism to ensure mixed 802.11b and<br />
802.11g operation. If there is no such kind of mechanism exists, the two kinds of<br />
standards may mutually interfere and decrease network’s performance.<br />
TX Power Level<br />
For countries that impose limit on <strong>WL</strong>AN output power, it might be necessary<br />
to reduce TX (transmit) power. There are 7 TX Power Levels to choose<br />
from — select a level to make sure that the output power measured at the<br />
antenna end will not exceed the legal limit in your country.<br />
Enable Watch dog Check and enable this watch dog function<br />
Watch Interval<br />
Setup the interval time for watch dog function between 1 to 60 mins<br />
Watch Host Enter the watch dog host ip address .<br />
ACK Timeout<br />
When a packet is sent out from one wireless station to the other, it will waits<br />
for an Acknowledgement frame from the remote station. If the ACK is NOT<br />
received within that timeout period then the packet will be re-transmitted<br />
resulting in reduced throughput. If the ACK setting is too high then<br />
throughput will be lost due to waiting for the ACK Window to timeout on lost<br />
packets. By having the ability to adjust the ACK setting we can effectively<br />
optimize the throughput over long distance links. This is especially true for<br />
802.11a and 802.11g networks<br />
You can set as default for auto adjustment.<br />
Apply Change<br />
Press to save the new settings on the screen.<br />
Reset<br />
Press to discard the data you have entered since last time you press Apply<br />
Change.<br />
Access Control<br />
Press the setup button for detail configurations<br />
25 <strong>WL</strong>5460AP v2 User’s <strong>Manual</strong>
When Enable Wireless Access Control is checked, only those clients whose wireless MAC addresses<br />
listed in the access control list can access this Access Point. If the list contains no entries with this function<br />
being enabled, then no clients will be able to access this Access Point.<br />
Wireless Access Control Select the Access Control Mode from the pull-down menu.<br />
Mode<br />
Disable: Select to disable Wireless Access Control Mode.<br />
Allow Listed: Only the stations shown in the table can associate with the AP.<br />
Deny Listed: Stations shown in the table won’t be able to associate with the AP.<br />
MAC Address<br />
Comment<br />
Apply Changes<br />
Reset<br />
Delete Selected<br />
Delete All<br />
Reset<br />
Enter the MAC Address of a station that is allowed to access this Access Point.<br />
You may enter up to 20 characters as a remark to the previous MAC Address.<br />
Press to save the new settings on the screen.<br />
Press to discard the data you have entered since last time you press Apply<br />
Change.<br />
To delete clients from access to this Access Point, you may firstly check the<br />
Select checkbox next to the MAC address and Comments, and press Delete<br />
Selected.<br />
To delete all the clients from access to this Access Point, just press Delete All<br />
without selecting the checkbox.<br />
If you have made any selection, press Reset will clear all the select mark.<br />
26 <strong>WL</strong>5460AP v2 User’s <strong>Manual</strong>
Client Mode Setting<br />
Alias Name<br />
You can set the alias name for this device. limited not exceed 32 characters.<br />
Disable Wireless Check the box to disable the Wireless LAN Interface, by so doing, you won’t be<br />
LAN Interface able to make wireless connection with this Access Point in the network you are<br />
located. In other words, this device will not be visible by any wireless station.<br />
Band<br />
You can choose one mode of the following you need.<br />
2.4GHz (B): 802.11b supported rate only.<br />
2.4GHz (G): 802.11g supported rate only.<br />
2.4GHz (B+G): 802.11b supported rate and 802.11g supported rate. The<br />
default is 2.4GHz (B+G) mode.<br />
Network Type Client mode have two Network type :<br />
Infrastructure<br />
A wireless network that is built around one or more access points, providing<br />
wireless clients access to wired LAN or Internet service. It is the most popular<br />
<strong>WL</strong>AN network structure today.<br />
AdHoc wireless network do not use wireless AP orrouter as the central hub of the<br />
network. Instead, wireless client are connected directly to each other.<br />
SSID<br />
The SSID differentiates one <strong>WL</strong>AN from another; therefore, all access points and<br />
all devices attempting to connect to a specific <strong>WL</strong>AN must use the same SSID. It is<br />
case-sensitive and must not exceed 32 characters. A device will not be permitted<br />
to join the BSS unless it can provide the unique SSID. An SSID is also referred to<br />
27 <strong>WL</strong>5460AP v2 User’s <strong>Manual</strong>
Site Survey<br />
as a network name because essentially it is a name that identifies a wireless<br />
network.<br />
Channel Number<br />
Auto MAC Clone<br />
<strong>Manual</strong> MAC Clone<br />
Address<br />
Security<br />
Site survey displays all the active Access Points and IBSS in the neighborhood.<br />
You can select one AP to associate. Press Site Survey button to search the<br />
wireless device that this client want to connect.<br />
Allow user to set the channel manually or automatically.<br />
If set channel manually, just select the channel you want to specify.<br />
If “Auto” is selected, user can set the channel range to have Wireless Access Point<br />
automatically survey and choose the channel with best situation for<br />
communication. All stations communicating with the Access Point must use the<br />
same channel.<br />
when setup infrastructure of Client mode, the channel number can not<br />
Be changed. You have to go to AP mode to change the channel number<br />
Check the box to enable MAC Clone for Single Ethernet Client.<br />
Enter the MAC Address of Single Ethernet Client.<br />
Please refer the AP mode settings Security for details.<br />
In client mode are not supported with RADIUS 802.1x authentication.<br />
Advance Setting<br />
Please refer the AP mode settings Advance Setting for details.<br />
28 <strong>WL</strong>5460AP v2 User’s <strong>Manual</strong>
Bridge Mode Setting<br />
Alias Name<br />
You can set the alias name for this device. limited not exceed 32 characters.<br />
Disable Wireless Check the box to disable the Wireless LAN Interface, by so doing, you won’t be<br />
LAN Interface able to make wireless connection with this Access Point in the network you are<br />
located. In other words, this device will not be visible by any wireless station.<br />
Band<br />
You can choose one mode of the following you need.<br />
2.4GHz (B): 802.11b supported rate only.<br />
2.4GHz (G): 802.11g supported rate only.<br />
2.4GHz (B+G): 802.11b supported rate and 802.11g supported rate. The<br />
default is 2.4GHz (B+G) mode.<br />
Channel Number In Bridge mode, both wireless AP/Router device need set to the same Channel<br />
number.<br />
Security<br />
Please refer the AP mode settings Security for details.<br />
But bridge mode are not supported with RADIUS 802.1x authentication.<br />
WDS Security To enable security between wireless AP/Router , you can select WEP 64bits, WEP<br />
128bits, WPA (TKIP), WPA2(AES) for data encryption.<br />
For WEP encryption, Select ASCII if you are using ASCII characters. Select HEX if<br />
you are using hexadecimal numbers (0-9, or A-F).<br />
For WPA/WPA2 encryption, you need enter the Pre-Shared Key Information for<br />
the authentication purpose.<br />
29 <strong>WL</strong>5460AP v2 User’s <strong>Manual</strong>
Advance Setting<br />
AP MAC address<br />
Site Survey<br />
Please refer the AP mode settings Advance Setting for details.<br />
Enter 12 digits in hex numbers in the AP MAC address (BSSID) field and press the<br />
Add MAC Address Button to associate with other’s Wireless access point.<br />
Before you want to use bridge mode to connect each other to provide<br />
A wireless bridge between 2 remote LANs, you need add the BSSID of other’s<br />
wireless AP first.<br />
Site survey displays all the active Access Points and IBSS in the neighborhood.<br />
Press Site Survey button to search the wireless device.<br />
Add MAC Address<br />
Reset<br />
Show Statistics<br />
Delete Selected<br />
Delete All<br />
Enter MAC address of remote access point.<br />
Press to discard the data you have entered since last time you press Apply<br />
Change.<br />
List all packets information of traffic.<br />
To delete bridge from access to this Access Point, you may firstly check the Select<br />
checkbox next to the MAC address and Comments, and press Delete Selected.<br />
To delete all the clients from access to this Access Point, just press Delete All<br />
without selecting the checkbox.<br />
30 <strong>WL</strong>5460AP v2 User’s <strong>Manual</strong>
WDS Repeater Mode Setting<br />
Alias Name<br />
You can set the alias name for this device. limited not exceed 32 characters.<br />
Disable Wireless Check the box to disable the Wireless LAN Interface, by so doing, you won’t be<br />
LAN Interface able to make wireless connection with this Access Point in the network you are<br />
located. In other words, this device will not be visible by any wireless station.<br />
Band<br />
You can choose one mode of the following you need.<br />
2.4GHz (B): 802.11b supported rate only.<br />
2.4GHz (G): 802.11g supported rate only.<br />
2.4GHz (B+G): 802.11b supported rate and 802.11g supported rate. The<br />
default is 2.4GHz (B+G) mode.<br />
SSID<br />
The SSID differentiates one <strong>WL</strong>AN from another; therefore, all access points and<br />
all devices attempting to connect to a specific <strong>WL</strong>AN must use the same SSID. It<br />
is case-sensitive and must not exceed 32 characters. A device will not be<br />
permitted to join the BSS unless it can provide the unique SSID. An SSID is also<br />
referred to as a network name because essentially it is a name that identifies a<br />
wireless network<br />
Channel Number The number of channels supported depends on the region of this Access Point. All<br />
stations communicating with the Access Point must use the same channel.<br />
Wireless Client<br />
Isolation<br />
When enabled, the wireless clients are separated from each other. Please refer<br />
the AP mode settings Wireless Client Isolation for details.<br />
31 <strong>WL</strong>5460AP v2 User’s <strong>Manual</strong>
Security<br />
Please refer the AP mode settings Security for details,<br />
This setting is use between Wireless client and this device.<br />
WDS Security<br />
Please refer to the Bridge mode settings WDS Security for details<br />
This setting is use between both wireless AP/Router devices.<br />
Advance Setting<br />
Access Control<br />
AP MAC Address<br />
Delete Selected<br />
Delete All<br />
Please refer the AP mode settings Advance Setting for details.<br />
Please refer the AP mode setting Access Control for details.<br />
Enter 12 digits in hex numbers in the AP MAC address (BSSID) field and press the<br />
Add MAC Address Button to associate with other’s Wireless access point.<br />
Before you want to use bridge mode to connect each other to provide<br />
A wireless bridge between 2 remote LANs, you need add the BSSID of other’s<br />
wireless AP first.<br />
To delete bridge from access to this Access Point, you may firstly check the Select<br />
checkbox next to the MAC address and Comments, and press Delete Selected.<br />
To delete all the clients from access to this Access Point, just press Delete All<br />
without selecting the checkbox.<br />
32 <strong>WL</strong>5460AP v2 User’s <strong>Manual</strong>
Universal Repeater Mode Setting<br />
Alias Name<br />
You can set the alias name for this device. limited not exceed 32 characters.<br />
Disable Wireless Check the box to disable the Wireless LAN Interface, by so doing, you won’t be<br />
LAN Interface able to make wireless connection with this Access Point in the network you are<br />
located. In other words, this device will not be visible by any wireless station.<br />
Band<br />
You can choose one mode of the following you need.<br />
2.4GHz (B): 802.11b supported rate only.<br />
2.4GHz (G): 802.11g supported rate only.<br />
2.4GHz (B+G): 802.11b supported rate and 802.11g supported rate. The default<br />
is 2.4GHz (B+G) mode.<br />
SSID<br />
The SSID differentiates one <strong>WL</strong>AN from another; therefore, all access points and<br />
all devices attempting to connect to a specific <strong>WL</strong>AN must use the same SSID. It is<br />
case-sensitive and must not exceed 32 characters. A device will not be permitted<br />
to join the BSS unless it can provide the unique SSID. An SSID is also referred to<br />
as a network name because essentially it is a name that identifies a wireless<br />
network<br />
Channel Number The number of channels supported depends on the region of this Access Point. All<br />
stations communicating with the Access Point must use the same channel.<br />
SSID of extended<br />
Interface<br />
When in Universal Repeater mode, you have to enter the ESSID of other’s<br />
AP/Router that device want to connect.<br />
The device SSID and the SSID of extended interface can be the same or different.<br />
33 <strong>WL</strong>5460AP v2 User’s <strong>Manual</strong>
Site Survey<br />
Security<br />
Advance Setting<br />
Access Control<br />
When you are using the universal repeater mode, please make sure the remote<br />
AP/Router WDS function is turned off.<br />
Please refer the Bridge mode settings Site Survey for details.<br />
Please refer the AP mode settings Security for details,<br />
This setting used Wireless client or remote AP to link this device.<br />
Please refer the AP mode settings Advance Setting for details.<br />
Please refer the AP mode setting Access Control for details.<br />
34 <strong>WL</strong>5460AP v2 User’s <strong>Manual</strong>
WISP (Client Router) Mode Setting<br />
Alias Name You can set the alias name for this device. limited not exceed 32<br />
characters<br />
Disable Wireless Check the box to disable the Wireless LAN Interface, by so doing, you won’t be<br />
LAN Interface able to make wireless connection with this Access Point in the network you are<br />
located. In other words, this device will not be visible by any wireless station.<br />
Band<br />
You can choose one mode of the following you need.<br />
2.4GHz (B): 802.11b supported rate only.<br />
2.4GHz (G): 802.11g supported rate only.<br />
2.4GHz (B+G): 802.11b supported rate and 802.11g supported rate. The<br />
default is 2.4GHz (B+G) mode.<br />
SSID<br />
The SSID differentiates one <strong>WL</strong>AN from another; therefore, all access points and<br />
all devices attempting to connect to a specific <strong>WL</strong>AN must use the same SSID. In<br />
WISP mode, you have to enter the WISP Outdoor AP<br />
SSID manually or click the “site survey” button to connect and get<br />
SSID automatically.<br />
Site Survey<br />
Please refer the Client mode settings Site Survey for details.<br />
MAC Clone Address Enter the MAC Address of Single Ethernet Client.<br />
Security<br />
Please refer the AP mode settings Security Survey for details.<br />
Not supported with RADIUS 802.1x authentication.<br />
35 <strong>WL</strong>5460AP v2 User’s <strong>Manual</strong>
Advance Setting<br />
WAN port<br />
Please refer the AP mode settings Advance Setting for details.<br />
Virtual Server<br />
You can select many WAN Access Type : Static IP , DHCP Client, PPPOE,<br />
PPTP, and L2TP for WAN connection depend on you WISP provided.<br />
Special Application<br />
In WISP mode, you can setup and enable Virtual server function. Like Web, FTP,<br />
Email, DNS, Telnet server.<br />
Select one virtual server type and enter the Local IP address, Local Port Range<br />
and click the save button.<br />
You can enable some system default special application, like Qucktime 4<br />
36 <strong>WL</strong>5460AP v2 User’s <strong>Manual</strong>
DMZ<br />
Audio/Video application, Dialpad internet phone service. or define the special<br />
application manually, select the incoming type (TCP/UDP) Incoming start ~ End<br />
port ,Trigger Start ~ End port. Select the Trigger Type.<br />
Enable DMZ and enter the DMZ Host IP address.<br />
Remote Management<br />
Enable the function that setting configuration from Internet.<br />
37 <strong>WL</strong>5460AP v2 User’s <strong>Manual</strong>
WISP + Universal Repeater Mode Setting<br />
Alias Name You can set the alias name for this device. limited not exceed 32<br />
characters<br />
Disable Wireless Check the box to disable the Wireless LAN Interface, by so doing, you won’t be<br />
LAN Interface able to make wireless connection with this Access Point in the network you are<br />
located. In other words, this device will not be visible by any wireless station.<br />
Band<br />
You can choose one mode of the following you need.<br />
2.4GHz (B): 802.11b supported rate only.<br />
2.4GHz (G): 802.11g supported rate only.<br />
2.4GHz (B+G): 802.11b supported rate and 802.11g supported rate. The<br />
default is 2.4GHz (B+G) mode.<br />
SSID<br />
The SSID differentiates one <strong>WL</strong>AN from another; therefore, all access points and<br />
all devices attempting to connect to a specific <strong>WL</strong>AN must use the same SSID. In<br />
WISP mode, you have to enter the WISP Outdoor AP<br />
SSID manually or click the “site survey” button to connect and get<br />
SSID automatically.<br />
Site Survey<br />
Please refer the Client mode settings Site Survey for details.<br />
SSID of extended<br />
Interface<br />
Please refer the Universal repeater mode settings SSID of extended Interface<br />
for details.<br />
MAC Clone Address Enter the MAC Address of Single Ethernet Client.<br />
38 <strong>WL</strong>5460AP v2 User’s <strong>Manual</strong>
Enable Encryption On<br />
You can designate security to use for <strong>WL</strong>AN side, WAN side or both sides.<br />
Both WAN and <strong>WL</strong>AN side: The security is used on both the WISP and the<br />
Wireless Client(PC side) connection..<br />
<strong>WL</strong>AN side only: The security used on wireless client connection only. The<br />
WISP side is not encrypted.<br />
WAN side only: The security used on WISP connection only. The <strong>WL</strong>AN side is<br />
not encrypted..<br />
Security<br />
Please refer the AP mode settings Security Survey for details.<br />
Not supported with RADIUS 802.1x authentication.<br />
Advance Setting Please refer the AP mode settings Advance Setting for details.<br />
WAN port<br />
Please refer the WISP mode settings WAN port Setting for details.<br />
Virtual Server Please refer the WISP mode settings Virtual Server Setting for details.<br />
Special Application Please refer the WISP mode settings Special Application Setting for details.<br />
DMZ<br />
Please refer the WISP mode settings DMZ Setting for details.<br />
Remote Management Please refer the WISP mode settings Remote Management Setting for details.<br />
39 <strong>WL</strong>5460AP v2 User’s <strong>Manual</strong>
Status<br />
In this screen, you can see the current settings and status of this Access Point. You can change settings by<br />
selecting specific tab described in below.<br />
. System<br />
System<br />
40 <strong>WL</strong>5460AP v2 User’s <strong>Manual</strong>
Uptime<br />
The time period since the device was up.<br />
Firmware Version The current version of the firmware installed in this device.<br />
Wireless<br />
Mode<br />
There are 7 modes supported, The default mode is Access Point. If you want to<br />
change to other mode, please click the Mode and select the wireless mode you<br />
want.<br />
Physical Address Display wireless MAC address information.<br />
Band<br />
Display wireless band type information.<br />
SSID<br />
Display the SSID of this device.<br />
Channel Number The number of channels supported depends on the region of this Access Point. All<br />
stations communicating with the Access Point must use the same channel.<br />
Encryption<br />
Display encryption setting information.<br />
Associated Clients Displays the total number of clients associated to this AP. You can have up to 64<br />
clients to associate to this Access Point.<br />
BSSID<br />
BSSID displays the ID of current BSS, which uniquely identifies each BSS. In AP<br />
mode, this value is the MAC address of this Access Point.<br />
LAN Configuration (TCP/IP)<br />
Connection Method: Display the connection method, you can setup in TCP/IP section<br />
Physical Address: Display the LAN MAC address<br />
IP Address:<br />
Display the LAN IP address, you can setup in TCP/IP section<br />
Network Mask: Display the network mask, you can setup in TCP/IP section<br />
Default Gateway: Display the default gateway ip , you can setup in TCP/IP section<br />
DHCP Server: Default the DHCP Server is enabled(ON)<br />
DHCP Start IP Display the DHCP server start IP address.<br />
Address:<br />
DHCP Finish IP Display the DHCP server finish IP address.<br />
Address:<br />
Internet Configuration<br />
Connection Method: Display the internet connection method, you can setup in WISP modeWAN<br />
Port configuration<br />
Physical Address: Display the AP MAC address information<br />
IP Address:<br />
Display the internet IP Address, you can setup in WISP modeWAN<br />
Port configuration<br />
Network Mask: Display the network mask, you can setup in WISP modeWAN<br />
Port configuration<br />
Default Gateway: Display the default gateway , you can setup in WISP modeWAN<br />
Port configuration<br />
41 <strong>WL</strong>5460AP v2 User’s <strong>Manual</strong>
. Statistics<br />
The Statistics table shows the packets sent/received over wireless and ethernet LAN respectively.<br />
. Active Clients<br />
Display the active Wireless Clients information, include wireless MAC address, TX/Rx Packet, TX Rate, and<br />
Power Saving information.<br />
42 <strong>WL</strong>5460AP v2 User’s <strong>Manual</strong>
TCP/IP<br />
In this page, you can change the TCP/IP settings of this Access Point, select to enable/disable the DHCP<br />
Client, 802.1d Spanning Tree, and Clone MAC Address.<br />
IP Address<br />
This field can be modified only when DHCP Client is disabled. If your system<br />
manager assigned you static IP settings, then you will have to enter the<br />
information provided.<br />
Subnet Mask<br />
Enter the information provided by your system manager.<br />
Default Gateway Enter the information provided by your system manager.<br />
DHCP<br />
Select Disable, Client or Server from the pull-down menu.<br />
Disable: Select to disable DHCP server function.<br />
Client: Select to automatically get the LAN port IP address from ISP (For<br />
ADSL/Cable Modem).<br />
Server: Select to enable DHCP server function.<br />
DHCP Client Range <strong>WL</strong>-5060AP IP addresses continuing from 192.168.100.1 to 192.168.100.253<br />
Show Client<br />
Click to show Active DHCP Client table.<br />
DNS Server<br />
Enter the Domain Name Service IP address.<br />
802.1d Spanning Tree To enable 802.1d Spanning Tree will prevent the network from infinite loops.<br />
Infinite loop will happen in the network when WDS is enabled and there are<br />
multiple active paths between stations.<br />
43 <strong>WL</strong>5460AP v2 User’s <strong>Manual</strong>
Clone MAC Address<br />
You can specify the MAC address of your Access Point to replace the factory<br />
setting.<br />
44 <strong>WL</strong>5460AP v2 User’s <strong>Manual</strong>
Reboot<br />
Click the Reboot button to restart device.<br />
45 <strong>WL</strong>5460AP v2 User’s <strong>Manual</strong>
Other<br />
. Upgrade Firmware<br />
1. Download the latest firmware from your distributor and save the file on the hard drive.<br />
2. Start the browser, open the configuration page, click on Other, and click Upgrade Firmware to<br />
enter the Upgrade Firmware window.<br />
3. Enter the new firmware’s path and file name (i.e. C:\FIRMWARE\firmware.bin) or click the Browse<br />
button to find and open the firmware file (the browser will display to correct file path).<br />
4. Click Upload button to start the upgrade function or Reset button to clear all the settings on this<br />
page.<br />
If firmware upgrade fail, please see Appendix A.<br />
. Save / Reload Settings<br />
This function enables users to save the current configuration as a file (i.e. config.dat) or loades<br />
configuration from a file. Enter the file name or click Browse… to find the file from your computer.<br />
Save Settings to File: Click SAVE.. to save the current configuration to file.<br />
Load Settings From File: Click Browse… if you want to load a pre-saved file, enter the file name<br />
with the correct path and then click on Upload or click Browse… to select the file.<br />
46 <strong>WL</strong>5460AP v2 User’s <strong>Manual</strong>
Reset Settings to Default: Click Reset button to restore the default configuration.<br />
. Password<br />
For secure reason, It is recommended that you set the account to access the web server of this Access Point.<br />
Leaving the password blank will disable the protection. The login screen prompts immediately once you finish<br />
setting password. Remember your password for you will be asked to enter them every time you access the<br />
web server of this Access Point.<br />
New Password Set your new password. Password can be up to 30 characters long. Password<br />
can contain letter, number and space. It is case sensitive.<br />
Confirm Password Re-enter the new password for confirmation.<br />
Note: when you setup the password and click the apply change button, system will pop-up Window and ask<br />
the username and password, Please enter system default username “admin” (not changeable) and your<br />
password for entering the configuration WEB UI.<br />
. Log<br />
47 <strong>WL</strong>5460AP v2 User’s <strong>Manual</strong>
This function can list all log information about device.<br />
Enable Log<br />
System All<br />
Wireless Only<br />
Refresh<br />
Clear<br />
. NTP<br />
Enabled or Disabled display system log information.<br />
List system all log information.<br />
List wireless log information only.<br />
Refresh log information.<br />
Clear all information in window.<br />
This function can setting system time from local computer or Internet.<br />
Current Time<br />
Setting system time<br />
Enable NTP client update Enable or Disable setting system from Internet NTP Server.<br />
Time Zone Select Select system time zone.<br />
NTP Server<br />
Select NTP Server by Server list or manual inputing.<br />
Save<br />
Save configurayion to flsh.<br />
Reset<br />
Reset system time configurayion.<br />
Refresh<br />
Refresh system time information.<br />
48 <strong>WL</strong>5460AP v2 User’s <strong>Manual</strong>
Appendix A<br />
. Emergency Code<br />
Should firmware upgrade fail, <strong>WL</strong>-5460AP will enter Emergency Mode. Please do the following instructions<br />
for firmware recovery:<br />
1. Open the internet protocol dialogue and set IP address at http://192.168.1.X/.<br />
2. Open WEB broswer and enter the IP address http://192.168.1.6/ to enter Emergency Mode setup page.<br />
3. Click the Browser button to find and open the firmware file.<br />
4. Click UPGRADE button to start upgrade firmware. Wait for about 35 to 40 seconds for the firmware<br />
upgrade to complete.<br />
49 <strong>WL</strong>5460AP v2 User’s <strong>Manual</strong>
5. Reopen the internet protocol dialogue. Set IP address at http://192.168.100.X/.<br />
6. Open WEB browser. Enter the IP address http://192.168.100.252/ to login to the configuration menu.<br />
50 <strong>WL</strong>5460AP v2 User’s <strong>Manual</strong>