Connecting a MIDI keyboard to your Linux system - Linux Magazine
Connecting a MIDI keyboard to your Linux system - Linux Magazine
Connecting a MIDI keyboard to your Linux system - Linux Magazine

Create successful ePaper yourself
Turn your PDF publications into a flip-book with our unique Google optimized e-Paper software.
<strong>Connecting</strong> a <strong>MIDI</strong> <strong>keyboard</strong> <strong>to</strong> <strong>your</strong> <strong>Linux</strong> <strong>system</strong><br />
MAKING<br />
MUSIC<br />
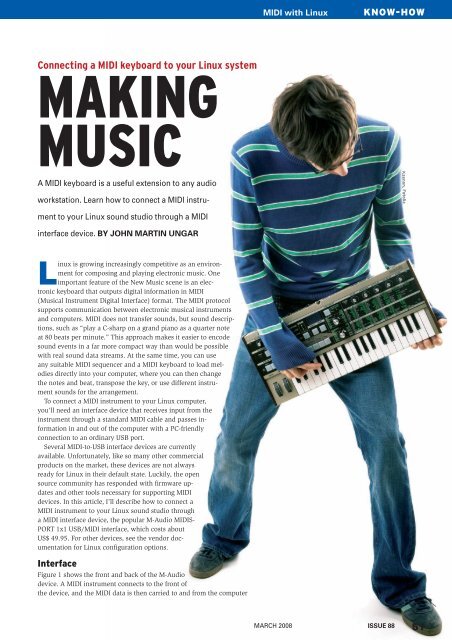
A <strong>MIDI</strong> <strong>keyboard</strong> is a useful extension <strong>to</strong> any audio<br />
workstation. Learn how <strong>to</strong> connect a <strong>MIDI</strong> instru-<br />
ment <strong>to</strong> <strong>your</strong> <strong>Linux</strong> sound studio through a <strong>MIDI</strong><br />
interface device. BY JOHN MARTIN UNGAR<br />
<strong>Linux</strong> is growing increasingly competitive as an environment<br />
for composing and playing electronic music. One<br />
important feature of the New Music scene is an electronic<br />
<strong>keyboard</strong> that outputs digital information in <strong>MIDI</strong><br />
(Musical Instrument Digital Interface) format. The <strong>MIDI</strong> pro<strong>to</strong>col<br />
supports communication between electronic musical instruments<br />
and computers. <strong>MIDI</strong> does not transfer sounds, but sound descriptions,<br />
such as “play a C-sharp on a grand piano as a quarter note<br />
at 80 beats per minute.” This approach makes it easier <strong>to</strong> encode<br />
sound events in a far more compact way than would be possible<br />
with real sound data streams. At the same time, you can use<br />
any suitable <strong>MIDI</strong> sequencer and a <strong>MIDI</strong> <strong>keyboard</strong> <strong>to</strong> load melodies<br />
directly in<strong>to</strong> <strong>your</strong> computer, where you can then change<br />
the notes and beat, transpose the key, or use different instrument<br />
sounds for the arrangement.<br />
To connect a <strong>MIDI</strong> instrument <strong>to</strong> <strong>your</strong> <strong>Linux</strong> computer,<br />
you’ll need an interface device that receives input from the<br />
instrument through a standard <strong>MIDI</strong> cable and passes information<br />
in and out of the computer with a PC-friendly<br />
connection <strong>to</strong> an ordinary USB port.<br />
Several <strong>MIDI</strong>-<strong>to</strong>-USB interface devices are currently<br />
available. Unfortunately, like so many other commercial<br />
products on the market, these devices are not always<br />
ready for <strong>Linux</strong> in their default state. Luckily, the open<br />
source community has responded with firmware updates<br />
and other <strong>to</strong>ols necessary for supporting <strong>MIDI</strong><br />
devices. In this article, I’ll describe how <strong>to</strong> connect a<br />
<strong>MIDI</strong> instrument <strong>to</strong> <strong>your</strong> <strong>Linux</strong> sound studio through<br />
a <strong>MIDI</strong> interface device, the popular M-Audio <strong>MIDI</strong>S-<br />
PORT 1x1 USB/ <strong>MIDI</strong> interface, which costs about<br />
US$ 49.95. For other devices, see the vendor documentation<br />
for <strong>Linux</strong> configuration options.<br />
Interface<br />
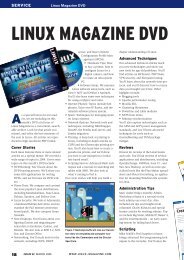
Figure 1 shows the front and back of the M-Audio<br />
device. A <strong>MIDI</strong> instrument connects <strong>to</strong> the front of<br />
the device, and the <strong>MIDI</strong> data is then carried <strong>to</strong> and from the computer<br />
<strong>MIDI</strong> with <strong>Linux</strong><br />
MARCH 2008<br />
KNOW-HOW<br />
ISSUE 88<br />
51
KNOW-HOW<br />
Figure 1: The <strong>MIDI</strong>SPORT 1x1 interface connects <strong>to</strong> <strong>MIDI</strong><br />
devices and then passes the information <strong>to</strong> the computer<br />
through the USB port.<br />
through the USB port on the back. The<br />
“1x1” in the name means that the device<br />
has one <strong>MIDI</strong> In port and one <strong>MIDI</strong> Out<br />
port. (The <strong>MIDI</strong> Out connection lets <strong>your</strong><br />
<strong>Linux</strong> <strong>system</strong> output <strong>MIDI</strong> instructions<br />
<strong>to</strong> an external sound-generating device.)<br />
M-Audio makes interface models with<br />
up <strong>to</strong> eight inputs and outputs.<br />
To use the the M-Audio <strong>MIDI</strong> interface<br />
with <strong>Linux</strong>, you’ll need <strong>to</strong> install new<br />
firmware. Debian users will prefer the<br />
DEB package [1]; users of Ubuntu 7.04<br />
need a separate version [2]. SUSE and<br />
openSUSE, Red Hat/ Fedora, and Mandriva<br />
can use the RPM packages [3].<br />
Users with other distributions will need<br />
version 1.2 of the source code [4].<br />
Listing 1: New Device<br />
01 nonumber<br />
02 Bus 002 Device 001: ID<br />
0000:0000<br />
03 Bus 001 Device 002: ID<br />
0763:1011 Midiman<br />
04 Bus 001 Device 001: ID<br />
0000:0000<br />
Choosing a Keyboard<br />
To leverage the features offered by modern,<br />
virtual instruments, I recommend a<br />
<strong>keyboard</strong> with <strong>to</strong>uch response, as well<br />
as additional after-<strong>to</strong>uch that provides<br />
modulation options at the push of a but<strong>to</strong>n.<br />
Also, the <strong>keyboard</strong> should have a<br />
pitch bend wheel <strong>to</strong> change the key and<br />
another modulation wheel <strong>to</strong> change<br />
the sound.<br />
<strong>MIDI</strong> with <strong>Linux</strong><br />
Regardless of <strong>your</strong> distribution,<br />
you will need a utility<br />
called fxload <strong>to</strong> upload<br />
the firmware <strong>to</strong> the <strong>MIDI</strong> interface;<br />
<strong>your</strong> distribution’s<br />
package manager should<br />
give you an install option.<br />
On Debian and Ubuntu,<br />
simply double-click the package<br />
after downloading it and<br />
follow the instructions of the<br />
package manager.<br />
For openSUSE, download<br />
the ezusbmidi package <strong>to</strong><br />
<strong>your</strong> machine and launch<br />
YaST <strong>to</strong> install.<br />
Workaround<br />
If any problems occur, you<br />
can try a workaround. First,<br />
load the firmware on<strong>to</strong> <strong>your</strong><br />
<strong>system</strong> and unpack the archive. Then,<br />
pop up a console, change <strong>to</strong> the new<br />
direc<strong>to</strong>ry created at the last step (midisport-firmware-1.2),<br />
and enter the following<br />
commands:<br />
nonumber<br />
$ ./configure<br />
$ make<br />
$ sudo su<br />
# make install<br />
QJackCtl.<br />
This gives you the firmware,<br />
and you will have a udev rule <strong>to</strong><br />
match in /etc/udev/Rules.d, rule 42,<br />
which will be called something like<br />
42-midisport-firmware.rules.<br />
The corresponding firmware scripts<br />
are located in /usr/local/share/usb/maudio<br />
and are identifiable by the file extension<br />
.ihx.<br />
Make sure that none of these scripts is<br />
0 bytes. If so, the installation script has<br />
caused an error and you will need <strong>to</strong><br />
01 nonumber<br />
02 snd_usb_audio 88736 0<br />
03 snd_usb_lib 21888 1 snd_usb_<br />
audio<br />
04 snd_pcm 89096 6 snd_usb_<br />
audio,snd_hda_intel,<br />
snd_hda_codec,snd_pcm_oss<br />
05 snd_rawmidi 31392<br />
52 ISSUE 88 MARCH 2008<br />
2 snd_usb_lib,snd_seq_midi<br />
06 snd_hwdep 15240 1 snd_usb_<br />
manually copy the file from the midisport-firmware-1.2<br />
folder <strong>to</strong> the firmware<br />
direc<strong>to</strong>ry /usr/local/share/usb/maudio.<br />
The device is attached, but you still<br />
can’t use it. To do so, you first must load<br />
the firmware <strong>to</strong> the <strong>MIDI</strong> box via USB.<br />
Previously, this task was handled by the<br />
hotplug daemon, but modern distributions<br />
use the Hardware Abstraction<br />
Layer (HAL) and the udev rules, which<br />
are located below /etc/ udev/ Rules.d. The<br />
rules for <strong>your</strong> <strong>MIDI</strong> box are still missing,<br />
so let’s create them.<br />
With HAL and udev, the <strong>system</strong> takes<br />
about 60 seconds <strong>to</strong> find the new device<br />
and activate it with the use of the udev<br />
rule. Debian-based <strong>system</strong>s do this reliably,<br />
but you might need <strong>to</strong> give open-<br />
SUSE 10.2 a helping hand. The fxload<br />
command tells udev <strong>to</strong> upload the firmware<br />
<strong>to</strong> the device. If this does not happen<br />
au<strong>to</strong>matically, you can perform the<br />
steps manually. To do so, pop up a console<br />
and load the firmware as follows:<br />
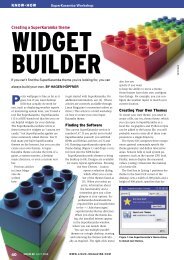
Figure 2: The main window in the Jack control program,<br />
$ fxload -D /dev/bus/usb/USB-Bus<br />
/Device -v -s /usr/local/share/u<br />
sb/maudio/MidiSportLoader.ihx -I<br />
/usr/local/share/usb/maudio/Mid<br />
iSport1x1.ihx<br />
Replace USB-Bus with the numeric identifier<br />
that lsusb shows you; in this example,<br />
this is 001. In the same vein, use the<br />
device number that is shown for Device<br />
– 002, in this case. Then, open the KDE<br />
Listing 2: Checking for Required Modules<br />
audio<br />
07 snd 65256 17 snd_usb_<br />
audio,snd_hda_intel,<br />
snd_seq_oss,snd_hda_<br />
codec,snd_pcm_oss,<br />
snd_mixer_oss,snd_seq,snd_<br />
pcm,<br />
snd_timer,snd_rawmidi,snd_<br />
seq_device,<br />
snd_hwdep<br />
08 usbhid 45088 0
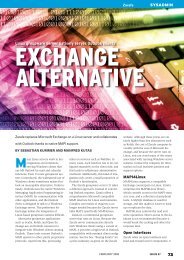
Figure 3: The Jack setup menu with critical settings.<br />
Desk<strong>to</strong>p Settings program and change <strong>to</strong><br />
Sound and Multimedia | Sound <strong>system</strong> |<br />
Hardware. Now you will see <strong>your</strong> device<br />
or at least be able <strong>to</strong> enable it in Select<br />
<strong>MIDI</strong> device. Note that Debian and<br />
Ubuntu do not have their usb/maudio<br />
direc<strong>to</strong>ries below /usr/local/share, but<br />
below /usr/share instead.<br />
<strong>Connecting</strong> the Keyboard<br />
Attaching any <strong>keyboard</strong> <strong>to</strong> the 1x1 interface<br />
is possible; any old organ with a<br />
<strong>MIDI</strong> port will do, but you can just as<br />
easily hitch up <strong>to</strong> a modern <strong>keyboard</strong> or<br />
synthesizer from <strong>your</strong> live equipment.<br />
For my experiments, I used a fairly ancient<br />
Yamaha PSR 400 and was happy<br />
enough with it.<br />
Like the <strong>MIDI</strong> interface, the <strong>keyboard</strong><br />
must have at least one <strong>MIDI</strong> In and one<br />
<strong>MIDI</strong> Out port. Connect the two with the<br />
appropriate connec<strong>to</strong>rs of the <strong>MIDI</strong> interface<br />
device. (Note that the signal going<br />
out of the <strong>keyboard</strong> is going in <strong>to</strong> the interface,<br />
and the signal going out of the<br />
interface device is going in <strong>to</strong> the <strong>keyboard</strong>.)<br />
Using the USB lead, connect the<br />
box <strong>to</strong> <strong>your</strong> computer.<br />
Now the <strong>system</strong> should show the new<br />
device. Popping up a console and entering<br />
lsusb lets you check this. If everything<br />
is wired up correctly, the output<br />
should be similar <strong>to</strong> Listing 1.<br />
Meet Jack<br />
After <strong>your</strong> PC has identified the interface<br />
as a USB device, you can start using the<br />
<strong>keyboard</strong>. To do so, you will need the<br />
Jack [5] sound server.<br />
Jack is a low-latency <strong>system</strong> that is<br />
ideal for a trouble-free sound <strong>system</strong>. La-<br />
tency refers <strong>to</strong> the<br />
wait time between<br />
triggering and processing<br />
a signal.<br />
In music and<br />
sound generation,<br />
<strong>to</strong>o much latency<br />
will cause clicks<br />
and dropouts, and<br />
in recording, it<br />
will cause an unacceptable<br />
lack of<br />
synchronization in<br />
signal processing.<br />
The kernel is responsible<br />
for these<br />
delays on <strong>Linux</strong>;<br />
however, a solution<br />
has been available since the introduction<br />
of kernel version 2.6, and version<br />
2.6.10 even introduced a working<br />
low-latency variant. Ubuntu Studio [6]<br />
and JAD [7] pre-install the kernel, but<br />
you can build <strong>your</strong> own low-latency<br />
kernel for any other distribution.<br />
The Jack sound server cuts in<strong>to</strong> the<br />
Advanced <strong>Linux</strong> Sound Architecture<br />
(ALSA) at a low level <strong>to</strong> handle highbandwidth<br />
audio streams at maximum<br />
speed. Whether the sound streams come<br />
from the analog converter on <strong>your</strong> sound<br />
card, an edi<strong>to</strong>r, effects, or virtual instruments<br />
makes no difference. Jack lets you<br />
send data both <strong>to</strong> ALSA’s pcm_out and<br />
any other program that can generate a<br />
Jack-in port. This gives users the framework<br />
for an extremely flexible and extensible<br />
modular software <strong>system</strong>. Because<br />
Jack latches in<strong>to</strong> the <strong>system</strong> at a<br />
low level, you need root privileges <strong>to</strong><br />
launch the <strong>system</strong>, which also applies<br />
<strong>to</strong> any application that uses Jack.<br />
Installing Jack<br />
For basic <strong>MIDI</strong> studio operations, you<br />
only need the Jack daemon and<br />
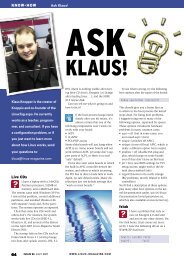
Figure 4: QJackCtl Patchbay is where the connected audio applica-<br />
tions are patched.<br />
<strong>MIDI</strong> with <strong>Linux</strong><br />
MARCH 2008<br />
KNOW-HOW<br />
QJackCtl, the Qt-based GUI. Both packages<br />
are provided by any standard distribution<br />
and can be installed easily with<br />
YaST or Synaptic.<br />
Immediately after the install, Jack is<br />
ready for use. Before you launch Jack for<br />
the first time, check <strong>to</strong> see whether the<br />
kernel has all the required modules. To<br />
do so, pop up a console and enter lsmod<br />
| grep usb.<br />
The output should look something like<br />
Listing 2; otherwise, you will need <strong>to</strong><br />
load the USB sound module before you<br />
continue. To do so, enter the command<br />
modprobe snd_usb_audio. Then type<br />
lsmod | grep usb again. Having the snd_<br />
seq module is important. If this module<br />
does not appear in the list, type modprobe<br />
snd_seq <strong>to</strong> load it.<br />
Starting Jack<br />
To start the Jack front end, click Applications<br />
| Multimedia | Music in <strong>your</strong> KDE<br />
menu and select QJackCtl. The spartan<br />
main window provided by the front end<br />
appears (Figure 2). If you click Start immediately,<br />
you will probably see an error<br />
message because the default settings<br />
are not normally correct. Thus, it makes<br />
more sense <strong>to</strong> select the Setup menu<br />
(Figure 3).<br />
To begin, enable the parameters Realtime,<br />
No Memory Lock, H/ W Moni<strong>to</strong>r,<br />
and H/ W Meter, as well as Verbose messages<br />
output. In the Interface drop-down<br />
box, select the hw:0 option and, above<br />
that, accept the settings as Driver: alsa.<br />
Pressing OK saves the settings; now quit<br />
Jack and restart it.<br />
Next, you can move on <strong>to</strong> wiring the<br />
<strong>system</strong>. In the multimedia section,<br />
launch the ZynAddSubFX synthesizer. If<br />
the synthesizer is not installed yet, use<br />
<strong>your</strong> package manager <strong>to</strong> install it. Then,<br />
in the Jack control window, open Patchbay<br />
(Figure 4).<br />
To enable input,<br />
click Add <strong>to</strong> the<br />
right of Input<br />
Sockets/ Plugs. In<br />
the Type dialog<br />
that appears, select<br />
<strong>MIDI</strong> and then<br />
select the <strong>MIDI</strong><br />
interface below<br />
Client. Clicking<br />
Add Plug adds the<br />
<strong>MIDI</strong> interface <strong>to</strong><br />
the list of avail-<br />
ISSUE 88<br />
53
KNOW-HOW<br />
Figure 5: The spartan welcome window of the Seq24 sequencer gives<br />
users space <strong>to</strong> create new patterns.<br />
able plugs. Pressing OK confirms <strong>your</strong><br />
selection; then, quit the dialog. Now<br />
<strong>your</strong> <strong>keyboard</strong> is available as an input<br />
device. In the same way, you can enable<br />
output on the other side of the Patchbay<br />
window with ZynAddSubFX as <strong>your</strong><br />
<strong>MIDI</strong> input.<br />
<strong>Connecting</strong> the two plugs is the last<br />
step. To do so, select the Input Socket<br />
and the Output Socket and click Connect<br />
then Activate. Clicking the close control<br />
(x) but<strong>to</strong>n closes the Patchbay window.<br />
Now you have wired up <strong>your</strong> <strong>keyboard</strong><br />
and synthesizer with Jack and you<br />
can be creative – load a sound in<strong>to</strong><br />
ZynAddSubFX and play!<br />
If the sound is scratchy, has drop-outs,<br />
or is very late, change the values for<br />
Sample Rate, Frames/ Period, and Peri-<br />
<strong>MIDI</strong> Tools<br />
<strong>MIDI</strong> channels are numbered 0 through<br />
15 or 1 through 16 depending on the<br />
convention the vendor follows. Assuming<br />
you have 16 instruments, or at least<br />
that many digital sound genera<strong>to</strong>rs and<br />
effects capable of receiving <strong>MIDI</strong> signals<br />
on different channels, you can send a<br />
sound stream <strong>to</strong> an instrument on any<br />
of these channels. Normally you can<br />
freely assign sound genera<strong>to</strong>rs <strong>to</strong> any<br />
<strong>MIDI</strong> channel. General <strong>MIDI</strong> [8] restricts<br />
this freedom for the sake of standardizing<br />
instruments. For example, the drum<br />
track is always <strong>MIDI</strong> channel 10.<br />
The open source software synthesizers<br />
ZynAddSubFX and Hydrogen are<br />
equally suitable for interpreting incoming<br />
<strong>MIDI</strong> signals. A third useful <strong>to</strong>ol is<br />
the software wavetable synthesizer Ti-<br />
Midity++ [9], which converts <strong>MIDI</strong> files<br />
<strong>to</strong> sound that is then output via Jack and<br />
ALSA; <strong>your</strong> distribution should include<br />
the instrument. Also, you might want <strong>to</strong><br />
download the Freepats package [10] <strong>to</strong><br />
get <strong>your</strong> wavetable synthesizer playing.<br />
<strong>MIDI</strong> with <strong>Linux</strong><br />
ods/ Buffers in the<br />
Jack setup pane;<br />
note that this<br />
could affect <strong>your</strong><br />
sound quality.<br />
Working with the Sequencer<br />
To make <strong>MIDI</strong> music, you need what is<br />
known as a sequencer. The sequencer<br />
records the melodies you play on <strong>your</strong><br />
<strong>keyboard</strong>, helps you edit them, and outputs<br />
the results via the attached instruments.<br />
The choice of sequencers on<br />
<strong>Linux</strong> is not particularly opulent, especially<br />
considering that the most popular<br />
open source sequencers – Rosegarden<br />
and Muse – cause considerable trouble<br />
without a low-latency kernel. On the<br />
other hand, this complication makes the<br />
choice easier – I went for the simple, all-<br />
Figure 6: Create the individual components of <strong>your</strong> song in the<br />
Seq24 Pattern Edi<strong>to</strong>r.<br />
round sequencer Seq24 for these tests.<br />
To set up the sequencer, use <strong>your</strong> distribution’s<br />
package manager.<br />
If the Jack front end is not running,<br />
then launch QJackCtl before you launch<br />
the Seq24 sequencer at the console by<br />
entering /usr/bin/seq24. At first, you<br />
only get an empty main window (Figure<br />
5) filled with rows and columns. Rightclicking<br />
a free field and selecting New <strong>to</strong><br />
open what is known as the Pattern Edi<strong>to</strong>r<br />
(Figure 6) lets you create sequences<br />
and loops.<br />
Creating and editing the individual<br />
sound bits of <strong>your</strong> composition is done<br />
Figure 7: Seq24 lets you play <strong>your</strong> pattern via a connected synthesizer – ZynAddSubFX in<br />
this case.<br />
54 ISSUE 88 MARCH 2008
Figure 8: An example of an arrangement with Seq24.<br />
in the Pattern Edi<strong>to</strong>r. Type a name for<br />
the pattern in the first field at the <strong>to</strong>p left<br />
– for example, Intro, Bridge, or Refrain.<br />
Then, use the two arrows <strong>to</strong> set the<br />
number of beats <strong>to</strong> the bar, or simply<br />
use the default, 4/ 4. The next field <strong>to</strong> the<br />
right lets you define the length of the<br />
pattern in bars.<br />
When you are done, click the slightly<br />
cryptic but<strong>to</strong>n with the three <strong>MIDI</strong> connec<strong>to</strong>rs<br />
and select an instrument <strong>to</strong> output<br />
the <strong>MIDI</strong> events. Using the <strong>MIDI</strong><br />
icon on the far right, select the <strong>MIDI</strong><br />
channel that you will be using <strong>to</strong> output<br />
the signals. In the next row, set the resolution<br />
for the pattern. The default, 1/ 16,<br />
tells the sequencer <strong>to</strong> drag any notes that<br />
are not located exactly on a sixteenth of<br />
a bar <strong>to</strong> the sixteenth au<strong>to</strong>matically <strong>to</strong><br />
assure precise values. Also, you can set<br />
the key and adjust the major and minor<br />
setting here.<br />
To tap in a sequence, choose one of<br />
two options. The first is <strong>to</strong> use the matrix<br />
in the Pattern Edi<strong>to</strong>r <strong>to</strong> add <strong>to</strong>nes.<br />
First, press the right mouse but<strong>to</strong>n <strong>to</strong><br />
change the cursor <strong>to</strong> a pen, and press the<br />
left mouse but<strong>to</strong>n <strong>to</strong> insert events in<strong>to</strong><br />
the matrix. Then you can hold down the<br />
left mouse but<strong>to</strong>n on any event <strong>to</strong> move<br />
it or select the event and press the Delete<br />
key <strong>to</strong> delete it.<br />
The more intuitive approach is <strong>to</strong> use<br />
the attached <strong>keyboard</strong> as <strong>your</strong> input device.<br />
To do so, close the Pattern Edi<strong>to</strong>r,<br />
click File | Options in the main window,<br />
and open the <strong>MIDI</strong> Input tab.<br />
Select a <strong>MIDI</strong> interface or instrument<br />
and change back <strong>to</strong> the Jack Sync tab.<br />
Enabling the Jack Transport and Jack<br />
Master settings tells the sequencer <strong>to</strong> use<br />
Jack <strong>to</strong> organize the data streams and<br />
Seq24 as the master program for Jack<br />
audio control. The Master Conditional<br />
but<strong>to</strong>n only passes control <strong>to</strong> the sequencer<br />
if there is no other master.<br />
The Live Mode and Song Mode options<br />
let you specify whether you will manipulate<br />
the pattern while you are inputting<br />
it or would like <strong>to</strong> play a complete arrangement<br />
that you have created with<br />
the Song Edi<strong>to</strong>r, without the ability <strong>to</strong><br />
change it. Pressing OK confirms <strong>your</strong><br />
selection.<br />
In the bot<strong>to</strong>m right-hand side of the<br />
Pattern Edi<strong>to</strong>r, you will find a small icon<br />
with the function Records incoming mididata.<br />
In the main Seq24 window, enable<br />
the but<strong>to</strong>n and click the green triangle.<br />
This somewhat roundabout approach<br />
lets you record <strong>MIDI</strong> events from the<br />
<strong>keyboard</strong>. To s<strong>to</strong>p recording, click the<br />
red square <strong>to</strong> the left.<br />
Playing Back Sequences<br />
Selecting ZynAddSubFX in the Pattern<br />
Edi<strong>to</strong>r’s Select Output Bus menu lets you<br />
hear what you have played. The synthesizer<br />
must be enabled with the sound<br />
program loaded for this <strong>to</strong> work (Figure<br />
7). Again, in the bot<strong>to</strong>m right-hand side<br />
of the Pattern Edi<strong>to</strong>r, click the left but<strong>to</strong>n<br />
with the function Sequence dumps data<br />
<strong>to</strong> midi-bus. This tells the sequencer <strong>to</strong><br />
send the recorded <strong>MIDI</strong> data <strong>to</strong> the attached<br />
sound genera<strong>to</strong>r so you can hear<br />
the sounds.<br />
If the application fails <strong>to</strong> produce<br />
sound output, check <strong>your</strong> Jack Control<br />
patch field: Is the synthesizer audio output<br />
connected <strong>to</strong> the ALSA <strong>system</strong>? If<br />
not, change the setting.<br />
Modify Signals<br />
Because <strong>MIDI</strong> signals are simple control<br />
signals and not audio events, you can<br />
<strong>MIDI</strong> with <strong>Linux</strong><br />
MARCH 2008<br />
easily modify the signals any time later –<br />
for example, <strong>to</strong> change the key.<br />
To modify signals, first click on one of<br />
the bars representing the key and duration<br />
of the note. Once the bar has turned<br />
orange, you can move it or press the<br />
Delete key <strong>to</strong> delete. This lets you create<br />
and modify the individual patterns in<br />
<strong>your</strong> song.<br />
Create a Song<br />
To put <strong>your</strong> patterns <strong>to</strong>gether and create<br />
a song, launch the Song Edi<strong>to</strong>r by clicking<br />
the pencil icon in the bot<strong>to</strong>m righthand<br />
side of the main Seq24 window. In<br />
the left column of the Song Edi<strong>to</strong>r, you<br />
will see an overview of existing patterns,<br />
and the timeline for <strong>your</strong> song is at the<br />
<strong>to</strong>p in bars (Figure 8).<br />
Holding the right mouse but<strong>to</strong>n down<br />
while also pressing the left mouse but<strong>to</strong>n<br />
places a pattern on the timeline and<br />
removes the pattern from the list.<br />
Holding down the left mouse but<strong>to</strong>n<br />
moves a pattern in the timeline. Clicking<br />
the third icon from the left in the icon<br />
bar outputs <strong>your</strong> composition as an infinite<br />
loop.<br />
Making music with <strong>your</strong> <strong>Linux</strong> PC<br />
really can be this simple – so have fun<br />
composing! ■<br />
INFO<br />
[1] Debian package for <strong>MIDI</strong>SPORT:<br />
http:// packages. debian. org/ unstable/<br />
sound/ midisport-firmwaremc/<br />
[2] Ubuntu package for <strong>MIDI</strong>SPORT:<br />
http:// packages. ubuntu. com/ feisty/<br />
misc/ midisport-firmware<br />
[3] RPM package for <strong>MIDI</strong>SPORT:<br />
http:// rpm. pbone. net/ index. php3/ stat/<br />
26/ dist/ 7/ size/ 71557/ name/<br />
ezusbmidi-2002_11_17-1. src. rpm<br />
[4] <strong>MIDI</strong>SPORT firmware:<br />
http:// usb-midi-fw. sourceforge. net/<br />
[5] Information on Jack:<br />
http:// www. jacklab. org/<br />
[6] Ubuntu Studio:<br />
http:// ubuntustudio. org<br />
[7] Jacklab Audio Distribution:<br />
http:// distrowatch. com/ table.<br />
php?distribution=jacklab<br />
[8] General <strong>MIDI</strong> (Wikipedia): http:// en.<br />
wikipedia. org/ wiki/ General_<strong>MIDI</strong><br />
[9] TiMidity++: http:// freshmeat. net/<br />
projects/ timidity/<br />
[10] Freepats packages:<br />
http:// freepats. opensrc. org<br />
KNOW-HOW<br />
ISSUE 88<br />
55