2012-2013 products & technique catalog - Danville Materials
2012-2013 products & technique catalog - Danville Materials
2012-2013 products & technique catalog - Danville Materials

You also want an ePaper? Increase the reach of your titles
YUMPU automatically turns print PDFs into web optimized ePapers that Google loves.
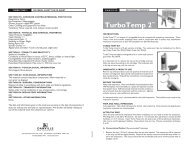
Provisional Composite<br />
Turbo Temp TM<br />
Technique<br />
Veneer Temporaries Made At Turbo Speed<br />
<strong>Danville</strong>’s TurboTemp is especially attractive for anterior veneer<br />
temporaries due to its esthetic Vita colors and slight opacity.<br />
Before the preps<br />
Before preparing the teeth for veneers, make a preliminary impression in a vinyl polysiloxane (VPS) such as <strong>Danville</strong>’s First<br />
Quarter Monophase. Monophase has the advantage of a very fast set time. The preferred impression tray is an anterior closed<br />
bite tray. Have the patient close into the impression before making the preps. (You may “recontour” the teeth with composite<br />
prior to taking this impression if you wish to build contour changes into your temporaries). Alginate impressions should be<br />
avoided since alginate will not match the accuracy of the VPS material, resulting in excessive finishing time. Should you need to<br />
replace the temporaries, alginate may not be usable.<br />
After the preps<br />
After you have prepared the teeth and a final impression is<br />
completed, you are ready to make the temporaries. You have<br />
a choice to make: bonded or non-bonded temps. If retention<br />
form exists, then non-bonded temps are usually preferred. When<br />
inadequate retention exists, the temps must be bonded for<br />
adequate retention. In the illustration (fig 1), the teeth lack<br />
adequate retention so bonding will be used.<br />
Bonded temps<br />
It’s generally good to etch a spot on each tooth about 3mm<br />
in diameter on the facial surface, away from the incisal edge<br />
(fig 2). After washing and drying, apply a fairly thick bonding<br />
agent such as <strong>Danville</strong>’s E-Bond to the etched area. Cure<br />
the spot of bonding agent (fig 3).<br />
Inject TurboTemp into the prep areas of the preliminary<br />
impression, being sure to avoid bubble trapping (a needle tip<br />
helps). Have the patient close into the tray. Wait 3 minutes<br />
and then have the patient open. The TurboTemp will<br />
remain on the teeth (fig 4). Remove the gingival flash,<br />
preferably with <strong>Danville</strong>’s Retract Instrument (fig 5). Light<br />
cure through the TurboTemp in order to attach the<br />
TurboTemp to the spot bond. Repair any bubbles with a<br />
flowable composite such as StarFlow. Polish the facial<br />
surface (fig 6). You are finished (fig 7).<br />
If the temps are bonded, after removal of the temps it will<br />
be necessary to remove the spot of bond; a disc usually<br />
works well. If they are not bonded, fracturing off the<br />
TurboTemp completes removal.<br />
Non-bonded temps<br />
Inject TurboTemp into the prep areas of the preliminary<br />
impression and place in the mouth. After 3 minutes, remove<br />
the impression. The TurboTemp will remain on the<br />
teeth. Do not remove the temps from the teeth but instead<br />
trim off the flash at the margins. A Retract instrument is a<br />
very handy way to cleave off the flash. (Move the Retract<br />
instrument up and down, parallel to the teeth.) To remove<br />
the temps, they will need to be slit with a rotary diamond<br />
and then wedged to fracture into two or more pieces.<br />
An option is to apply MicroPrime prior to forming the<br />
temporaries, as a desensitizer and antimicrobial.<br />
Figure 1 Figure 2<br />
Figure 3 Figure 4<br />
Figure 5 Figure 6<br />
Figure 7<br />
Call 800/827-7940 or visit danvillematerials.com<br />
35