2012-2013 products & technique catalog - Danville Materials
2012-2013 products & technique catalog - Danville Materials
2012-2013 products & technique catalog - Danville Materials

Create successful ePaper yourself
Turn your PDF publications into a flip-book with our unique Google optimized e-Paper software.
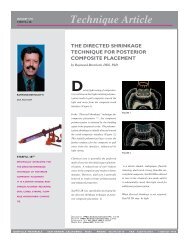
Flowable Composites / Core Build-Up<br />
8. Place a thin layer of flowable composite to the pulpal floor (if none has overlapped<br />
onto it). Light cure again. Now add more flowable to the level of the enamel<br />
but not onto the enamel to void “coupling” the dentin and enamel, max 2 mm thick<br />
per increment. Light cure each increment fully.<br />
9. Remove matrix. A MegaGrip forcep may come in handy here.<br />
Figure 7<br />
10. Remove rubber dam if used.<br />
11. Mark occlusion (Fig. 7) and adjust the marginal ridge to allow full CO (Centric<br />
Occlusion) closure. (Fig. 8) You now have a class I cavity to fill!<br />
12. Wash and dry prep. Optionally, place a layer of bonding agent to re-wet the prep<br />
and composite surface. Place light cure posterior composite (such as Heliomolar for<br />
best wear resistance, AP-X* for best strength, Estelite Sigma* for best esthetics and<br />
handling), slightly overfilling, taking care to insure all margins are covered. (Fig. 9)<br />
One increment will usually suffice to place the “enamel” layer.<br />
Figure 8<br />
13. Place a glycerine gel (<strong>Danville</strong>’s blue Liquid Lens is ideal) on the occlusal surface<br />
of the composite. (Fig. 10)<br />
Figure 9<br />
14. Have patient bite into CO. While in CO, it is sometimes possible to trans-enamel<br />
cure from the buccal. (Fig 11) The bite form will establish the occlusion, leaving only<br />
flash of composite to remove. (You may use a “trial bite” before light cure to expedite<br />
flash removal.)<br />
15. Have the patient open and light cure from occlusal. A “soft start” cure (150-<br />
200 on meter for at least 10 sec.) decreases stress in the composite. To decrease<br />
power density step back 1cm to reduce mwatts by 50%.<br />
Figure 10<br />
16. Finish and polish. I like Bisco’s Raptor* to add grooves, and Vivadent’s Astropol *<br />
to final polish. The restoration is now complete. (Fig. 12)<br />
Figure 11<br />
Figure 12<br />
Call 800/827-7940 or visit danvillematerials.com<br />
29