D242R STD Rear Kaw(99-06)ZRX1100-ZXR1200 ... - Galfer Brakes
D242R STD Rear Kaw(99-06)ZRX1100-ZXR1200 ... - Galfer Brakes
D242R STD Rear Kaw(99-06)ZRX1100-ZXR1200 ... - Galfer Brakes

Create successful ePaper yourself
Turn your PDF publications into a flip-book with our unique Google optimized e-Paper software.
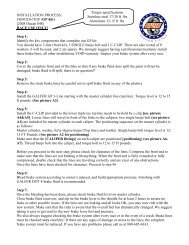
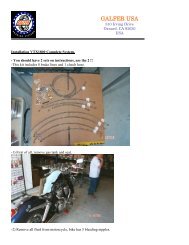
INSTALLATION PROCESS:<br />
FK003<strong>D242R</strong> <strong>Rear</strong> Brake Line Kit<br />
1<strong>99</strong>9-20<strong>06</strong> <strong>Kaw</strong>asaki <strong>ZRX1100</strong>-<strong>ZXR1200</strong><br />
Torque specifications<br />
Stainless steel 15-17 ft. lbs<br />
Aluminum 12-15 ft. lbs<br />
Step 1:<br />
Identify the key components that complete our brake line kit:<br />
You should have one (1) line, two (2) single banjo bolts, and one (1) c-clip. We have also included a total of six<br />
(6) washers; four (4) will be used, and two (2) will be spares. We strongly suggest having a professional<br />
mechanic install your brake lines, all other installs may void your warranty.<br />
Step 2:<br />
To ensure there is no paint damage from the brake fluid, completely cover the rear end of the bike. Installing<br />
brake lines can be a messy process, and brake fluid WILL spill!<br />
Step 3:<br />
After bleeding and drying out the OEM brake system, uninstall your rear stock hose. Take note of how the stock<br />
system was routed in case you need to re-install the hose.<br />
Step 4:<br />
Identify which end of the new <strong>Galfer</strong> brake line to install at the rear master cylinder. Before installing this end, it<br />
is very important that you have the <strong>Galfer</strong> banjo fitting positioned the same as the OEM hose (refer to<br />
pictures A and B.) Install the fitting to the master cylinder using a single banjo bolt and two (2) washers, the<br />
sequence will be as follows; master cylinder, washer, banjo fitting, washer, single banjo bolt.<br />
Step 5:<br />
Route the line behind the swing are and down to the rear caliper (refer to picture E.) Use the <strong>Galfer</strong> provided<br />
c-clip to replace the OEM line holder behind the swing arm. Install the line to the caliper using a single banjo bolt<br />
and two (2) washers, the sequence will be as follows; caliper, washer, banjo fitting, washer, single banjo bolt.<br />
(refer to pictures C and D.)<br />
Step 6:<br />
Before you begin the next step, please check the clearance of your new line. When the rear end is fully extended<br />
or compressed, make sure the lines do not bind with anything. Be sure to triple check that the lines are traveling<br />
correctly and are clear from any obstructions.<br />
Step 7:<br />
Bleed your brake system according to the owner’s manual. Add <strong>Galfer</strong> DOT-4 brake fluid to the system and build<br />
appropriate pressure.<br />
Step 8:<br />
Once you have bled the system, please check the brake fluid level in your master cylinder. Top off your brake<br />
fluid according to your manual and close the brake fluid reservoir. To ensure there are no leaks or other issues,<br />
use a jug or something similar to apply pressure to your brake pedal for at least 2 hours. If the lines are not<br />
leaking and all else looks good, (bolts are tight and torqued down to specification, washers are in place, and lines<br />
are clear from obstruction) you are now ready to ride with the new brake system.<br />
Please be aware that the overall braking feel has been changed dramatically. We suggest taking it easy while you<br />
get used to the new brake lever pressure and feel. We recommend checking your brake system periodically; be<br />
sure to check that your bolts are tight and VERY carefully check your lines for any leaks or damage. If there are<br />
any signs of damage or stress to the lines, the complete brake line kit will need to be replaced. Remember, our<br />
brake lines have a LIFETIME WARRANTY! If you have any problems or questions, do not hesitate to call our<br />
tech department - (800) 685-6633.
a. OEM at the rear master cylinder b. <strong>Galfer</strong> at the rear master cylinder<br />
c. OEM at the rear caliper d. <strong>Galfer</strong> at the rear caliper<br />
e. <strong>Rear</strong> overall<br />
<strong>Galfer</strong> c-clip<br />
GALFER USA<br />
310 IRVING DRIVE OXNARD, CA 93030 . PH (805) 988-2900 . FAX (800) 685-6633<br />
WWW.GALFERUSA.COM